If you use Numbers on your Mac for tracking, analyzing, and manipulating your data, it can be very handy to use the built-in controls. These include things like checkboxes, sliders, steppers, star ratings, and popup menus.
For various purposes, at least one of these controls might be exactly what you need. Here's how to add those kinds of controls to your spreadsheets in Numbers along with some examples of how they can be helpful.
Add Checkboxes in Numbers
We see checkboxes everywhere. From forms to surveys, this makes it easy for the person to complete the document without typing anything. Whether you're creating a spreadsheet for others to fill or want to use checkboxes to create lists for yourself, here's how to add them in Numbers.
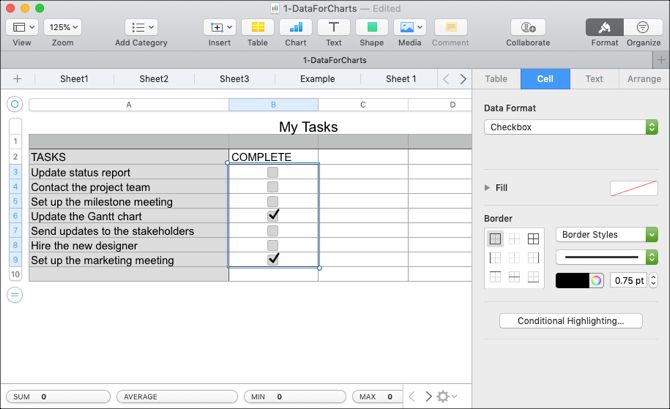
For this example, we're going to create a helpful checklist for our own use. We have our list of tasks on the left and are going to add checkboxes on the right. This way, we can mark our to-dos off the list quickly.
- Open your spreadsheet in Numbers and then select the cells where you want the checkboxes to appear. You can select a range easily by clicking the first cell and then dragging through the rest. Alternatively, select the first cell, hold down the Shift key, and select the last cell.
- Click the Format button on the top right to open the formatting sidebar.
- Choose the Cell
- In the Data Format dropdown box, pick Checkbox.
You'll then see empty boxes pop into your selected cells that are just waiting for checkmarks!
You can also add checkboxes in Pages on Mac.
Add Star Ratings in Numbers
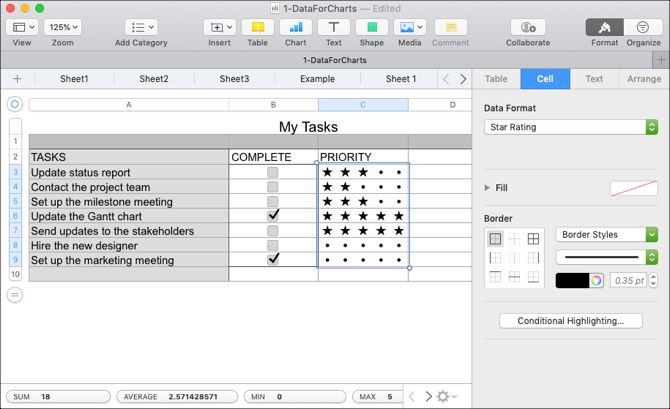
Another cool control you can use in Numbers is star ratings. You can use star ratings for creating customer surveys and client forms. You can also use them as a handy way to prioritize your own data, as in the checklist we just created. And that's the example we'll show here.
- Open your spreadsheet in Numbers and then select the cells where you want the star ratings to appear.
- Click the Format button on the top right to open the formatting sidebar.
- Choose the Cell
- In the Data Format dropdown box, pick Star Rating.
Now you will see five dots in each of your selected cells representing the number of stars you can have per item. Click a dot, from one to five, to apply that number of stars.
Add Sliders or Steppers in Numbers
Sliders and steppers in spreadsheets allow you to make incremental adjustments to specified cells and then quickly see how those changes affect your data. You can use sliders or steppers to adjust numbers, currencies, and percentages or use them to change values for charts and graphs you use.
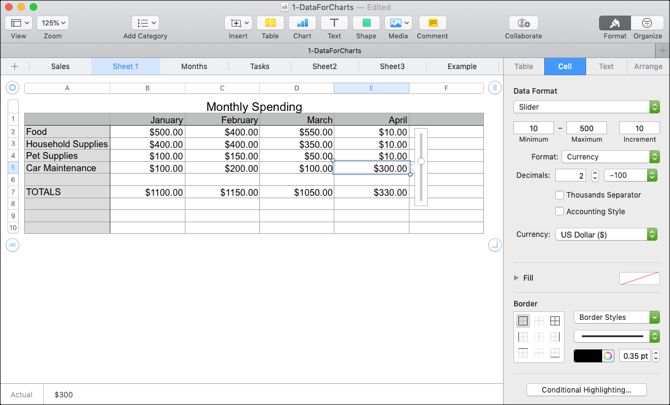
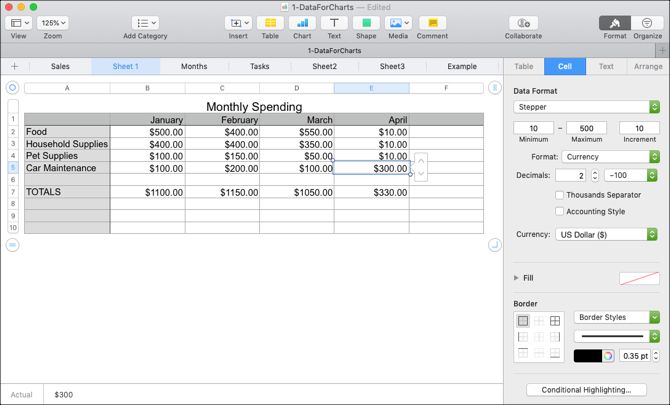
The difference between a slider and a stepper is that with a slider, you use a button to slide the scale you set up and down but with a stepper, you use arrows to move up and down in increments.
For this example, we have a household budget with our monthly spending. Our goal is to lower our expenses. By using sliders, we can increase or decrease the amounts for each expense to see how we can meet our goal.
- Open your spreadsheet in Numbers and then select the cells where you want the slider or stepper to appear.
- Click the Format button on the top right to open the formatting sidebar.
- Choose the Cell
- In the Data Format dropdown box, pick Slider or Stepper, per your preference.
Once you add the control, you can configure the amounts, increments, and format directly below the Data Format dropdown box.
- Minimum, maximum, and increments: Set the lowest and highest amounts for the control along with the increments to use for stopping points. Keep in mind that the minimum must be at least one.
- Format: Choose from number, currency, percentage, fraction, scientific, or numeric system for your data type.
- Decimals and negative numbers: If applicable to your Format, you can select the number of decimal points to use. And next to that, select how you want negative numbers to display.
Add Popup Menus in Numbers
Like checkboxes, popup menus can give you or the person completing the document a simple way to enter data. You can use these for lists of products, months of the year, color attributes, and many other types of data where you must select just one item from a list of specific options.
The nice thing about the popup menu feature in Numbers is that you can use cells that already contain data and have the menu populate automatically or you can insert a placeholder and enter the options later when you have them.
Add a Popup Menu With Existing Data
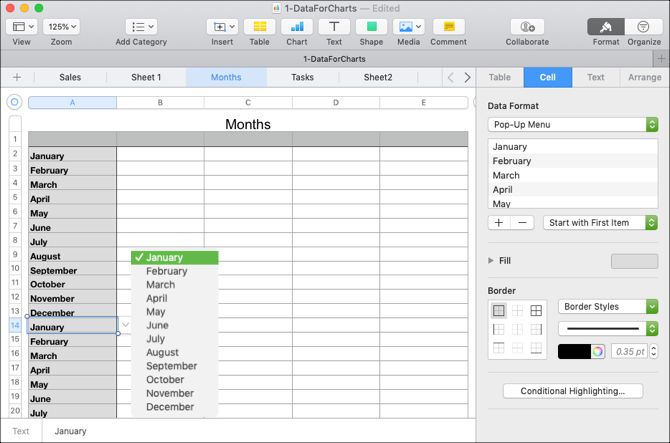
To add a popup menu with existing data, we're going to use the months of the year.
- Open your spreadsheet in Numbers and then select the cells with your existing data where you want the popup menu(s) to appear.
- Click the Format button on the top right to open the formatting sidebar.
- Choose the Cell
- In the Data Format dropdown box, pick Pop-Up Menu.
Once you do this, you'll see the items included in your popup menu in the sidebar below the Data Format dropdown.
To reorder an item, select one and drag it to its new location in the list. And to have the popup menu start with a blank cell or the first item on your list, pick an option from the dropdown menu directly below the item list.
Add a Popup Menu Without Data
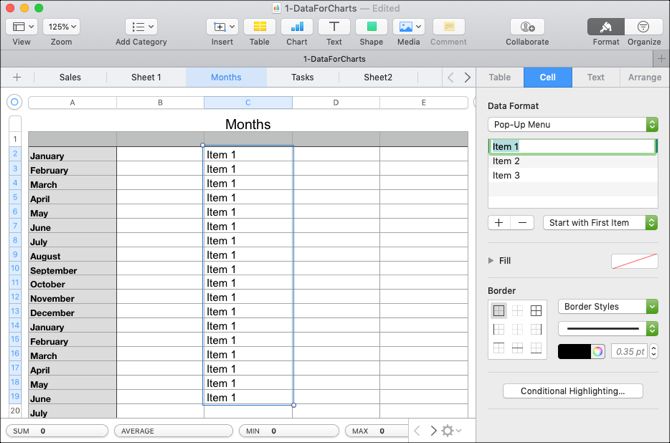
To add a popup menu placeholder so that you can add the menu items later, just follow the same steps as above. In the cells, you'll see "Item 1" appear and in the list in the sidebar, you'll see "Item 1," "Item 2," and "Item 3."
When you're ready to add your own menu items, double-click "Items 1, 2, and 3" in the sidebar and type your own items. To add more to the list, click the plus sign beneath the list and enter the next item.
And as mentioned above, you can start with a blank in the cell or with the first item on the list by making your selection in that dropdown menu to the right.
Choose the Right Control for Your Spreadsheet
Each of these controls can come in handy for the types of examples we used for this tutorial. They can make data entry easier, reduce errors, and create a visually pleasing document.
For additional help with Numbers on your Mac, take a look at how to use conditional formatting or how to create interactive charts.


