There are two things limiting smartphone photography: The actual camera you have on your device, and the app you're using to take photos. If your device just has a mediocre camera, there's not much an app would be able to do about it (although we have done an extensive test that shows camera apps do make a difference even when your camera isn't amazing). Then again, if you do have a very good camera on your device, the app you choose takes on a much bigger importance. Pick the right camera app, and you end up with what's effectively a complete point-and-shoot camera replacement in your pocket. Camera FV-5 is one camera app that strives to offer complete control over your device's camera, and mostly delivers. At $4, it's not cheap – but when you factor in the cost of your device with its fancy camera, it feels like a bargain.
What You Can Do
Before we start looking at all the buttons and features, let's get a feel for what can be created with Camera FV-5:
http://www.youtube.com/watch?v=ecOc6l_ygNc
We've previously covered time-lapse photography with a Raspberry Pi, and that post also shows you how you can stitch all of your images together into one movie. Camera FV-5 won't do the stitching for you, but it will allow you to take long exposure, exposure-bracketed shots for creating real (not software-simulated) HDR images. In case you're not sure what HDR is, the acronym stands for High Dynamic Range, and we have an entire HDR Photography Guide that can help you get into this exciting photography technique.
Note that exposure bracketing and time-lapse photography are just two things you can do with Camera FV-5. The app gives you control over every imaginable aspect of your smartphone camera. If you're a dSLR photographer, it'll make you feel right at home.
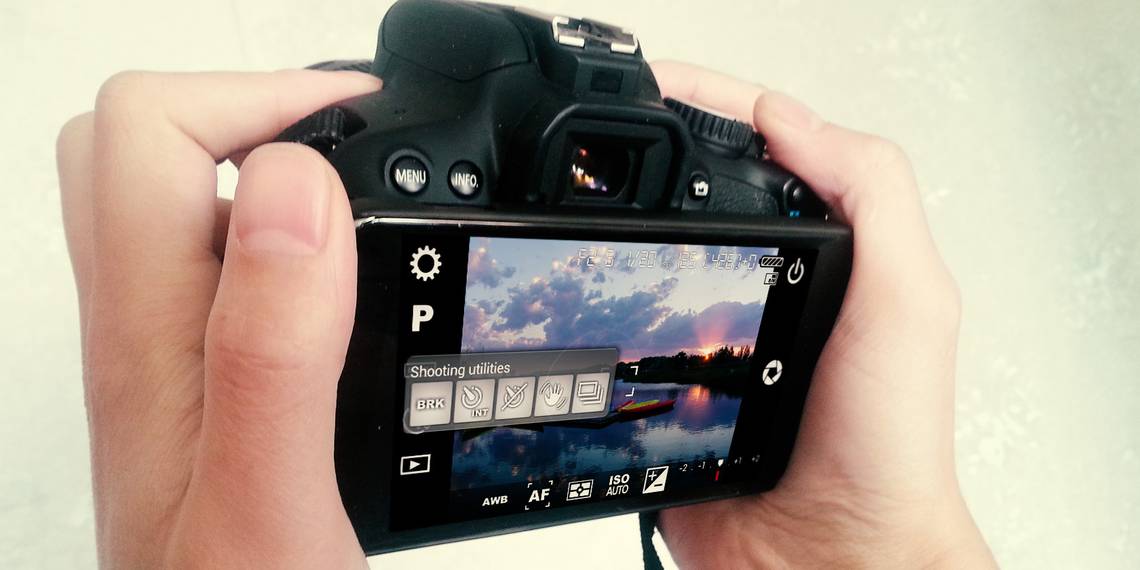
The Basics: Screen Overlay
If you're used to minimalistic camera apps with just a single shutter button, you're in for a shock:

No less than 16 (!) different interface elements in the screenshot above. I numbered them all so we could run through them quickly. If you're comfortable with a dSLR, many of these will be familiar. On the other hand, if this is your first foray into "more advanced" photography, let me quickly show you around:
- The shutter button (you can also use your phone's physical shutter button, if it has one).
- The focus area. Yellow means it's focused.
- Exposure compensation - we're in the middle here, so the photo will come out "just right" (you can slide the pointer to the right for a lighter photo, or left for a darker one).
- ISO control – this is one of the few camera apps I've seen that let you set your own ISO level (light sensitivity). Lower ISO means less grainy photos.
- Light metering mode – we'll get into that later.
- Focus mode – currently set to auto-focus, but you can also set it to macro, infinity, and a few other states.
- White balance – set to "auto white balance" but you can specify your lighting manually (incandescent, fluorescent, etc.) to affect color temperature in the resulting photo.
- Flash mode – also supports "red eye reduction," but really, you should just keep the flash off.
- Well, surprise, it's a menu! Lets you access bracketing, intervalometer, self timer, and burst mode.
- Lets you manually set long exposure times.
- Access to your device's gallery, to view photos you've taken. Camera FV-5 doesn't have its own gallery, and uses whatever you have (we recommend QuickPic).
- Current f-stop (aperture opening). Phones actually have a set aperture, so this will always be the same number on your phone. If you have an Android-powered camera (such as the previously-reviewed Galaxy Camera), you will see this number change.
- Exposure time. Longer exposures result in blurrier motion, but that's really oversimplifying it (sometimes you do want a longer exposure).
- Currently selected ISO level. 50 is as low as my device would go.
- Current battery level – needed, because Camera FV-5 runs in full-screen mode, like every other camera.
- Access to the Settings menu, one of the app's few annoyances.
Phew.
Exposure Compensation in Action
Here's a highway:

And here's that same highway again:

All conditions are the same, only I've pushed the EV slider to the +1 mark. Again, obvious for any dSLR shutterbug, but not something I've seen on many smartphone camera apps. You get to control how bright the resulting shot would be, and you can also see how that brightness is produced (in this case, ISO remains at 50, but the exposure time jumps from 1/800ths of a second to 1/200).
You can also tap the +/- button for an easier EV slider:

Exposure Bracketing
With exposure bracketing enabled, every time you tap the shutter button, several images are captured in rapid succession, each at a different exposure level. You can then use external software to create an HDR composite image.
Camera FV-5 lets you set how many images you want captured on each burst (up to 7 – more than my Canon T3i) and the exposure spread. Here you can see a 3-image burst set at 1 EV-level increments:

So we'll have a shot at –1, one that's set at 0, and another one at +1.
Light Metering
The last feature I'd like to show is another rarity on smartphone cameras, light metering control:

You can tell Camera FV-5 based on which image area it should set the exposure level: The entire image, the central part of the image, or just the narrow focus area. Used right, this means you can take a portrait shot in front of a very bright background, and your subject would come out visible! Not a minor accomplishment when it comes to smartphone photography.
Not So Great: The Menu
Almost no app is uniformly praise-worthy, and when it comes to Camera FV-5, the menu is the sole part that could do with a bit of love from the developer:

The worst thing about the menu is that it's stuck in landscape orientation, even when you invoke it when your device is in portrait mode. This makes it necessary to scroll quite a bit. The menu structure is otherwise sensible, and thanks to the wealth of on-screen controls, you won't find yourself delving into the menu too often. The only major feature lacking on-screen controls are the composition and crop guides – Camera FV-5 can overlay a grid on your image to help you better compose, and even show you what the image would look like when cropped to a different aspect ratio (say, 1:1, for Instagram). You can bind these features to a hardware button, so you can use your device's volume button to switch screen overlays, but it would have been better if there was an on-screen button for that.
An Impressive Camera
If you've ever longed for stronger manual controls for your smartphone photos, you should really try Camera FV-5. You don't have to spend $4 right away, because there is also a free, Lite version. Though really, if you pause to consider how much your phone cost, $4 isn't all that much money to spend to get better use out of its expensive camera.
Do you know of a better or slicker camera app that gives you the same amount of manual control and power? If so, please let me know below.