Some of the best Mac apps come pre-installed. With a little planning, you can use these apps in unusual ways for organizing your work and life.
Today, we'll show you how to combine the power of Reminders, Calendar, or Notes with the ingenuity of the Bullet Journal to plan your day.
What Goes Into a Bullet Journal?
Back when we discussed how to use Evernote as a bullet journal, we covered the basics of this analog note-taking system. So we'll skip the introduction today and go for a bare-bones recap of Bullet Journal elements instead.
Here are the four core modules that form the backbone of the Bullet Journal method:
- Daily Log: For daily entries
- Monthly Log: For a scannable view of the tasks and events lined up for the whole month
- Future Log: For "someday" events (i.e. to schedule for months beyond the current one)
- Index: To find and refer to specific entries (since digital tools come with a convenient search feature, let's skip this module)
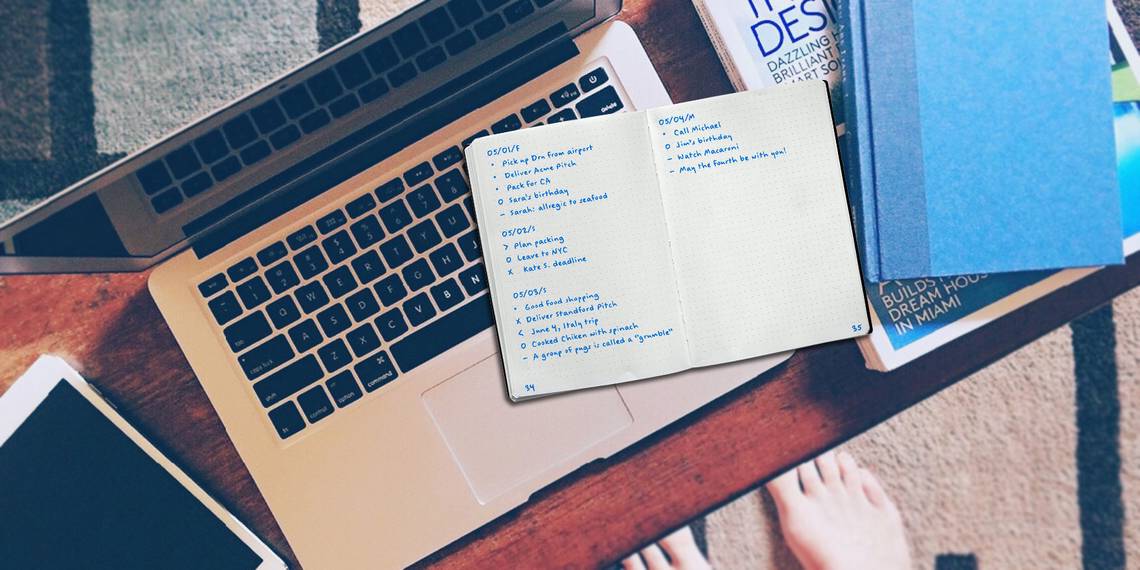
You can tell at a glance whether a bullet journal entry is a task, event, or a note. That's because it comes with a preset signifier. Here's the list of signifiers, or in Bullet Journal terms, bullets:
- • Task
- < Scheduled task
- X Completed task
- > Migrated task
- O Event
- - Notes
- * Priority
- ! Inspiration
- "Eye" icon Needs research or extra information
Most of the characters that represent bullets are already available on your keyboard. Type them in straightaway, no matter which app you're using for the bullet journal. Here's how you can bring in the two missing bullets:
- "Eye": Use the letter i as a replacement.
- •: Create a text-expansion shortcut under System Preferences > Keyboard > Text to insert the bullet.

Now it's time to recreate modules 1-3 in our chosen Mac apps one by one. Let's work through the modules backwards and wrap up with some extra tips for each app.
Using Apple Notes
Since the Notes app bears a close resemblance to a paper notebook, you should have no trouble using the former as a bullet journal.
Create a dedicated folder for your bullet journal. To keep things from getting out of hand, have one for each year, and after the year's up, prefix the folder name with the text _Archived. Add a single note for the Future Log and format each month as a Heading within it. Now fill in your tasks and events as usual.

For the Monthly Log, it's best to create a dedicated note for each month and split it into two sections: Calendar Page and Task Page. You can also have two notes for each month instead -- one for the Calendar Page and one for the Task Page. Use the table feature of Notes (Format > Table) to keep dates and the corresponding entries in separate columns for easier scanning.

As an alternative, you could combine the monthly logs for an entire year into a single note. Add a table for each month to list the Calendar Page and Task Page side by side. If you list them one below the other sans a table, you'll have to scroll up and down a lot.

Now, create Daily Log notes as you go. Maintain a separate one for each day of the month. Also, pin the Future Log and the current Monthly Log to the top of the notes list using the File > Pin Note option.
Tips for Using Apple Notes
Use numbers 1-30 (or 31) for naming Daily Log notes to make them easier to identify in the notes list. Throw in the initial of the corresponding day of the week if you want in typical Bullet Journal fashion. Also, set the Sort Notes by: option under Notes > Preferences to Title. The daily logs will then show up in the right sequence based on the date. Click on the light gray timestamp at the top of a note to toggle between its "created" and "edited" dates.

Add reminders to Bullet Journal entries via the File > Share > Reminders option. That is if you need a mental nudge before a task or event is due. You'll need to edit the reminder name and explanatory text. These fields show the note's name and contents by default.

Using Calendar
You have a readymade bullet journal in the Calendar app, albeit an unconventional one. Since you're already looking at a calendar, you don't need to set up anything. Dive right in and create events, and switch to the appropriate view as required.
The Month view acts as the Monthly Log and the Future Log. Create a new event named Tasks for the first day of each month and list all your monthly tasks in the Notes section of this event. Treat this as the Task Page of your Monthly Log.

Use the Day view or the Week view as your Daily Log. Resize the all-day section in both views to make room for your journal entries.

Adding the appropriate bullets will help you distinguish between various types of entries. But since all events in a calendar get highlighted with a single color, you'll have trouble matching journal entries with the right modules at a glance.

Fix that problem with this simple two-step workaround:
- Create a calendar group via File > New Calendar Group and name it Bullet Journal.
- Within this group, create separate calendars for Future Log, Monthly Log, and Daily Log. Pick different colors for each one via their right-click menu.
Now you'll be able to distinguish between module entries no matter which view you're in.

To view the contents of, say, only the Monthly Log module, uncheck the boxes for the Daily Log calendar and the Future Log calendar in the sidebar.

Tips for Using Calendar
To save time, duplicate events from the Monthly Log and drag and drop them to the Daily Log. The app auto-updates the events with the right color, so you'll be able to tell that they're Daily Log events.

If you're completely new to the Calendar app on your Mac, be sure to check out our additional tips.
Using Reminders
Reminders makes for a decent Bullet Journal tool, but it takes a bit of getting used to. Make the View > Sort by option your ally and you'll do fine. Start with one list each for Future Log and Monthly Log.
Adding to the Future Log list is straightforward. Be sure to add entries in chronological order, so you can sort them by creation date to see your Future Log in action. Of course, you can drag and drop errant entries into the right place anytime.

Create reminders for both tasks and events, but schedule only the latter. Since there's no way to split up entries into sections month wise, you'll need to add the name of the month in the Notes section for both reminder types.

For event reminders, set the priority to High. Low or Medium priority will also do. This tweak is only to add a bright visual cue and make quick work of distinguishing events from tasks. The usual symbols for these bullets appear somewhat inconspicuous in Reminders.

In the Monthly Log list, schedule tasks and events that would otherwise go on the Calendar Page of the Bullet Journal. Stick to the usual format for calendar dates (i.e. 1M, 2T, 3W, and so on). For entries that go on the Task page, create reminders without adding due dates.
Now click on View > Sort by > Title. With this arrangement, Calendar Page contents automatically go to the top of the list in the right sequence. The Task Page contents follow in alphabetical order.

The Daily Log is nothing more than a simple list with your tasks, events, and notes. Create a separate list for each day of the month to avoid confusion.
If Reminders doesn't cut it, try an Apple Reminders alternative instead.
Tips for Using Reminders
Keep a small calendar visible at the bottom of the sidebar by clicking on View > Show Calendar. You'll see tiny dots for each day that has one or more reminders scheduled. Click on one of these dots to see the corresponding reminders on the right. For each reminder, you'll see the name of the list it belongs to, which is convenient.

One Last Tip for Your Bullet Journal
Create shortcuts for the sort options you'll need often. You can do that from System Preferences > Keyboard > Shortcuts > App Shortcuts. Let's say you want to create a shortcut to sort entries by their due date. Here are the details you'll need to add in App Shortcuts:
- Application: Reminders
- Menu Title: Due Date (as listed under View > Sort by in Reminders)
- Keyboard Shortcut: Option + D (or any other shortcut of your choice)

Where's Your Bullet Journal?
Thanks to the versatility of the Bullet Journal, you can adapt it to any note-taking, list-making, or calendar app. Across any platform, too! We have shown you how to create a bullet journal in Trello, Evernote, and now in Reminders, Calendars, and Notes on macOS.
Feel free to use these articles as inspiration and add your own twist to this popular and effective note-taking method. Before you do that though, check out the official mobile app that goes with the analog Bullet Journal. It's called Bullet Journal Companion ($2.99). Remember, you also have regular journaling apps for your Mac.