File sharing isn't always online. If you have a flash drive, you can share a file with your friend in a way that's impossible for anyone – your ISP, the NSA, or your mom – to track. This is the idea behind the dead drop project, where people cement flash drives into walls to share files.
Of course, positioning your computer so that it connects to a flash drive that's stuck in a wall is...awkward. It also doesn't really work with phones.
So imagine this sort of offline file sharing, but over WiFi. That's the idea behind PirateBox. Think of it as a wireless dead drop, letting anyone within range upload and download files.
You can build your own PirateBox for under $65, and once it's set up any device with a web browser can connect to a browser-based interface to share files. They'll also find a chatroom, an imageboard and a a DLNA media server.
Why build a PirateBox? Because it's awesome, but if that's not a good enough reason, here's a few more potential uses:
- Offer a quick way for people to share files at an event.
- Set up a digital Geocache
Interested? I'm going to show you how to set this all up with a Raspberry Pi (though it's also possible to install PirateBox on some routers, and even an old Android phone).
You'll find a comprehensive Rapberry Pi tutorial on the PirateBox website, which I recommend you check out. My tutorial aims to be a little easier to follow, and to address a few problems I ran into while setting everything up. I'll also be around in the comments to answer questions. Let's get started!
Step 1: Collect The Parts For Your PirateBox

This project is quite affordable: the combined parts shouldn't cost you more than $65 new, and there's a good chance you've got at least some of these things lying around your house unused. Here's everything you'll need:
- Raspberry Pi ($25). Version A/B and B+ will all work fine.
- Compatible wireless card (around $15). There's a list of compatible devices on the PirateBox website; it's really worth making sure you get a device known to work, because there's not a whole lot you can do without a dedicated driver. I went with the TP-LINK TL-WN722N.
- SDHC SD Card, at least 4 GB (around $10).
- USB Flash Drive (optional, around $15), if you feel your SD card isn't big enough to serve as your primary file server. I went with a 16 GB drive.
- 5-volt power supply for your Pi (micro USB). I used an old cell phone charger, you can find something similar for around $6.
- Computer with a USB card reader (for flashing the operating system onto your SD card).
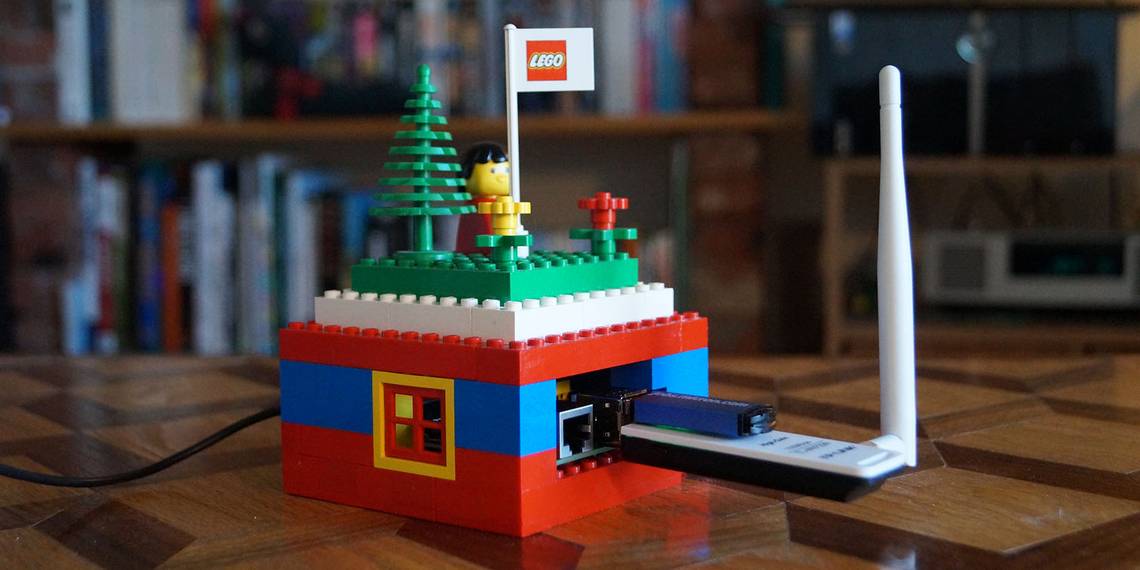
- Something to build a Pi case with (I used Lego bricks).
It's rather easy to build the entire unit for under $70, and there's a good chance you have a lot of these parts around the house already. Gather everything you need and we'll get the operating system ready.
Step 2: Get The OS Onto Your SD Card

Head to the Pi(rate)Box home page and download the the operating system – you'll find a link to a Torrent file at the top of the article. The operating system comes as a 2 GB IMG file. Remember: seed the torrent generously to help others get these files.
When the download is complete, you need to write the IMG to your SD card. If you're not sure how to do that, here are programs for your operating system of choice:
- Windows: Win32 Disk Imager
- Mac: ApplePi Baker
- Linux: USB-imagewriter (search your distro's package manager!)
Point your program to the image and your USB drive – make sure it's the right one. The operating system for your PirateBox is ready!
Step 3: Put All The Pieces Together

Now that your SD card is ready, it's time to put everything together. Plug in the SD card, the WiFi dongle and your USB drive as shown above. Then plug the Pi directly into your router using an ethernet cable – the unit will ultimately run completely offline, but you need to connect it to your network for the initial setup.
You might also want to get your case ready. As you can see above, I made my case using Lego bricks (I firmly believe Lego bricks can make your life better), but you can use whatever materials you want. Check out our list of unique DIY Raspberry Pi cases if you need ideas.
Note that, for this project, you don't need access to all the ports on your Pi. This gives you freedom while building your case – I took advantage of this by only exposing the ethernet, SD and USB slots (with an HDMI window, just in case).
Step 4: Configure Your PirateBox

Got everything put together, and plugged in? Good. Wait a minute or so, and then we'll connect to your PirateBox using the command line from another computer. Don't panic! It's easier than you think. Mac and Linux users need only open the Terminal, while Windows users should download an SSH program such as PuTTy. The official instructions directed me to this:
ssh root@alarmpi
I couldn't get this to work, and as such needed to use the device's IP in order to connect. You can find this by checking your router's settings, if need be. In any case, the root password for your PirateBox is "root". After you connect to it, you'll see a list of things you should do (as pictured). The first: change that password using this command:
passwd
Once you've done this, you should start the Piratebox service:
systemctl start piratebox
And then you should tell your PirateBox to start the service at boot:
systemctl enable piratebox
You can also enable the image board, if you'd like (you can do this later if you prefer). Use this command to open a config file:
nano /opt/piratebox/www/board/config.pl
Then change the admin username and password. Once you've done this, exit the text editor and run the following command:
wget http://127.0.0.1/board/kareha.pl
You'll also find instructions for setting up the UPnP Media Server – set this up if you like. Once everything is ready, unplug your PirateBox and disconnect the Ethernet cable. It's time to connect to your box for real, over WiFi.
Step 5: Start Up Your PirateBox, and Connect!

Plug the PirateBox's power supply back in (but don't plug in the ethernet!). On your computer, check the available WiFi networks: you should, within a minute, see a new wireless network called "PirateBox - Share Freely".
Connect to this, then open "piratebox.lan" (or any other URL) in your browser. You should see a website like the one pictured. From here users can chat, upload files or click through to use the forum.
If your PirateBox doesn't start up, don't panic: this is a known issue with certain wireless cards, and there's a fix for it on the forum.
Note that once you're connected to your PirateBox over WiFi you can connect to SSH again, to make changes.
Step 6: Getting USB Storage Working

By default your PirateBox doesn't use the USB drive to store files, meaning you're limited to whatever space is left on your SD card. I've no idea why this is, and why the documentation isn't more up-front about this, but that's the case.
If you'd like to use your USB drive, format it to FAT32 using another computer (in Windows, right-click the drive, then click "Format", picking "FAT32" from the drop-down). Then, connect to your PirateBox via SSH and follow these instructions. Those commands will tell your PirateBox to mount your USB at boot, then set up that drive to serve as the storage for uploaded files and your image board.
Step 8: A Few More Tweaks

If you don't like the default SSID, "PirateBox - Share Freely", you can change it. Use this command to edit the proper config file:
nano /opt/piratebox/conf/hostapd.conf
Then, change the line that starts with "ssid=" to include your preferred network name.
You might also notice that the timestamps aren't related to anything – files claim to have been updated in the 1960s. This is because your Pi, unlike most computers, doesn't have an on-board battery to keep the clock accurate. This forum post gives you a temporary fix for this, but note you'll need to do this every time you restart your PirateBox (there's no way to fix this, sorry).
One more thing: by default, the chat box resets every time the PirateBox does. If you'd like to change this, you can configure it.
nano /opt/piratebox/conf/piratebox.conf
To open the config file, then edit:
RESET_CHAT="yes"
...to say...
RESET_CHAT="no"
Thanks to Disk91.com for that tip.
There's a lot more customizing you can do, but we'll save that for future articles. Be sure to explore the PirateBox forum, though!
What Will You Use Your PirateBox For?
That's it! Now that you have a PirateBox set up, what do you plan to do with it? Let us know in the comments below – I'll also try to answer any questions that you have. In the meantime, if you want to learn more, I suggest heading over to the PirateBox forum. There you can talk to the team behind, and other fans of, PirateBox. You'll learn a lot.