
You can create mind maps with pen and paper, digital notebooks, or specialized apps on your PC. Microsoft Word is a good candidate for making quick mind maps, but let's give thought to another app today: Microsoft PowerPoint can be more adept at mind maps because it has a ready canvas and easy draw and drag tools.
How to Build a Mind Map in Microsoft PowerPoint
PowerPoint drawing tools are very capable. While you can make stunning visuals with them, a mind map can give anyone the birdseye view of the idea behind the presentation. We will start a new slide and use SmartArt to add the graphical elements.
- Start a new slide and add the title for your mind map.
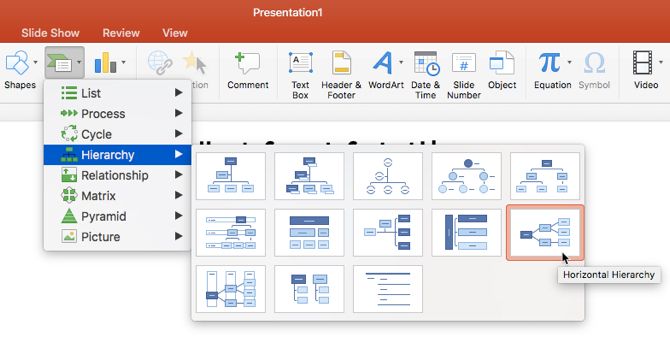
- Insert SmartArt. These graphics will form the layout of the mind map. There are many SmartArt layouts available, but the Horizontal Hierarchy is the closest to the appearance of a mind map.
-
Go to the Ribbon > Insert > SmartArt > Hierarchy > Horizontal Hierarchy.
- Click on the first (central) box and type your central topic. In this example, I have typed "Content Ideas".
-
The central topic will branch into main topics and sub-topics. Here the main topics are "Recreate Top Posts" and "Ask Your Readers".
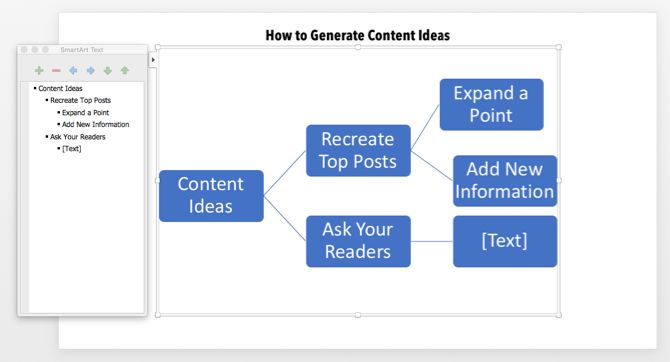
- The sub-topics fill in the parts of the main topic. For instance, the "Recreate Top Posts" main topics will branch out into sub-topics called "Expand a Point" and "Add New Information"
- You can also use the SmartArt Text box on the left to add the details and also promote or demote the SmartArt shapes.
- Add SmartArt Shapes with the help of the text box (or the SmartArt toolbar) and maintain their hierarchy. This way, you can expand your mind map with more topics and sub-topics.
- The SmartArt Design and Format toolbar can help you create aesthetically nice mind maps that wow your audience.


Any time you feel you have made a mistake, just hit Reset Graphic (on the SmartArt Design toolbar) to bring the mind map back to its original state.