With so many ways of using it, you shouldn't be surprised to find that the Raspberry Pi has sold over 1 million units. Although designed for one key purpose (programming) this small credit card-sized computer is capable of so much more – which is why it seems to have become a popular choice as a home media center solution.
Simply by adding the right software – in this case a dedicated XBMC build called Raspbmc – you can turn the little computer into a compact Raspberry Pi media center solution that is waiting for you to add your favourite video, music, and picture files.
However, you will need a little bit more than just the Raspberry Pi if you are going to make the most of Raspbmc. Several hardware components are required…
Using the Right Hardware For Your Situation
You should already have a Raspberry Pi; you will probably already have an SD card; the required Ethernet and HDMI cables, as well as the Micro USB power supply.
In addition, in order to build a Raspberry Pi media center, you will need:
- A SATA HDD with Sata to USB converter w/short SATA cable OR
- An external HDD with USB connector
- External 5v/12v power supply for the chosen HDD
If you’re planning on sending your audio through a surround sound unit then you will also require an audio cable.
Note that it is possible to combine the power supplies for the two devices. This will require the addition of a SATA to Molex power cable, an external 5v/12v power supply with male mini-DIN connector, a micro USB cable and a female mini-DIN connector. It might also require some means of mounting the connectors and will certainly require some electronics knowledge, as you'll be splitting the power supply between the DIN and the USB, thereby supplying power to the Raspberry Pi and the HDD. Different power cables are constructed differently, so if you choose to take this approach you will need to spend some time checking the different wires in your cable and ensuring that both the HDD and the Raspberry Pi receive the required current. It is probably best to stick to the dual power pack solution.
Setting Up Your Raspberry Pi Media Center with XBMC
With your hardware all sorted, you will need to install the Raspbmc software onto an SD card and insert it into your Raspberry Pi.

Full steps on how to do this can be found in How To Make Your Raspberry Pi Into a Home Theater System, along with basic steps on how to extend the media center.
This is vital, as it will enable you to enjoy media beyond your own collection. Thanks to these XBMC add-ons it is possible to:
- Watch the news online
- Add podcast feeds
- Enjoy YouTube videos
- Watch Hulu
- Enjoy free cable and sport (yes, you read that right)
What Else You Will Need
If you’re using the Raspbmc build, you will need to use a separate computer to download some of the add-ons as they are based in unofficial repositories.

As such, you will need a USB memory stick to copy them from PC to Pi. Once added to XBMC, the USB stick can be removed.
You might be wondering about the best way to control your new media center. The best way isn’t with the mouse and keyboard (after all, your HDD is taking up one of your USB ports, and a hub will just add another device into the mix) but with one of the many XBMC remote apps that are available for mobile phones and tablets. Just check the store of your preferred mobile platform to see what is on offer – these apps use a network connection and a dedicated API on the XBMC device that supports remote access.
Fixing It All Together
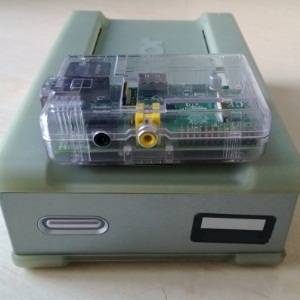
With your Raspberry Pi media center ready to go, you may find that it is easier to keep it all in one place rather than distributed across a few shelves.

My initial Raspberry Pi Media Center setup made great use of Velcro-type strips of fabric on the base of the mini-computer’s case and the back of my flat panel TV. However with the addition of the external hard disk drive, it makes sense to incorporate the Pi more closely with the HDD case.
Ultimately, this might involve mounting the Raspberry Pi within the HDD case (from what I can tell, it should just about fit…) but in the meantime finding some means of attaching the computer to the HDD case seems like the best idea. You might think along the same lines, relying on anything from temporarily adhesive material to some L-profile aluminum to keep the Raspberry Pi securely mounted.
Conclusion – Media Center for Pocket Money!
If you’re looking for a media center solution there really is little reason to overlook the Raspberry Pi. Depending upon the approach you take you could be building a media center for under $100, with the main portion of the outlay on the storage rather than the media center itself!
With free software and affordable equipment, this is an easy to start, easy to finish, and ultimately satisfying project – and really, you should have started by now!