Everyone who has an online presence should be concerned about privacy. Protecting your digital data is important. A greater vulnerability, however, is your webcam.
This bridge between the real world and virtual world is easily exploitable. It's also an important tool that you probably use all the time, so you want the easiest and most efficient way to control what has access to it.
There are lots of tried-and-true methods for blocking your webcam, but they have some drawbacks. Fortunately, new features available in macOS Mojave make it easier and safer to switch that webcam off and back on when you need it.
Old-School Methods (macOS Sierra and Older)
Before we check out the new options available to you in macOS, let's take a quick look at some older methods of blocking camera access. These options are best for people who are running macOS Sierra or lower, as they still have their drawbacks.
Tape Over the Camera
This is a classic. Use masking or painter's tape and cover the camera up when you're not using it. You can do this easily with readily available materials at home and it's easily removable when you actually want to use the camera.
For a more elegant method, you can even get a stylish webcam cover to easily flip between blocked and unblocked.
Unplug the Camera
This was an easy method when most webcams were external USB devices. On a Mac, however, the webcam is built-in, so unplugging it requires some hardware knowledge and the courage to void your warranty.
In later models, the cable might be soldered to the logic board, meaning you might not be able to disconnect it at all. Also, this method stops you from easily using your webcam when you do actually want it. It's only for people who want to permanently get rid of their camera.
Disable the Camera
If you're comfortable with using Terminal, you can use a script to disable the camera. Again, this can be a hassle when you want to re-enable the camera later, but at least you don't have to open your whole machine.
Don't Forget the Microphone
The big drawback to using any of these methods (aside from scraping tape gunk off your webcam for your next job interview) is that they won't block the microphone, so anyone spying on you remotely can still hear you. There are solutions to this, but none of them are ideal.
You can tape up your microphone to muffle it a bit, but it's not foolproof.
Alternatively, you can try a quick fix by going to System Preferences > Sound > Input . Turn the Input Volume of your microphone all the way down to prevent it from picking up sound. If someone gains root access to your machine, however, they can simply turn this back up again.
There are Terminal commands to disable your sound drivers, but they may also disable your audio output, which means the speakers won't work.
And similar to the camera, attempting to open your Mac and disable the microphone may work, but it will definitely void your warranty. Depending on the model, this may not even be possible.
New-School Methods (macOS Privacy Features)
Fortunately, Apple recently introduced a lot of new privacy features that make managing access to the camera quick, simple and customizable.
Safari Website Preferences
If you have macOS High Sierra or higher, you can use Safari to enable or disable the camera and microphone for certain websites.
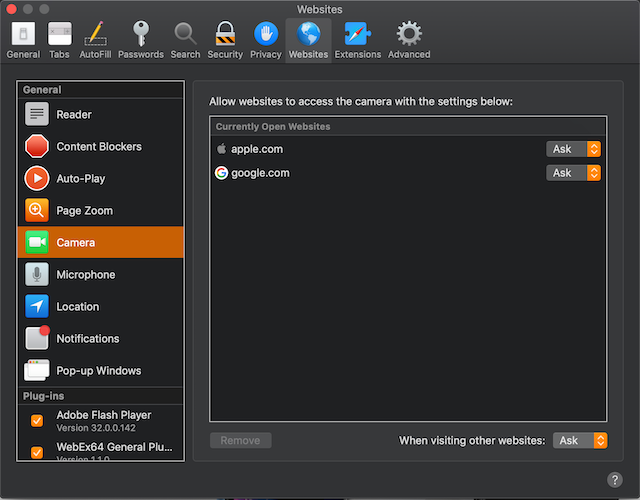
Go to Safari > Preferences > Websites > Camera to customize what sites have access. On the right, you'll see a list of your currently open websites. You can change the settings to Deny, Allow, or Ask for permission whenever sites want to use the camera.
At the bottom, you can also set your default policy for all new websites. Even better, you can use the same feature with the microphone. Just switch to the Microphone tab on the left to manage it.
Privacy Protection in macOS Mojave
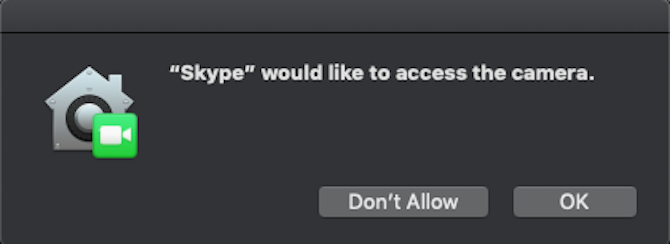
Introduced in macOS Mojave, Privacy Protection takes the above concept from in Safari and adds it to every app in your system. No matter what is installed, if it wants access to your camera or microphone, you have to give it permission.
If an app attempts to access your camera or microphone, you should see a prompt, which you can use to confirm or deny access.
You can manage what apps have access at any time. Go to the Privacy section of System Preferences > Security & Privacy and select Camera. The list of apps that want access to it are in the window on the right. Uncheck the box for any app that you don't want to have access.
Follow the same procedure to give or take away access to your Microphone. If your Mac isn't compatible with Mojave, you can try a free tool from Mac security developer Objective-See that alerts you to all webcam usage.
The T2 Chip
The latest line of MacBook and MacBook Pro models ship with Apple's T2 security chip, which provides the foundation for other macOS security features such as FileVault encryption and Touch ID. One additional security feature that T2 provides is that it will fully disconnect the microphone of a Mac notebook when its lid is closed.
The best part about this feature is that it's a hardware disconnect. This means that even if someone has root access to your machine, they have no way of enabling the microphone when its lid is closed.
Apple notes that it is redundant to do this for the camera, since when the lid is closed, its field of view is obstructed anyway.
macOS Mojave Does So Much More
Security is just the tip of the iceberg in Mojave. After you've taken these steps to ensure your digital safety, take some time to check out the other new features in the Mojave update. Protect yourself against eye strain with Dark Mode, use your iPhone as a portable scanner, clean up your desktop with Stacks, and more. And it's absolutely free to upgrade.


