GIFs are more widely used now than ever with how many appear on social media. You'll see everything from cute kittens to sassy celebrities, most of which put a big smile on your face.
In addition to GIFs used for amusement are those used for business purposes. They work well for demonstrating steps to a process, for example. You can even use them in articles to give you a helpful visual accompanying the written word.
If you want to try your hand at creating a GIF for business or pleasure, it doesn't have to cost you anything but a few minutes of your time. So here are six great GIF makers for Mac to check out.
1. Smart GIF Maker

The Smart GIF Maker app is a great way to make GIFs on your Mac. When you import your video, the app breaks it down into frames you can then work with, remove, or edit. You can also use images with the app and import them with the same type of editing options.
With each frame, you can change the drawing size, use an eraser tool, adjust the background color, and use the eyedropper for matching colors.
After you edit your frames, you can set the time delay for each and the number of loops on the main screen. When you finish creating your GIF, hit the Preview button at the top and then export it to your computer if you're happy with it.
Smart GIF Maker is easy to use, has a clean and straightforward interface, and is available for free with an in-app purchase to remove the watermarks.
Download: Smart GIF Maker (Free, in-app purchases available)
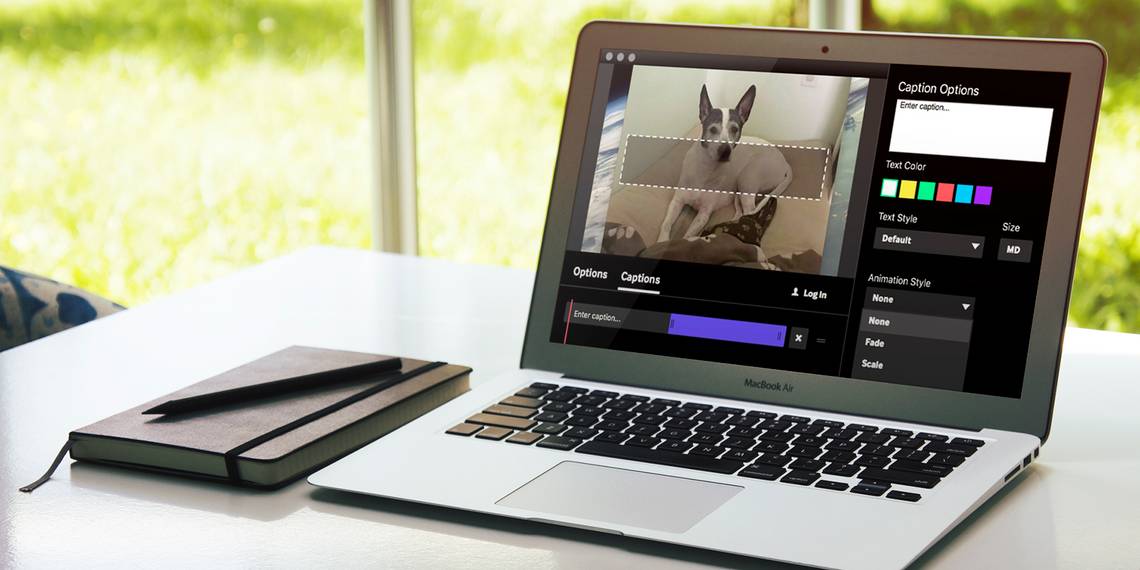
2. Giphy Capture

Giphy Capture is a bit different to the previous GIF maker. This one sticks with screen recordings for creating your GIFs. Click to start recording and then click again to stop it. Next, head to the editing area to perfect your creation.
You can adjust the size up to 640 pixels; set the loop type to normal, reverse, or ping-pong; and change the frame rate from standard to low, high, or HD. Then add a fun caption to your GIF; change the text color, style, or size; and pick an animation style like fade or scale.
If you have an account with Giphy, you can sign in and upload your GIF. Or just save it to your computer if you prefer. Giphy Capture is a neat tool with basic editing options that makes creating GIFs from your screen simple.
Download: Giphy Capture (Free)
3. LICEcap

Another screen recording and GIF creation tool you can download directly is LICEcap. This one works like Giphy Capture and is just as easy to use. Open it up and adjust the frames per second and dimensions of the recording window. Then hit the Record button.
Before the recording starts, a popup window will appear for you to name the file, add tags, change the title frame time, show the elapsed time, and display mouse button presses. You can also add a title, repeat counts, and have the recording automatically stop after a certain amount of time.
Click Save and your recording will begin. Hit Stop when you finish.
LICEcap is particularly good for making screen recordings for business purposes, as opposed to wild GIFs to share on social media.
Download: LICEcap (Free)
4. Gifski

With Gifski, you convert videos to GIFs. Drop a file into the Gifski window or click the Open button to browse for a video on your Mac. You can then easily select the portion of the video you want to turn into a GIF.
This Mac GIF maker enables you to choose the dimensions for your GIF, as well as the frame rate, the visual quality, and how many times it loops. You can have it loop forever, and you can also add to have it bounce (this is where it plays to the end, then plays backward, then forward again, and so on).
Once Gifski has finished, you can copy, share, or save your new GIF to your Mac. And best of all, Gifski is open source and completely free. There are no in-app purchases or watermarks to deal with.
Download: Gifski (Free)
5. GIFlash

Like Gifski, GIFlash is free, with no limitations or in-app purchases. This Mac GIF creator works with both video and photos. So you can turn a video into an animated GIF or do the same with a series of still images.
Interestingly, you can also mix photos and videos together. You can even move around or delete individual frames. And you can select the portion of the screen you want to capture when converting videos.
What you can't seem to do is define how much of a video—time-wise—you want to load into GIFlash before you start working on it. You have to load it all in and then trim it down afterward.
But you can change the frame rate, the dimensions, and the alignment. You also add a background color or invert colors in your animation. And you can set the loop count and intervals.
Download: GIFlash (Free)
6. Gifox

Gifox creates animated GIFs on your Mac in two ways. You can load up a video file and turn that into an animated GIF. Or you can capture part of your screen and do the same. With the screen capture option, Gifox lets you record either part of your screen or a particular app.
The free version limits your recording time to 10 seconds and puts a small watermark in the corner of your GIFs.
Gifox costs $14.99, which seems expensive. But if you need to regularly capture the content of an app, it might be worth the investment.
That's before you even get into the Gifox's settings. Not only can you change the dimension of your GIFs, but you can set the frame rate, the speed multiplier, the number of colors, dither, and more.
Gifox isn't the perfect GIF maker for Mac, but it's well worth checking out.
Download: Gifox (Free, premium version available)
Start Making GIFs on Mac With Ease
Each of these intuitive tools offers something a bit different from the others. Depending on whether you want to use existing images and videos or screen captures for your GIFs, these should have you covered.
Once you've created your GIFs, they're great for sharing via email, messaging apps, and social media. Before you upload any of your own personal pictures to any websites, though, make sure you know what their privacy policies are first.