If you're a big fan of Adobe Lightroom, you probably already know all the tips and tricks to editing awesome photos, but how can you speed up that workflow? How can you save yourself from hours of work when you have a large batch of photos to work on?
This article will show you how to batch edit in Lightroom. We'll also cover some simple-but-effective tricks you can employ to start racing through batch edits.
And if you're not sure on the differences between Lightroom and Photoshop, take a look at our comparison of Lightroom vs. Photoshop.
1. Organize Your Library
Once you've completed the Lightroom import process, you will usually have a bit of tidying up to do before the real editing begins.
You may have photos which are out of focus, badly exposed, or simply duplicates. One thing that will really speed up your editing process is by filtering out all of the bad or unusable shots immediately.
From the top-right of Lightroom, choose the Library module.
To view each photo individually, select the Loupe View on the bottom left, use the shortcut key E.
To the left of the Loupe view button is the Grid View (shortcut key G). The grid view shows all of your library at once, similar to a folder structure. This is useful, but you won't need it for this first pass.
In loupe view, all your photos are visible horizontally at the bottom of the screen, underneath your currently selected photo.
It's wise to build previews of all your photos. This greatly speeds up the editing process, and makes Lightroom much more responsive, but it does take a small amount of time to begin with.
Start by selecting all of your photos. Click the first photo, hold down Shift and click the last photo. You'll see that selected photos change from a dark gray to a light gray background.
Build previews by going to Library > Previews > Build 1:1 Previews. This may take some time, depending on your computer's power and number of photos, but the performance gain is worth the wait.
Once previews have been built, you can finally begin to batch edit in Lightroom!
2. Filtering Images
I like to make multiple passes over a batch of photos, filtering out bad, unusable, or duplicate photos. Although it seems counter-intuitive, doing this can actually save you time, as you won't need to edit any photos that you won't actually use.
To speed things up, enable Auto Advance from the Photo menu.
Auto Advance is a simple feature which will save you a lot of time. Put simply, whenever you rate a photo, Lightroom will automatically move on to the next image. This may sound insignificant, but it allows you to really race through a batch edit.
Start by filtering out all of your bad photos. You can use the arrow keys to navigate through your collection, but if you use the X key to mark photos as rejected, Auto Advance will do the rest for you. Go through your whole catalog and reject any photos that cannot be used at all.
Once done, switch to the Grid View by pressing the G key. Underneath the modules selection on the top right, choose the Filters button, and then Flagged.
You may immediately notice that all your photos now disappear. This is because by default Lightroom is filtering by photos marked as Picked. All of your rejected photos are marked as rejected, so use the attribute selector at the top to filter by rejected photos.
Now that only your rejected photos are visible, go ahead and select them all and then hit Delete.
Lightroom will ask you to confirm if you'd like to remove the photos from Lightroom, or delete them from the disk entirely. I personally like to delete them from disk, as I have multiple backups, and don't need to keep bad photos, but your choice may vary.
Now repeat the process as many times as you like. You may want to remove duplicates, or any stray photos which do not belong to this series.
3. Image Selection
Now that all your bad photos are removed, it's time to further refine and reduce. There's no point editing 1000 photos if you only need to deliver 100, so save yourself some time and only edit the photos you need to.
Lightroom provides several different methods for grouping photos. You can rate each image from one to five stars, you can apply a color label, or, as you've seen above, you can mark photos as rejected or flagged.
This stage is something of a personal preference, but I prefer to use colors to group photos into different batches (this may be outside and inside shots, or perhaps different cameras). Color labels are slightly slow to apply however, and can be done by right clicking > Set Color Label.
You can apply a color label to a selection of multiple photos, but there's no shortcut key. Color labels are best used for roughly sorting images into different batches, and then using the filters to work on one batch at a time.
By using the numbers one through five, you can rate each photo. I like to use four for any photo suitable for editing, and then five for any finished photos ready for export.
4. Batch Processing
Once you've refined your final image selection, you can finally begin batch editing. Use the filters at the top of the grid view to chose your selection. You may want to edit in color batches, or only edit four star photos. Whatever your choice, the use of colors, stars, and flags provide huge flexibility in choosing your selection.
We've covered image editing before, whether that's working with the Lightroom histogram, understanding split toning your photos, or recommending free Lightroom presets, so this section will focus on applying edits across a range of images.
Once your images are filtered, you can be confident that each batch contains similar images. Maybe they were all taken in the same room, with similar lighting.
Switch to the Develop from the top right. Start with the first photo. Make basic changes which can apply to all the images. This may be White Balance, Sharpening, Noise Reduction, and Lens Corrections, but you can change anything you like.
Once you've made your basic edits, you should apply this to all images in the series. Staying with the image you've chosen, right click and go to Develop Settings > Copy Settings.
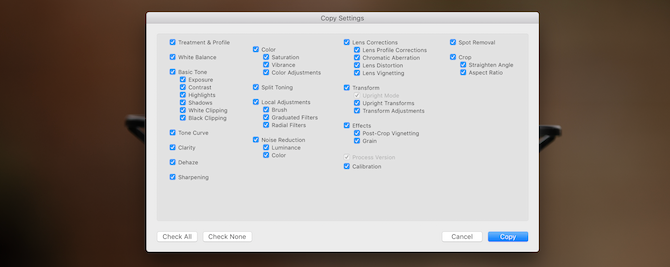
This will bring up the Copy Settings panel. Use the tick boxes or the Check All and Check None buttons to choose which settings to copy. If you haven't made specific individual image changes, you can usually copy all with no problems.
Once you've chosen the settings you'd like to copy, click the Copy button. Now select all the images you'd like to apply these settings to. You can hold the Shift key, and click the first and last images to select all those between.
Right-click on one of the destination images, and once again go to Develop Settings and then Paste Settings.
All of your selected images will now have the changes applied. Any further changes you make will not automatically move across however.
At this point, most of the hard work is done. You'll still need to go in and make adjustments to each image individually, but hopefully the repetitive tasks are all complete, saving you a lot of time and effort.
How Do You Batch Edit in Lightroom?
As you've seen, it really is that simple to batch edit in Lightroom. From simple filtering to copy and pasting settings, these tips can really save you a lot of time. A few minor changes here and there can quickly add up to hours over the course of a large edit.
If you've got the skills but your computer struggles to cope with Lightroom, you should make a note of these Lightroom performance tips.


