The Moog name has been synonymous with quality, analogue synthesizers since the late 1960s. These items have always been prohibitively expensive for many, so now you can get Animoog for iPad ($31.99) instead. I get it – $30 for an app seems eye-wateringly expensive these days, but when you consider the thousands of dollars asked by the company for their musical hardware, it starts to look a little more tempting.
Moog synthesizers have been used extensively over the years, from musicians like The Beatles to Stanley Kubrick film soundtracks. Using some convincing emulation and Moog's new Anisotropic Synth Engine (ASE), you too can recreate some analog warmth with your iPad.
A Lot of Synthesizer
Animoog might seem rather expensive, but for $30 there is a startling amount of depth to be found in Moog's ASE – so much so that it might put newcomers off. Moog foresaw this and were kind enough to provide a short (but detailed) .PDF manual to get beginners up to speed with the dazzling array of controls on offer (also viewable in-app, on the Setup tab). I'd suggest reading that if you're not sure where to begin.

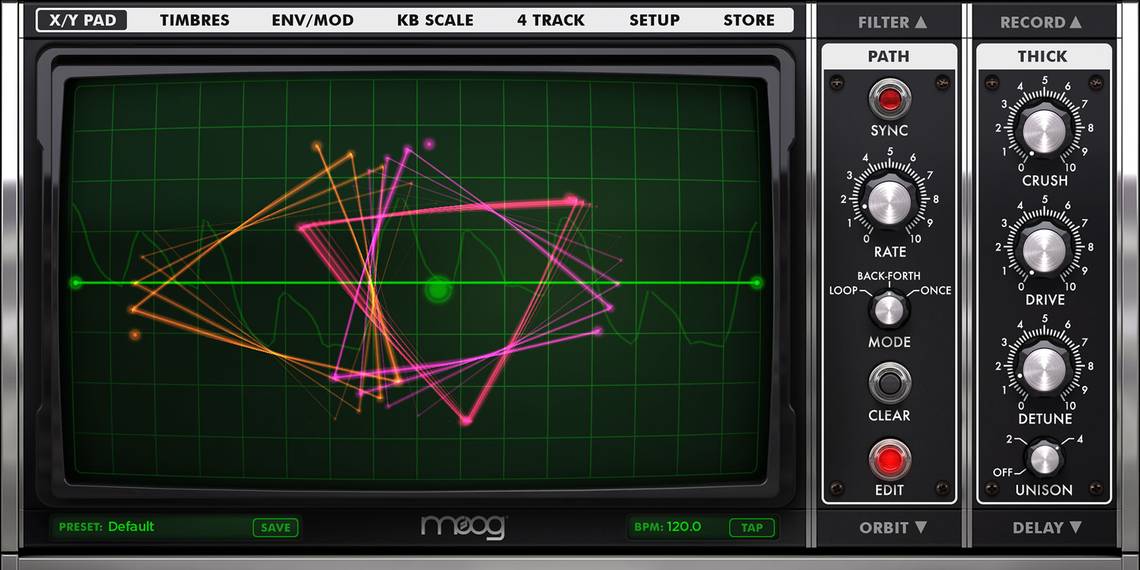
Like most synthesizer apps, the setup is rather familiar. You've got your notes at the bottom of the screen, often arranged in a scale (which is set on a per-preset basis), some knobs to twiddle on the right and a big mock-oscilloscope X/Y pad in the middle. There are tempo (BPM) controls and quick access to presets just above the notes, and a set of tabs at the top of the screen for navigating your way around the various settings.
The knobs on the right can be switched using the up and down arrows to access the orbit oscillator, filter controls, X/Y path and the all-important recording controls. If this all seems a bit overwhelming then don't panic – there are some excellent tutorials coming up. The best way to learn how to use Animoog is to start with a completely basic and boring sound, which generally involves turning everything down to zero then experimenting (more on this later).

The X/Y pad does an awful lot in Animoog. Not only is it used as a general control panel, allowing you to thumb-through the tabs at the top and change keyboard scale, access the four-track recorder and additional in-app purchases, but in it's default X/Y pad mode it is used to modify the sound by touch.
The vertical axis on the X/Y pad controls the timbre of the sound played, which is where Animoog really comes into its own as a massively dynamic instrument. On the Timbre tab you will see eight options for various waveforms, and these correspond to the eight horizontal lines on the pad. Move the centre-point up and down the screen to change timbre, completely altering the sound while doing so. The horizontal axis can be bound to the LFO rate or similar control to modify the "intensity" of the effect.

There's even path control which allows you to set a pre-defined path for your notes to follow by simply hitting Edit then drawing your own pattern. While Animoog seems like a complex beast (it is) with a dazzling array of controls and buttons, it will occasionally surprise you with its fairly intuitive way of doing things.
Sounds Like A Moog
The included timbres are all based on iconic Moog hardware, and while they're never going to sound as warm as the original Voyagers and Little Phattys, they do produce some delightful tones and enough variety in sound to keep you busy for hours. This is bolstered by a huge array of presets that allow you to jump in and have some fun without knowing anything about how the kit in your hands works or what it does.

From theremin-like 1950s inspired "SciFiRadio" to face-melting dubstep bass in the form of "WobblePlayground", the included presets are a blast to play with. Each preset saves the entire setup – including keyboard scale, tempo, paths and filters and the current chosen timbres too. This makes creating, modifying and quickly returning to custom patches a breeze.

Keyboard scales under the KB Scale tab make it easy to sound like you actually know what you're doing with very little effort, and each can be modified further by enabling and disabling additional notes and scaling the visible keys on-screen using the available controls. There's also a handy Hold button which holds your last played note and allows you to fine-tune (or destroy) the sound before returning to the keyboard.

The app description promises the ability to "create a constantly evolving and expressive soundscape" and I can't think of a better way to do this than with the included four-track recorder. This is technically an in-app purchase ($4.99) but I was invited to register with Moog (supplying an email, name and some more information) to get it for free – which I did. It's a fairly powerful recorder, allowing you to record, layer, copy and paste as well as resample multiple tracks into one.
It's not as useful as the included AudioBus compatibility though, which allows you to route Animoog audio straight into other apps like GarageBand and NanoStudio (to name but a few). There's also full support for AudioCopy, accessed via the main Record module under the Copy button. I've found myself using this to sample chords which I've then imported into Akai's iMPC for loop composition. An option for Background Audio under Setup means you can keep Animoog going while you switch to another app (just keep an eye on your battery usage).

There's also the CoreMIDI and hardware MIDI support you'd expect from a professional software synthesizer, though you'll need to buy the MIDI Expansion Pack for $4.99 in order to control your other instruments using the full power of Animoog.
Learning Animoog
Hopefully I haven't put you off by emphasising the depth on offer here, but if you do feel a little overwhelmed then Matt Celletti from YouTube channel DubSpot has strung together a few very useful videos for those feeling a little overwhelmed by the software. Keep in mind that these were created for the original Animoog software (it has since had a complete re-write), so minor differences are visible, while the logic remains in-tact.
http://www.youtube.com/watch?v=d-q90mXE-Uo
The first video (above) will show you how to create an initialisation patch, where all settings are "off" and the noise you produce is rather flat and boring. From here you can begin to sculpt your own soundscape by experimenting.
http://www.youtube.com/watch?v=H1neC1edTdA
The second video tackles advanced modulation and routing parameters, as well as envelope settings. Matt actually explains a lot as he demonstrates it, so you should get an understanding of what you're doing as well as learn a fair amount about creating your own new sounds.
http://www.youtube.com/watch?v=URIY7NIPXrY
The final tutorial video focuses on using Animoog to create music using a DAW – in this case, Ableton Live.
Animoog is a lot of fun, and provides quite a lot of bang for your buck even at its full price. If you want a synthesizer, and you have an iPad, and $5,000 still seems a little steep to you then you can do a lot worse than the Animoog for $31.99.
Download: Animoog for iPad ($31.99)
Have you bought Animoog or any similar synthesizers? Let us know in the comments.