A designer's work is never done. From designing on a tablet to drawing inspiration from the world around you, design is always on your mind. Few companies understand that better than Adobe.
Adobe's smartphone applications can accomplish some fantastically creative achievements, and Adobe Capture is no exception. Capture is a deceptively simple app that allows users to collect and use design elements they encounter in real life. How? Read on to find out...
Adobe Capture's User Interface
Capture's interface is dead simple to use. The three top options available are: Settings, Library, and Options.

Settings provides a list of basic options you can adjust regarding your Adobe account, and features other Adobe applications for users to download. You can also select between different Adobe Libraries you may have set up beforehand.
Options allows access to a selection of features. Most importantly, you can collaborate with other designers to add more assets to your library or create a library link so others can access your personal Adobe library.

To create a library link so others can view your created elements, tap the Options icon and select Share Library Link.
Adobe Capture's Feature List
Adobe Capture is more of a toolbox than an application. It has six fully featured applets that provide absolutely crucial design elements: Shapes, Type, Colors, Materials, Patterns, and Brushes.
Each category has a complete, clear guide to creating your elements. Choosing the Shape function, for example, allows users to create vector shapes of anything they find in real life.
Once you take a picture, or load a saved image into the application, you can then refine the image to create a shape or pattern. Once you're done, you can save the asset to your Adobe Creative library or simply export the file to a computer.
In-app options remain the same using any part of the app, so workflow is quick, concise, and efficient. These standards are what make most Adobe products great, so you can rest assured that the quality of your finished product will be as stellar as the app you're working with.
Shapes
Adobe Shapes allows users to create a vector image from either a snapshot from your phone or an image already saved onto your device.
Once you've loaded your image into the application, adjust the slider to affect the threshold (ratio of negative to positive space) of the image. The higher the threshold, the darker and more pronounced the image.


Above this initial window are two options: Invert and an Auto Clean toggle. Invert will exchange positive for negative space in your image, turning white areas black and visa versa. Keep in mind, the "black" parts of your image are the shape you are creating. Auto Clean attempts to automatically smooth out your shape.


The next window allows you to clear up the image using either a simple eraser or brush tool. Since you're creating a vector shape, color options aren't necessary.
There are also three top categories in this window: Refine, Crop, and Smooth. Crop will allow you to crop your image, while Smooth will automatically attempt to refine the edges of your shape.


Finally, you can choose to save your work in the Adobe Cloud for later reference. If you'd like to use your original image for another applet, you can do so by tapping your final image. Then, tap the Image tab and select the Reuse icon to the bottom right.


You can now use whatever raw asset you've captured in any other applet on Adobe Capture.
Type
Of all the options in this application, Type is my absolute favorite. It's hard to find a proper font for graphic design, especially one that came from a real world reference.
Type allows you to take a picture of a font in real life, or reference a font from an image. Once you've loaded your image or taken a picture of your chosen font, adjust the area indicator so it only covers the font in your image.


From your image, the app will search through Adobe's font kits in order to find a similar font. The application will then back up the font option so you can reference it later.


While the fonts aren't free, knowing the name of the font you want to use will allow you to seek out close alternatives using font repositories like Google fonts (which are free to download).
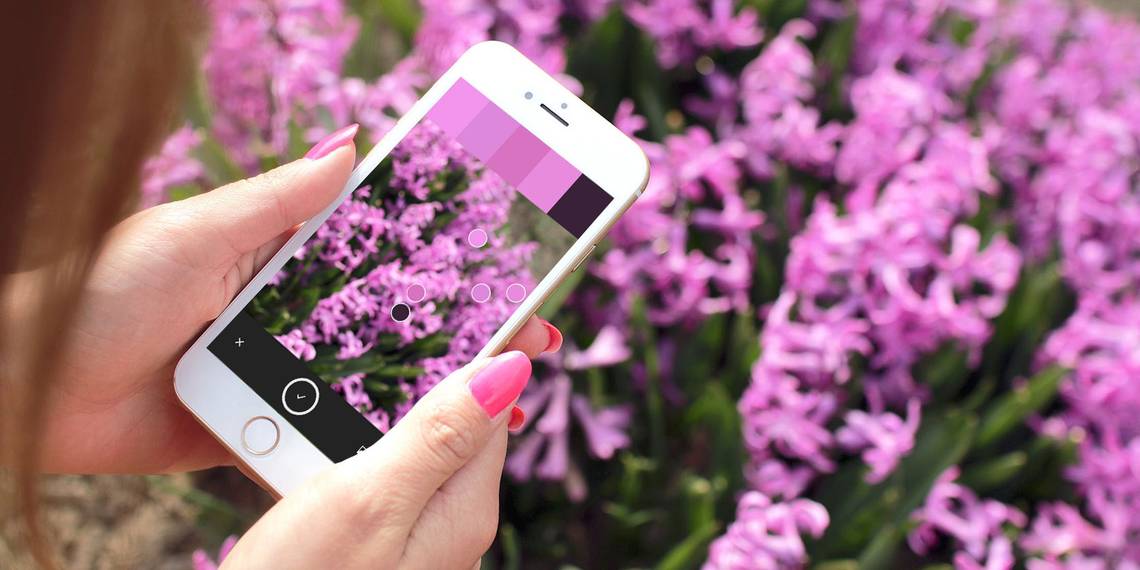
Colors
Next up is Colors. Colors will automatically create a color palette from a reference image. While it's only limited to five colors, you can choose what colors you wish to extract from the image.


Next, you'll be presented with three top options: Swatches, Harmonies, and Image.


Swatches allows users to adjust the colors they've picked from their image. The adjustments are standard RGB and Lightness sliders. Colors are adjusted individually, allowing you to maintain full control of your color options.
Harmonies, a useful feature in itself, allows users to view the compatibility of colors on the color wheel. On the bottom left of your screen is a paint palette logo. Tap the icon to view the available color categories. Adjust your colors if you wish, or leave them as they are.
Image, the final category, will allow you to revisit or readjust your initial color palette using your original reference image. Your color theme will then be saved directly into your Adobe color library for later use.
Materials
Next is Materials, which allows users to create textures they can then add to 3D shapes using Adobe Dimensions. Materials will create a spherical reference object so you can view your displayed material image.
Ensure that you choose an image with a repeating pattern or a literal texture, such as a wood panel or metal sheet. Your first window will have two principal options: Reference and Shape.
The reference option will toggle your 3D preview image on and off. The shape option will change the shape of your sphere so you can view your material texture using different shapes and light sources.


The next window allows you to adjust multiple material options. There are three top options you can use in this window: Refine, Crop, and Preview.


Refine allows for a slew of options, such as Roughness, Detail, and Intensity. Crop will allow you to crop your initial image to limit your materials reference, and Preview will again allow you to change your reference shape. After you're done with these options, you will be allowed to save your material.
Patterns
Patterns allows you to create a kaleidoscopic images---repeating image creating a continuing pattern---for later use in design work. To use, upload an image into the applet that possesses or resembles some kind of pattern. You will receive three top options: Color, Sample Size, and Pattern Shape.
The Color options allows you to choose between full color patterns, monochromatic, or black and white. The colors are based on your initial image.


Sample Size adjusts the sample colors you can use in your pattern. You can either use the full color spectrum of your image, or posterize the image so less colors appear in your pattern.


Finally, Pattern Shape allows you to change the reference shape of your pattern. You're presented with five options for shape, each creating a separate kaleidoscopic effect. The next window then allows you to fine tune your reference shape for the patterns using scaling and rotation.


A preview of your pattern is provided. Keep in mind, this process creates vector patterns. That means you can scale your pattern as large or small as necessary regardless of the size of your reference image.
Brushes
The Brushes applet allows you to create completely custom brushes from real life brush strokes or reference images.
Load your shape or stroke into the applet. Adjust the sharpness of your image in order to smoothen your brush shape. A base color sector is provided, which determines what color is removed in the adjustment process.


Aim for a definite image with a transparent background, which is absolutely crucial when attempting to extract a stoke from white paper for example.
Next, you're presented with four top options: Crop, Styles, Presets, and Refine.


The crop tools is separated into three parts, Tail, Body, and Head. Since you're creating a custom brush, these three options describe the orientation of your brush. Correct your stroke's scale and orientation. You'll see a preview space above your crop which allows you to draw a simple shape using your cropped stroke.


The Styles tab will take your custom stroke and implement it using default Adobe brush styles. These styles resemble brush, pencil, and charcoal brushes. Presets is the beefiest tab in the applet, allowing users to fine-tune their brush using options like Size, Color, and Repeating pattern.
You can even add basic textures, like Noise, Antialias, and Fade, to your brush to adjust exactly how your brush behaves as you stroke. Refine then allows you to adjust the strength of your stroke using the initial image, in case you made a mistake initially. Finally, you can save your brush to your library for later use.
Design IRL with Adobe Capture
We cannot believe this app is free. For designers, custom is king. Being able to create your own design assets and reach them directly from your Adobe account is both effective and convenient.
Like a texture? Take a picture on your phone. Like a brush stroke or a font in a magazine? Take a picture on your phone. It's that simple, and the application is still being refined. If you're a designer, illustrator, or all-round creative, you should download Adobe Capture ASAP. And if you're looking to learn the basics of graphic design we've got you covered.