<firstimage="https://www.makeuseof.com/wp-content/uploads/2010/08/phpcode.jpg">
Having your own blog sounds so simple, doesn't it? Install Wordpress on your hosting account, load up a cool theme, and then you're golden right? Well, not exactly.
Your Wordpress profile doesn't display a cool picture, so you've got to sign up for a Gravatar account. Your post doesn't display comments where you want them to on each post, so the next thing you know you find yourself trying to tweak the PHP code to get things just right.
I've been in the "need-to-customize" boat enough times to know that it's nice to have a carefully laid out set of instructions that will accomplish a specific task on your blog. In this case, I'm going to lay out how you can create a very convenient and dynamic biography footer at the end of every post, depending on which user wrote the blog entry.
This "tweak" will basically pull the bio information entered into the user profile screen in the admin panel, and it will publish the Gravatar photo associated with the email of that user using the bio info to change the footer credit on Wordpress.
Understanding The PHP Tags
You only have to edit one PHP file in your theme to accomplish this. That is the single.php file. This file handles the display of individual posts. You're going to insert dynamic PHP tags to create a footer in every post. The PHP functions that you're going to use are as follows.
- get_the_author_email() - This pulls the email address from the current user's profile page.
- the_author_description() - This pulls the description text from the profile page.
- the_author() - This will extract the user's name.
- the_user_posts() - This provides an accumulated total of posts the user has written.
All of this information is entered into the profile page by the users that you have writing on your blog.
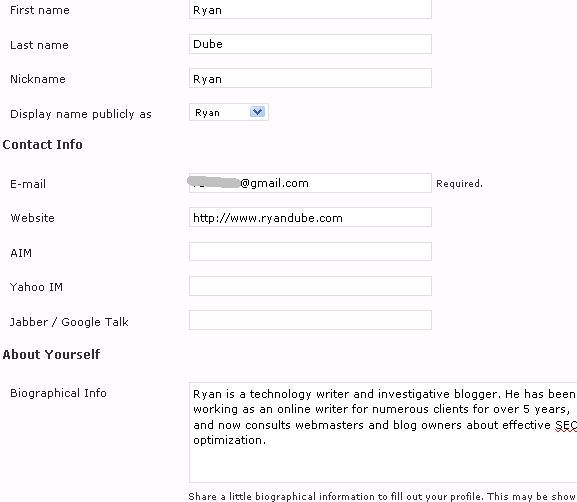
So long as your users use the same email in the "E-mail" field as they've used on their Gravatar account, their profile picture will load correctly into this WordPress blog. The author name comes from the "Nickname field", and the description comes from the "Biographical Info" field. So long as these fields are filled out, your footer bio in each post will work perfectly.
Writing The Code
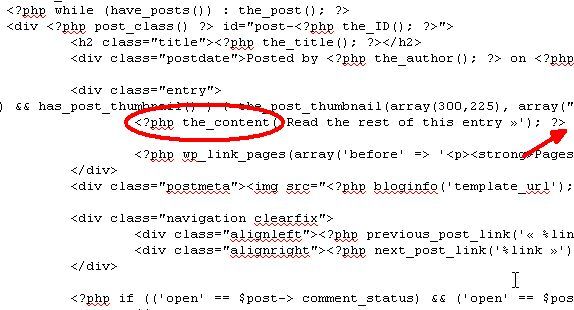
Even if you've never edited a line of PHP code in your life, you can do this. Go into your hosting account and browse the PHP files in your theme directory until you find single.php. It should be in WP-content/themes, and then the directory of your theme. Open up single.php, and search for "php the_content". It should look like the code below.
Go to the end of that line, and press enter so that you'll be entering the following code directly after that line. This will ensure that your footer information is always printed directly after the content of your post. It really is that simple.
Next, what you're going to do is create the bio footer one element at a time, starting with the avatar picture and ending with the number of posts. Just copy and paste the following code and you are all set.
<?php $author_email = get_the_author_email () ;
echo get_avatar ($author_email, '80') ; ?></span>
<br><p><i><?php the_author_description () ; ?>
<?php the_author() ; ?> has <?php the_author_posts () ; ?>
post(s) at NAME OF WEBSITE</i></p>
<div style="clear:both;"></div>
I like to have a line to divide the content from the bio, so I inserted "*****" with a line break. If you follow the code from top to bottom, you can see exactly how the bio footer is created. First, the email address is pulled from the user profile, then it's used to obtain the bio photo from the gravatar image. Next, the description is pulled from the profile and printed, followed by the number of posts.
You can also add any formatting (bold or italics) and any additional text that you like. Here's the footer after I've published a post.
The arrows point to the elements represented by variables - the photo, description, number of posts and the name. Using these variables, you can make the footer bio look however you like, and the information gets pulled from the appropriate profile and automatically filled in based on which user created the post.
It's fully automated and works on just about any WordPress blog running any theme. Go ahead and give it a shot (just remember to save your original single.php file in case of any errors) and let us know how it went! Do you know of any other ways to list bio information in the post footer? If so, let us know in the comments below.


