As a Linux newbie, it's normal to struggle. Everything just feels so different from Windows and you find yourself scratching your head at the simplest of tasks. And while the command line makes Linux life much easier, it can be intimidating for a beginner.
Fortunately, all it takes is a few simple tricks to get you comfortable within the terminal. Give it a few days and you may actually end up preferring the command line! Granted, there is a learning curve, but it's not as hard as you think. I promise.
If you've never used the command line before, I'd recommend that you first get acquainted with terminal before continuing. But if you're feeling confident, feel free to keep reading anyway.
Finding the Right Command
A fresh terminal is an endless sea of possibilities. You can do so much with it, which is exactly why it's so terrifying. With so many commands available at the tips of your fingers, how on Earth are you supposed to know which ones to use in a given situation?
The good news: you don't have to memorize anything. Using the
apropos
command, you can quickly figure out which commands lead to the actions you want to perform.
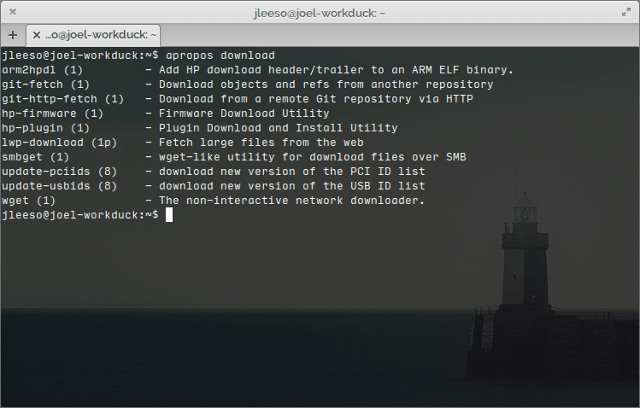
apropos "description"
By typing the above, you'll get a list of all commands that match the "description" string with said command's help string. So if I were to type:
apropos "list directory"
This results in all of the commands that have "list directory" included in the help string. For my system, that means the
dir
,
ls
,
ntfsls
, and
vdir
commands.
Execute a Previous Command
Anyone who uses Linux for an extended period of time will eventually resort to the command line for troubleshooting. When that day comes for you, you may find yourself typing and retyping a lot of the same commands.
One way to get around this is to hit the Up key, which will cycle through past commands you've typed. This is what most newbies end up doing, but there's a better way.
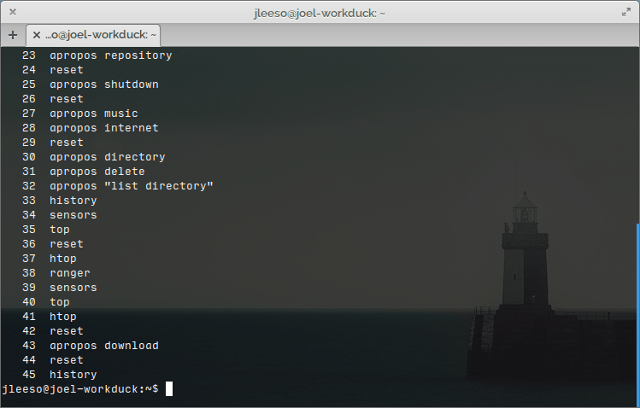
The
history
command will list all of the commands you entered since the terminal launched along with an identifying number next to each command. You can repeat any of the listed commands by typing:
!#
where # is the number listed to the command you want to repeat. It's much more convenient than mashing the Up key a million times to find that one command that needs repeating.
Similarly, you can type
!!
to repeat the last entered command.
Run Commands At a Specific Time
Let's say you want to run a command but not at this exact moment. For whatever reason, let's say there's a particular command (or set of commands) that need to be executed at a given time in the future. Linux allows it.
at 8:30 AM 03/21/15
With the
at
command, you can specify a date and time. Doing so will open up an input prompt where you can enter a sequence of commands to be run at the date and time you gave. When you're done, type Ctrl + D to quit the input prompt.
The parameter for date and time is extremely flexible. To get a better idea of the right format, check out this overview of the at command.
Easy Task Management
Windows has a lot of task manager programs that provide graphical ways to manage open applications and running processes. Linux doesn't have something like that, but you can achieve something similar with the
htop
command.
Most Linux distros don't come with
htop
installed. If you're on Ubuntu or an Ubuntu-derived distro, the following should work:
sudo apt-get install htop
Once
htop
is installed, you can run it by typing
htop
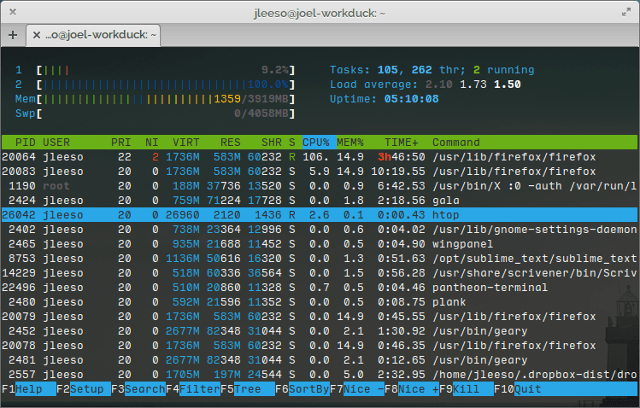
on the command line. When you do, you'll get a full overview of all the processes running on your system along with details like process IDs, CPU and RAM usage, and how long they've been running.
What I love about
htop
, as opposed to the default top command, is the ease of use. Tap the cursor keys left and right to scroll through the details (if they don't all fit in terminal's width) and up and down to scroll through the other listed processes.
Other features, like sorting, make it easier to find what you need, and the color-coded text makes it all easier to read at a glance.
Easy Filesystem Navigation
Another useful command is
ranger
, which doesn't come as a default application on most Linux distros, but it's simple to install. Again, if you're on Ubuntu or an Ubuntu-derived distro, you should be able to get it with:
sudo apt-get install ranger
What does
ranger
do? Once installed, type
ranger
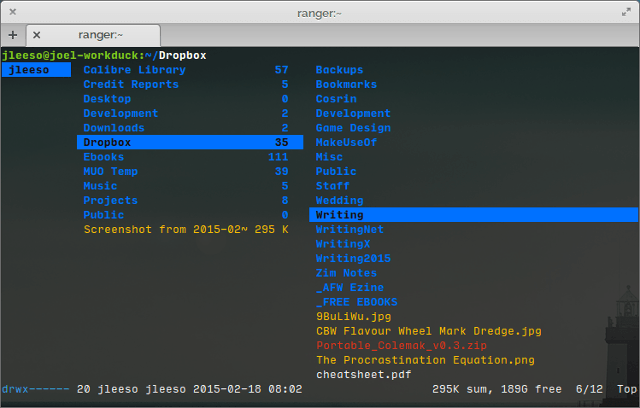
in the command line and your terminal will transform into an interface that makes it easy to navigate your entire filesystem using just a keyboard (though you can use your mouse too, if you want).
Each column represents a directory. Use the left key to go up one directory, the right key to enter the selected directory, and the up and down keys to browse the current directory. It's surprising just how much faster it is to browse a filesystem this way as opposed to clicking on folders in Nautilus.
Keep Software Up-to-date With PPAs
On Ubuntu, the software on your system is managed by something called a package manager. The package manager maintains a list of repositories, which are source locations for package downloads. Every Linux distro comes with a core set of repositories.
But what if you want to install an application that doesn't exist in the core repositories? You have to find a repository that does have it, then manually add that repository to your package manager. That's where personal package archives (PPAs) come in handy.
sudo add-apt-repository <PPA repository>
This can be a confusing notion for Linux newbies, so don't fret if you don't understand it right away. Reading this What Are PPAs? post on AskUbuntu should get you started on the right foot. Once you understand PPAs, you'll never struggle with new software installations ever again.
Keyboard Shortcuts for Efficiency
Lastly, here are a few keyboard shortcuts that can drastically speed up your command line usage once they become second nature.
- Alt+Backspace: Deletes the previous word.
- Alt+F: Skips ahead to the next space.
- Alt+B: Skips back to the previous space.
- Ctrl+U: Cuts all text up to the cursor.
- Ctrl+K: Cuts all text after the cursor until end of line.
- Ctrl+A: Moves the cursor to the start of line.
- Ctrl+E: Moves the cursor to the end of line.
Individually, these commands may seem like bit of a gimmick, and I wouldn't blame you for thinking so. However, once you start combining them together, it can really speed things up when you need to retype commands.
Are You More Comfortable Now?
The command line doesn't have to be scary; it just takes a bit of time to get comfortable with the most essential commands. Once you're comfortable, you'll wonder how you ever survived without the efficiency of a command line.
Whatever you do, be sure to avoid these lethal Linux commands.
Do you have any tips or tricks for using the Linux command line? Share them with us in the comments below!


