
Tired of performing repetitive tasks in Microsoft Word? Buried within the program is a powerful automation tool that can take those jobs off your hands. We’re speaking of macros, and though the feature relies on Microsoft’s Visual Basic for Applications (VBA), you can use it even if the idea of coding gives you the heebie-jeebies.
With a click on a button, Word will record your actions, generating a macro that you can replay as often as you’d like. If you’re adventurous, you can easily modify the macro for an extra degree of automation.
Here we’ll show you one simple but useful example: How to automate Word’s Find and Replace function.
Recording the Macro
In this example, you’re the esteemed president of the Society for the Preservation of Antique Dental Appliances. You have dozens of Word documents about historic dentures and the like, all with society’s name prominently mentioned. Then suddenly, the board votes to change the name to the Dental Antiques Preservation League. Now you need an easy way to update the docs.
You can begin with a new blank document or open an existing one. If you haven’t done so already, you’ll have to enable the Developer tab.
Go to File > Options > Customize Ribbon. On the right, under Main Tabs, check the Developer option. Select OK and exit.

Now let’s create our macro.
- Click Developer > Record Macro.
-
You’ll be prompted to name the macro. Enter “ChangeSocietyName” or any other name that suits you. When naming macros, avoid spaces, periods, exclamation marks, and special characters, or else you’ll get an error message. You can use numbers, but the first character must be a letter.
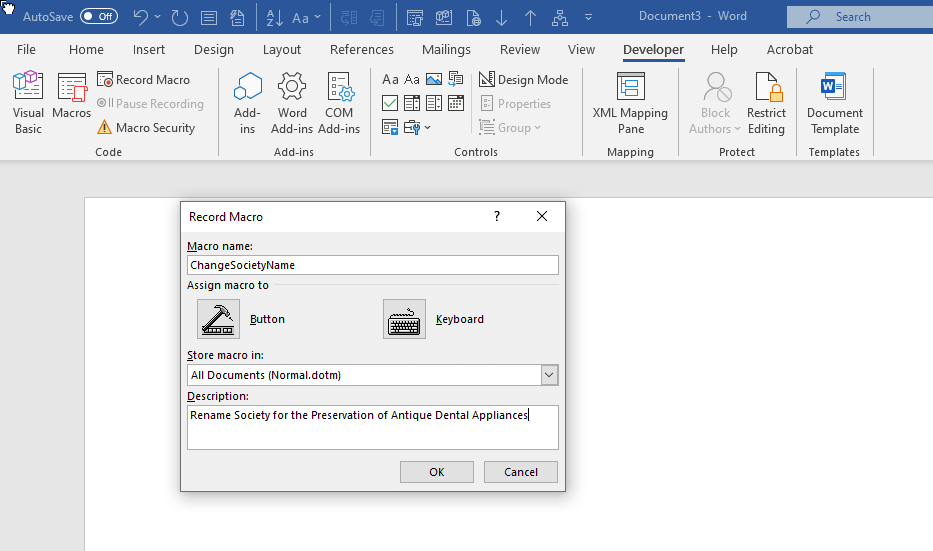
- You can assign the macro to a button and/or keyboard shortcut, but this is not a requirement. If you choose Button, Word will let you add it to the Quick Access Toolbar. You can also add a brief description of the macro.
- Click OK, and Word will now record your actions. Hit Ctrl + H to bring up the Find and Replace dialog.
-
Enter “Society for the Preservation of Antique Dental Appliances” in Find and “Dental Antique Preservation League” in Replace.
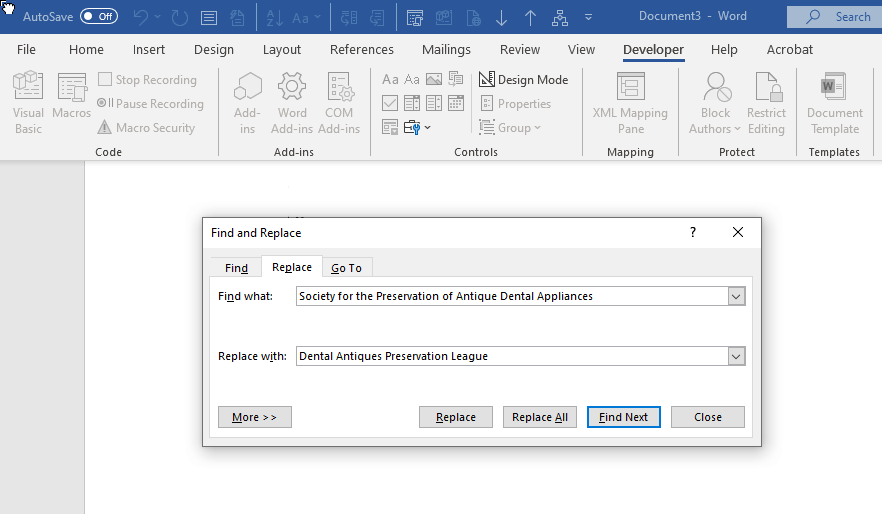
- Click Replace All to execute the Find and Replace operation. This is the sole action you want to record. It doesn’t matter if the macro actually replaces any text. The point is to save it for other documents.
- This is important: Click Developer > Stop Recording. Otherwise, the macro will include all subsequent actions.


Now let’s see your handiwork. Open a document containing the society’s name. Click Developer > Macros. If you double-click on ChangeSocietyName, Word will automatically perform the Find and Replace operation.

Tip: As you record the macro, you may need to perform an action that you don’t want to be recorded. For example, you may want to copy and paste text into the Find and Replace dialog rather than typing it manually. No problem: Just click Developer > Pause Recording, copy and paste the text, then click Developer > Resume Recorder. Then you can complete the macro recording as described above.
Though we focused here on Microsoft Word, you can also use macros to boost productivity in Excel. And there are lots of time-saving macros for Microsoft OneNote.
Diving Into the Code
Now we’ll take a deeper dive into our new Word macro. Go to Developer > Macros, but instead of double-clicking on the macro, select it and click Edit. This opens the Visual Basic editor, a self-contained environment for building VBA applications.

It may look daunting, but you can ignore the menus and most of the panels. Focus instead on the window containing the code. As you can see, Word has just written a macro that performs the Find and Replace.
Sub ChangeSocietyName()
'
' ChangeSocietyName Macro
' Rename Society for the Preservation of Antique Dental Appliances
'
    Selection.Find.ClearFormatting
    Selection.Find.Replacement.ClearFormatting
    With Selection.Find
        .Text = "Society for the Preservation of Antique Dental Appliances"
        .Replacement.Text = "Dental Antiques Preservation League"
        .Forward = True
        .Wrap = wdFindContinue
        .Format = False
        .MatchCase = False
        .MatchWholeWord = False
        .MatchWildcards = False
        .MatchSoundsLike = False
        .MatchAllWordForms = False
    End With
    Selection.Find.Execute Replace:=wdReplaceAll
End Sub
Let’s explain what’s going on here.
The “sub” on the first line is short for “subroutine,” a small program that can run on its own or as part of a larger VBA application. Lines preceded by single quotation marks are for comments. The quotation marks tell VBA to ignore any statements on those lines.
Then we get to the meat of the code: the code that performs the Find and Replace operation. As you can see, it specifies values for each option in the Find and Replace dialog, including the text and replacement text in quotation marks. The Selection.Find.Execute command near the end is equivalent to clicking the “Replace All” button.
Modding the Macro
To use macros, you don’t have to mess with the code or even look at it. But you can get more out of this function if you’re willing to dive in. For example, suppose you make a typo when recording the macro. Instead of re-recording it, you can go into Visual Basic and fix it.
You can also tweak the macro to make it more useful, and that’s what we’ll do here. When you run Find and Replace, whether manually or via macro, Word remembers the find and replace text. The next time you open the Find and Replace dialog, it will look like this.

It would be better to clear the values so we get a clean dialog box. We’ll do that with a second macro, except this time, we’ll do it directly in Visual Basic.
- In the Visual Basic editor, select the entire subroutine, from the first line to End Sub. Hit Ctrl + C to copy it.
- Place the cursor underneath End Sub and hit Ctrl + V. You’ve just duplicated the subroutine.
- Change the name from ChangeSocietyName to ClearFindReplace (or any other name that suits you). This is important because VBA will generate an error message if you try to run macros with duplicate names.
- In the .Text and Replacement.Text values, remove the text but leave the quotation marks. Essentially, you’re telling Word to find nothing and replace it with nothing, but you’re also clearing out those values.
The result should look like this:

Sub ClearFindReplace()
'
' ClearFindReplace Macro
' Clear Text from Find and Replace dialog
'
    Selection.Find.ClearFormatting
    Selection.Find.Replacement.ClearFormatting
    With Selection.Find
        .Text = ""
        .Replacement.Text = ""
        .Forward = True
        .Wrap = wdFindContinue
        .Format = False
        .MatchCase = False
        .MatchWholeWord = False
        .MatchWildcards = False
        .MatchSoundsLike = False
        .MatchAllWordForms = False
    End With
    Selection.Find.Execute Replace:=wdReplaceAll
End Sub
Now we’ll go back to the ChangeSocietyName macro. Below the Find and Replace code, but before End Sub, enter ClearFindReplace (without parentheses at the end).
That’s right: You don’t have to enter all the code you just created, just the name of the macro.
Sub ChangeSocietyName()
'
' ChangeSocietyName Macro
' Rename Society for the Preservation of Antique Dental Appliances
'
    Selection.Find.ClearFormatting
    Selection.Find.Replacement.ClearFormatting
    With Selection.Find
        .Text = "Society for the Preservation of Antique Dental Appliances"
        .Replacement.Text = "Dental Antiques Preservation League"
        .Forward = True
        .Wrap = wdFindContinue
        .Format = False
        .MatchCase = False
        .MatchWholeWord = False
        .MatchWildcards = False
        .MatchSoundsLike = False
        .MatchAllWordForms = False
    End With
    Selection.Find.Execute Replace:=wdReplaceAll
    ClearFindReplace
    End Sub
When Word runs ChangeSocietyName, first it will execute the original Find and Replace function. Then it will interpret ClearFindReplace as a command to run the second macro.
Going Further With VBA
As you can see, Word’s macro recording function can help you save time in countless ways. You can create macros to automate almost any operation, and in the Visual Basic editor, you can tweak the macros, embed one macro inside the other, or create a subroutine that executes multiple macros one after the other.
Because VBA is a full-fledged programming language, you can incorporate the subroutines into larger applications with variables, loops, conditional statements, and more. And once you've learned the basics of VBA in Word, you can apply much of that same knowledge to create macros in Microsoft Excel and Access.
To take it further, you’ll want to learn more about VBA conventions and the Visual Basic editor, such as how to organize your code and how to deal with bugs. But even if you want to stick with simple functions like the ones described here, you can go a long way toward improving your productivity.