
Spatial music has become a lot more accessible since Logic Pro made the decision to make the Dolby Atmos plugin native to its digital audio workstation. Logic Pro users can now test drive immersive, surround mixes without needing to buy expensive hardware or software.
If you're a bedroom producer or a professional engineer looking to get started, here's how to set up your first spatial audio session in Logic Pro.
Before You Begin
If you want to test drive spatial audio, you will need to install Logic Pro to 10.7.3 or higher, and use macOS Monterey 12.3 or later. While the Dolby Atmos plugin for spatial audio was first included in the 10.7 release, the later Logic Pro version includes the Apple Renderer which is crucial for those wanting to upload music to Apple Music.
Requirements:
- Logic Pro to 10.7.3 or later
- macOS Monterey 12.3 or later
Keep in mind, to use the Apple Renderer (Head Tracking) option for head tracking enabled devices, you will also require a Mac computer with Apple Silicon.
When to Convert to a Spatial Audio Session
As you will soon discover, converting a stereo session to a spatial audio session in Logic Pro requires a larger sample rate and buffer size. This increase in processing power has an effect on what you can and can't do while working in this format.
It's recommended not to record live instruments or include virtual instruments while in a spatial audio session. You should instead convert your session once you have completed all recordings. This shouldn't be a problem as most microphones record in mono or stereo outputs anyway, rather than in a multi-surround format.
You can use the Dolby Atmos plugin and the 3D Object Panner in post-production to change the spatial properties of your recordings later on.
How to Set Up a Spatial Audio Session in Logic Pro
Let's go over the process of setting up your spatial audio session in Logic Pro. We've laid out all the steps below.
1. Enable Complete Features

- In the navigation bar, go to Logic Pro > Settings > Advanced.
- Make sure the tick box is checked next to Enable Complete Features.
2. Change the Sample Rate

- In the navigation bar, go to File > Project Settings > Audio.
- Select 48 kHz or 96 kHz.
The reason for changing the sample rate of your session is that when spatial audio is turned on in Logic Pro, tracks are automatically converted in real-time to one of the above sample rates. For example, if your session is set to 44.1 kHz, Logic will convert it in real-time to 48 kHz. The same is true for a session in 88.2 kHz, which is then converted to 96 kHz.
This conversion affects the performance speed of Logic and is not recommended as a result. If you know that you want to work with spatial audio at some point, it's best to create a recording session in either 48 kHz or 96 kHz from the outset.
3. Adjust the I/O Buffer Size

- In the navigation bar, choose Logic Pro > Settings > Audio
- Make sure the Devices tab is selected.
- Look for the I/O Buffer Size and select either 512 or 1024 samples from the drop-down menu. If your session is in 44.1 kHz or 48 kHz, set your I/O to 512 samples. If your session is in 88.2 kHz or 96 kHz, set your I/O to 1024 samples.
- Once selected, hit the Apply button in the bottom right corner.
4. Turn On Spatial Audio

- In the navigation bar choose File > Project Settings > Audio
- Make sure that the General tab is selected.
- Under Spatial Audio, select Dolby Atmos from the menu.
- A message will appear saying "The project will be converted to 7.1.2 surround for mixing in spatial audio". You can go ahead and click OK.
For more information on how Apple is introducing spatial audio to its hardware and digital platforms, see our article about Dolby Atmos and spatial audio for Apple Music.
5. Choose a Renderer

- Press the X key on your keyboard to bring up the mixer. Alternatively, to open the mixer in a separate window, press [Command + 2] on your keyboard.
- Click on the Atmos plugin on the Master channel strip to open the plugin interface.
- Select either the Dolby Renderer or Apple Renderer from the Monitoring Format drop-down menu.
If you're unsure about what the renderer does, you can read about the difference between the Dolby Renderer and Apple Renderer to see which one you should use.
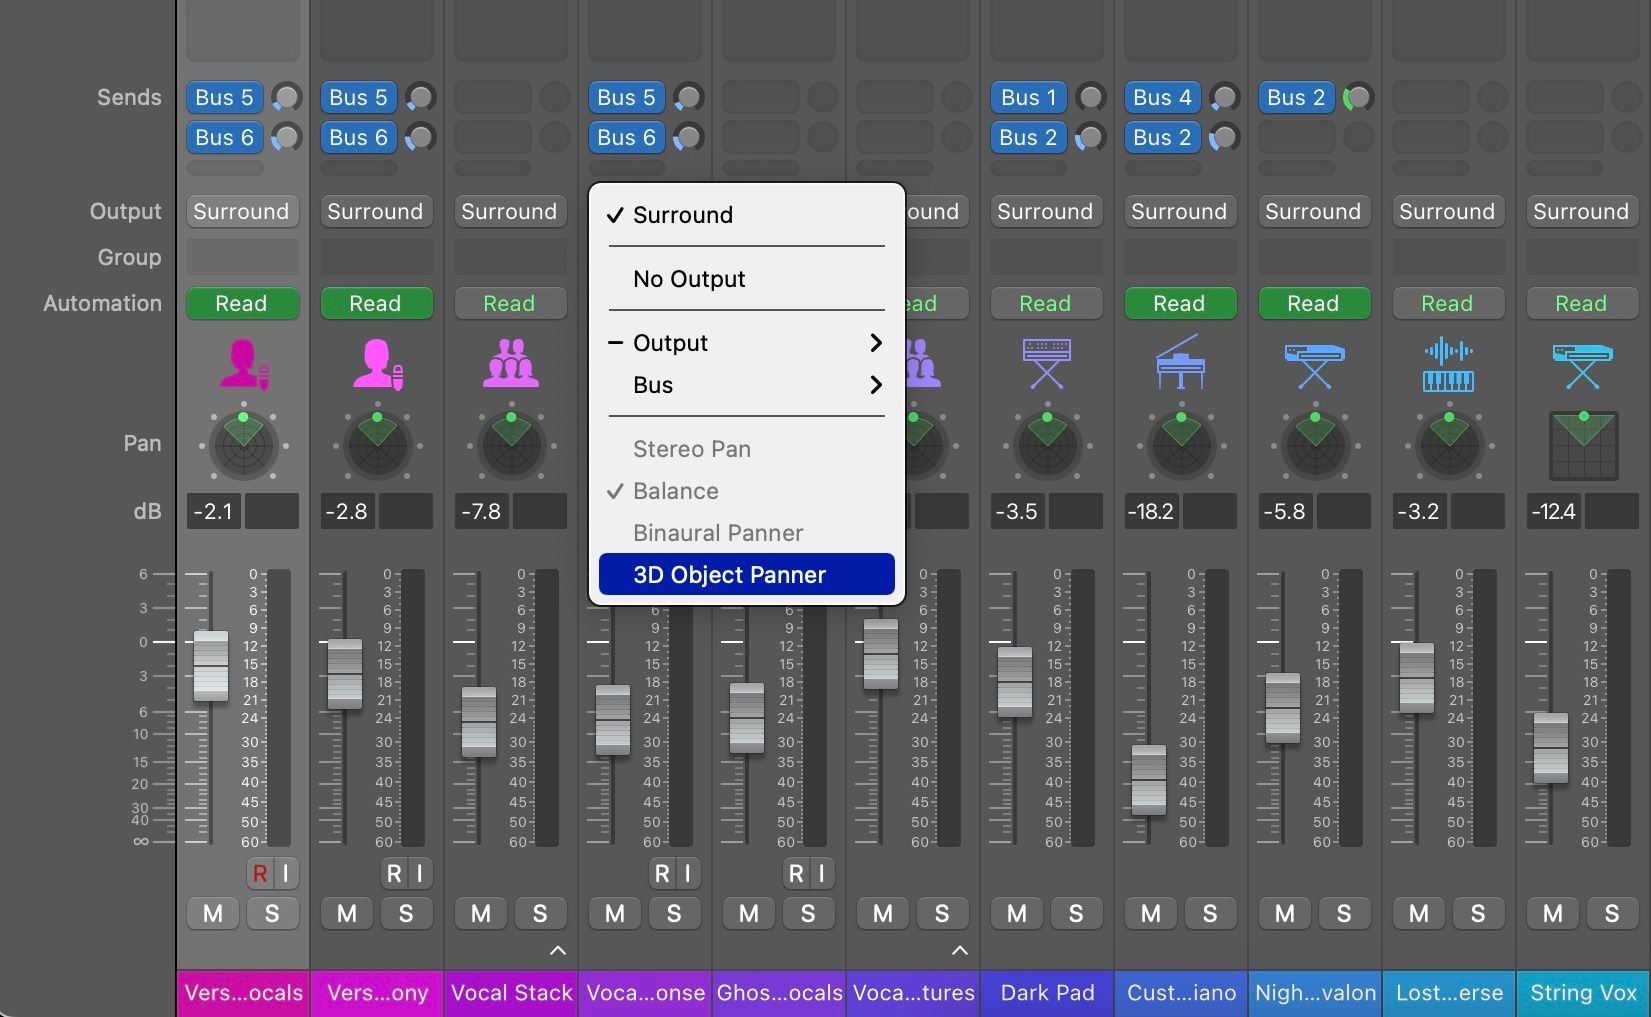
6. Add the 3D Object Panner
Finally, to start panning objects in 3-dimensional space, you will need to open the 3D Object Panner plugin.
-
Choose the channel strip that you want to pan, then in the Output click on the insert labeled Surround. Next, click 3D Object Panner from the menu.
-
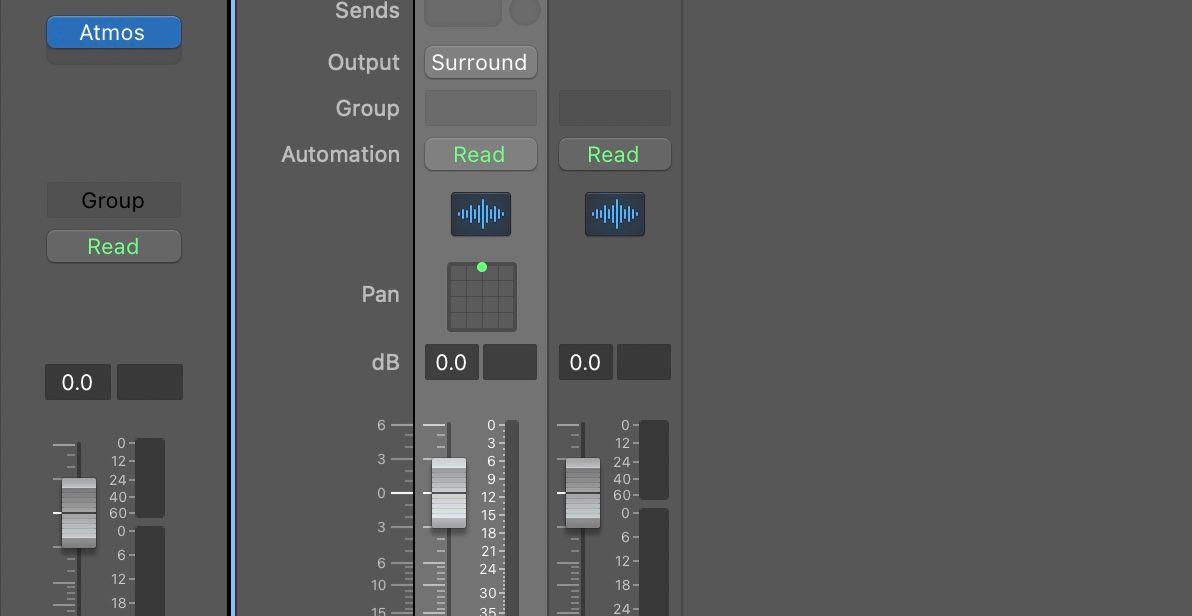
To bring up the visual interface for the 3D Object Panner, double-click on the small square panner icon that appears below the Automation in the channel strip. It looks different from a normal panner which usually has a circle icon.
-
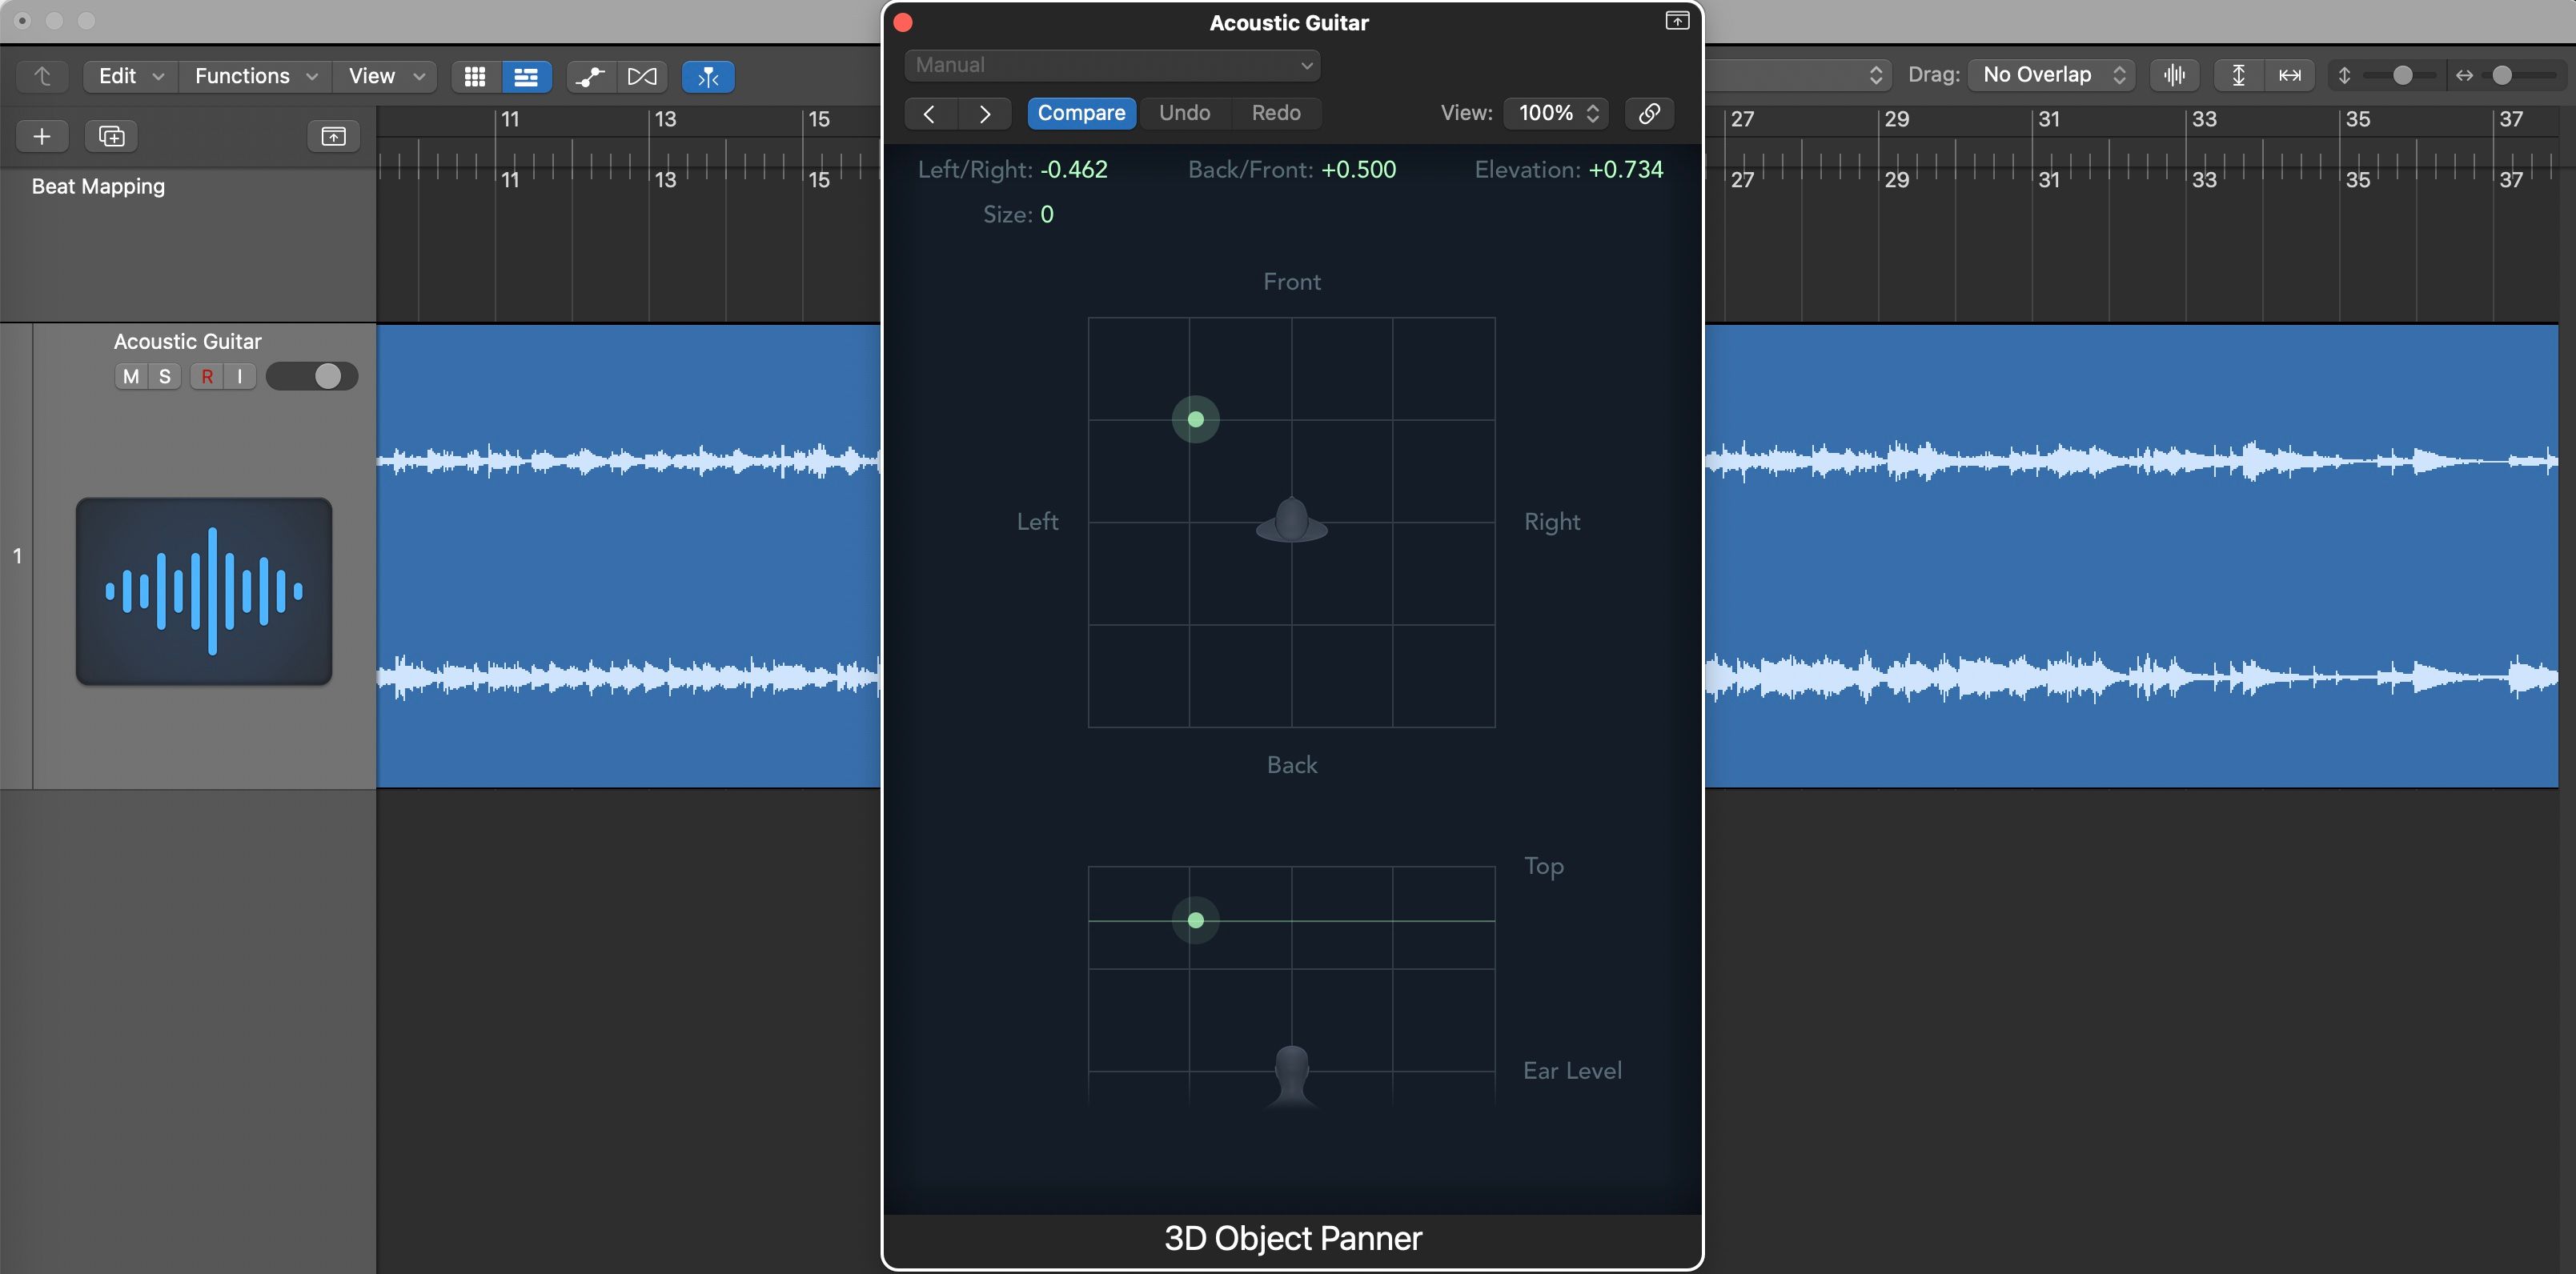
Once the panner is open you can play your track by pressing the spacebar, then move the green dot around to change the panning position of the track. You have the option to pan around the listener horizontally (front, back, left, right) and vertically (top and ear level).


7. Test the 3D Panner
If you followed these steps correctly you should now be able to add a 3D panner to any one of the tracks you have in your session. After that, you can change the position of the sound using the 3D panner plugin.
Traditionally, a panner only gives you the ability to pan an audio track 90 degrees to the left, or 90 degrees to the right of a listener. But after setting up a spatial audio session, you now have the ability to pan audio tracks left, right, forward, and backward; alongside changing the perceived height by panning up or down from the height of your ears.
Take some time to test out how the 3D panner changes the position of a sound, and experiment with how you can use it creatively in a mix.
If you can't hear any sound, check your audio output settings. Go to Logic Pro > Settings > Audio and make sure you have the correct Output Device selected. In some cases, the output device will duplicate and show up in brackets like this: (Built-in Output). In this example, we simply re-selected the option for Built-in Output that wasn't inside brackets.
Set Up Your Spatial Audio Session in Logic Pro
Now that you know how to set up a spatial audio session in Logic Pro, you can start creating new immersive audio tracks. Try converting your old stereo tracks into surround sound, or write new music just for spatial audio. If this is your first time working with 3D surround sound, it could easily change the way you think about sound forever.