Windows 11 comes with many new features and changes and will continue to get new ones until it reaches end-of-support. If you are new to Windows 11, it can become a bit of a hassle for you to set up everything that might be important to you in one go.
While everybody has a different set of wants from a PC, there are specific settings in Windows 11 that you should tweak irrespective of your use cases. We are putting together a list of settings you should change on Windows 11 before using your PC.
1. Enable Clipboard History to Move Content Efficiently
The copy and paste function is helpful for everyone because it helps you move your content from one location to another. Windows 11 offers an advanced copy-paste tool that will save you a lot of time, but unfortunately, it is not enabled by default.
If you are new to Windows 11 or have never heard of the tool, enabling it from the Windows 11 Settings app is easy.
These are the steps to enable Clipboard History:
- Open the Settings app by pressing Win + I on your keyboard
-
In System, scroll down until you find the Clipboard option. Click on it.
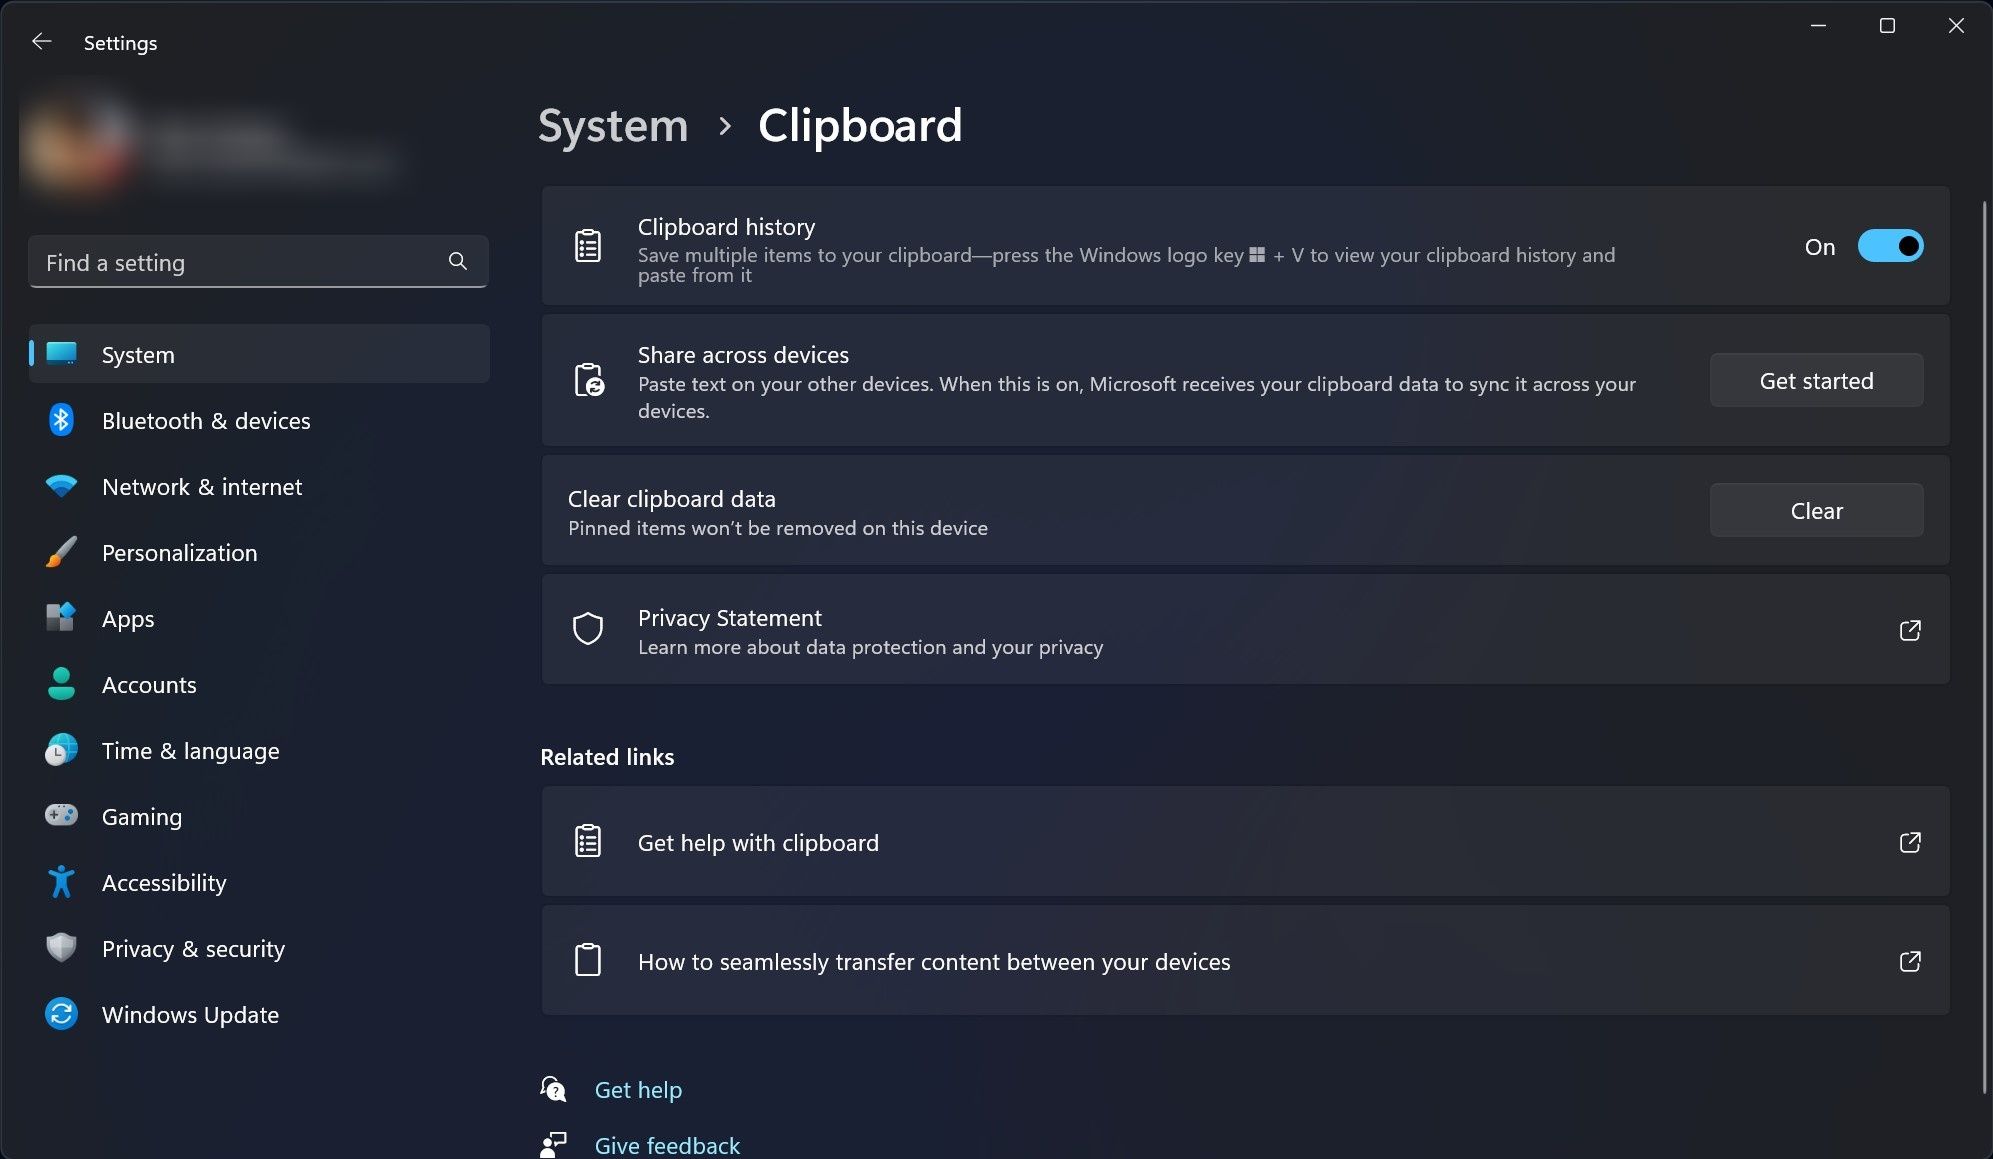
- Turn on the Clipboard history toggle.

Now you can press Win + V on your keyboard to bring the Clipboard history and select the desired item from all the previous strings of text or photos you copied previously. And much like previous iterations, Windows 11 Clipboard will forget everything you copied when you turn off your device.
2. Set Up Nearby Sharing

If you have multiple PCs running Windows 11 or 10, Nearby Sharing will make it easier for you to transfer content from one to another over WiFi or Bluetooth. However, as the name itself suggests, it works between nearby Windows computers. Check out how to use Nearby Sharing on Windows 11 for more information.
3. A Cleaner Desktop Experience
All your important files and folders should be at your fingertips. By creating app or folder shortcuts in Desktop, you can access everything important to you in the fastest way possible. However, these shortcuts should not be so much in number that your Desktop starts looking cluttered.

You should review what’s important to you from time to time to prioritize what to keep as shortcuts on the Desktop. If you just bought a Windows 11 PC, you will see Desktop icons such as Recycle Bin. You can quickly hide Desktop icons from your Windows desktop with just a few clicks. You can also remove shortcuts to any files or folders from the desktop by right-clicking on them and then selecting the trash icon in the bottom right corner of the context menu.
4. Enable Storage Sense to Manage Your Memory Better

Storage Sense gives you a smart way of freeing up your disk space. When turned on, it automatically deletes items you longer need, like temporary files and items in your Recycle Bin. Additionally, Storage Sense allows you to choose how often to run and what to clean. You can also manage locally available cloud content associated with your Microsoft OneDrive account.
It is important to note that all the changes you are making to Storage Sense apply only to you. It will not affect anyone else using the same PC with a different account.
5. Enable Find My Device to Track Your PC

If you are not using a Windows 11 desktop, you should enable the Find My Device toggle from the Settings app. If your Windows 11 laptop or tablet is lost or stolen, Find My Device can help you find your device’s location. For the setting to work, check out how to configure location services on Windows and enable them.
6. Tweak the Night Light Setting to Get Better Sleep
One of the reasons for your inability to get to sleep at night could be that you are using your PC at nighttime. To be more specific, blue light emitting from the display is responsible for your sleeping difficulties. If you can not avoid using your PC during the nighttime, the Night light setting in Windows 11 can reduce the exposure of blue light to your eyes, thus helping you get better sleep at night. To find and enable it, follow the below steps:
- Open the Settings app.
-
Navigate to System > Display > Night light.
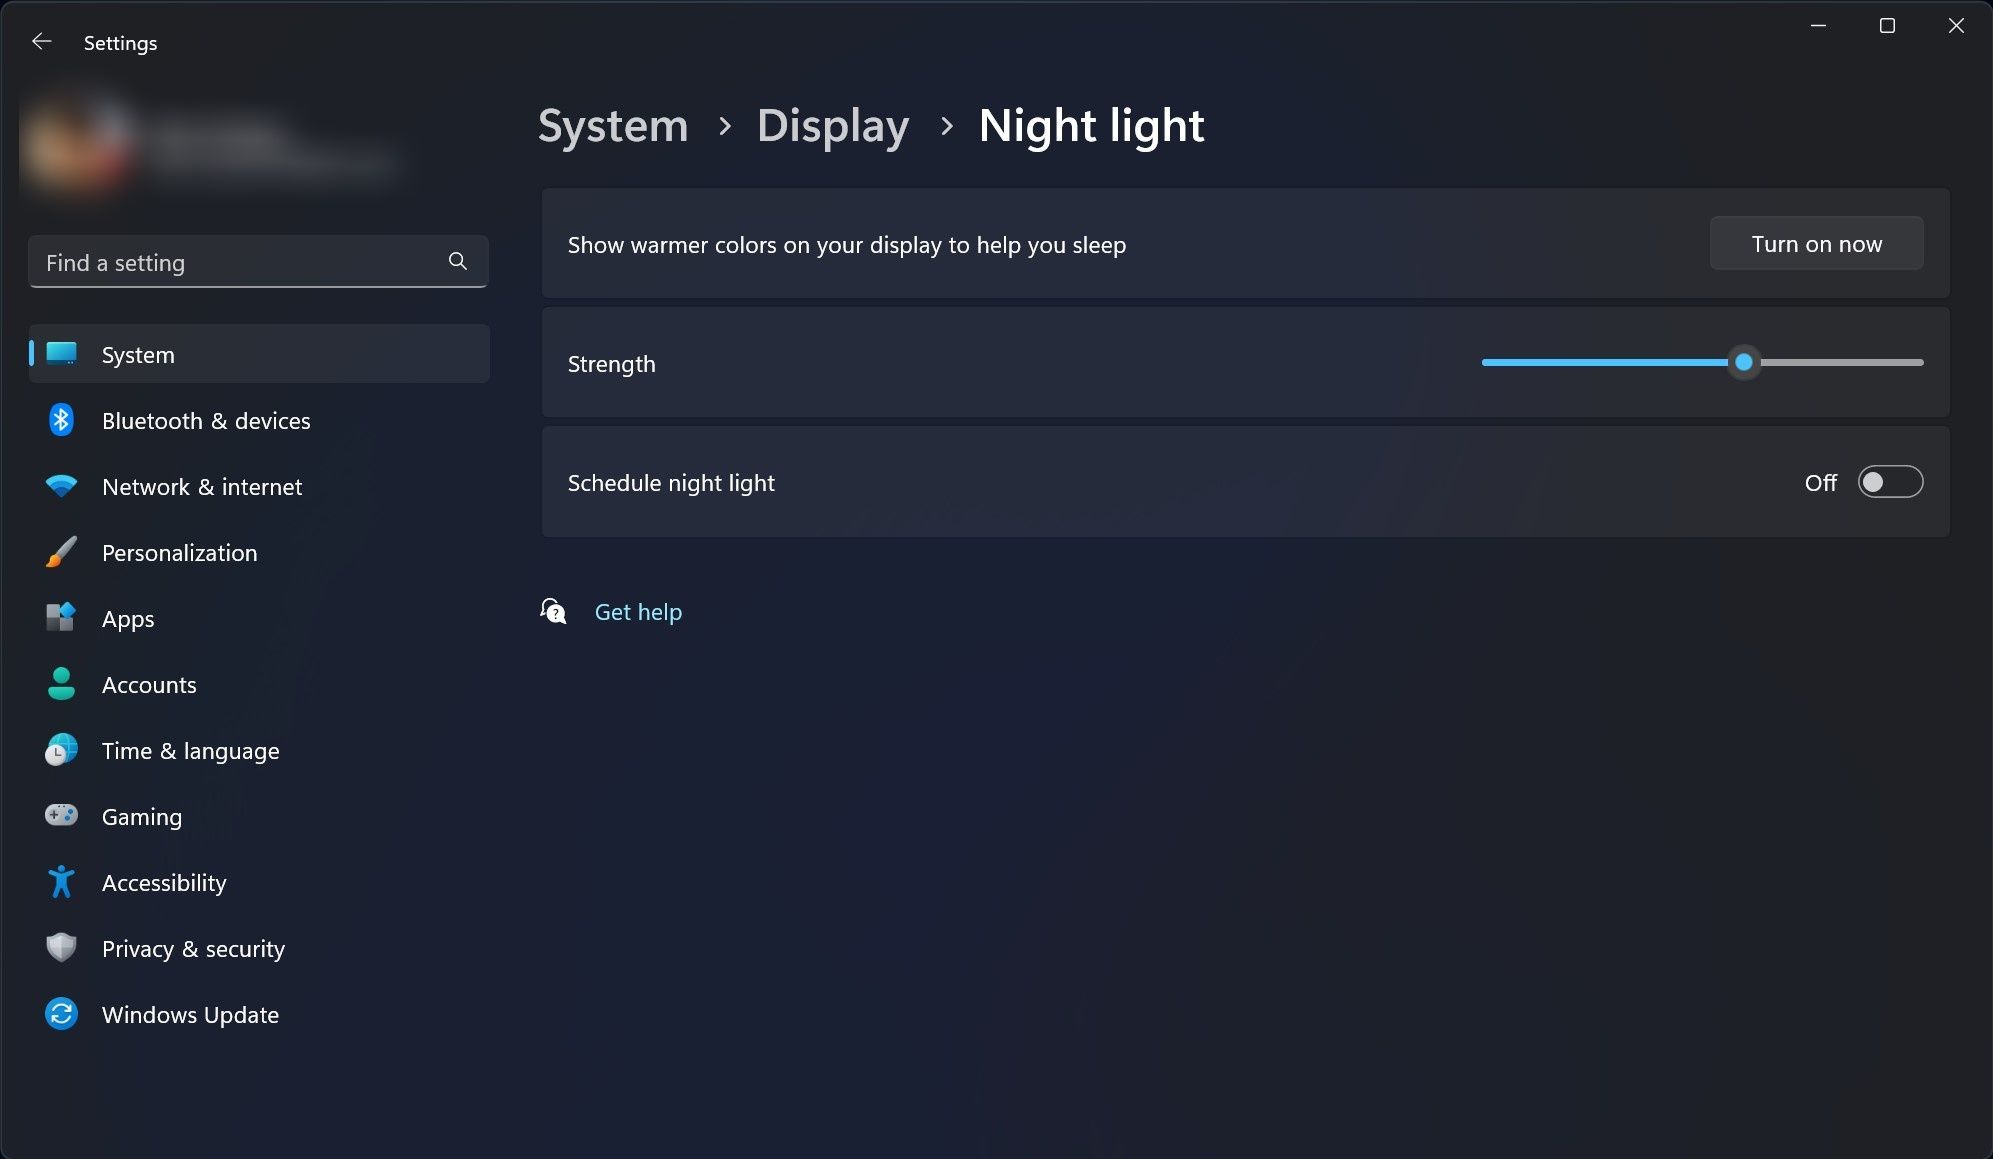
- Click on Turn on now, right beside Show warmer colors on your display to help you sleep.

You can also set up the time range, during which Windows 11 will keep Night light on. You can do that by clicking on the Schedule Night light toggle.
7. Set Active Hours
If you used Windows 10 previously, you might already be familiar with Active hours. The feature is meant to give you more control over Windows updates.

When you set up Active hours, you tell your PC when to restart your device after update installations. There are two ways you can set it up. You can either allow Windows to learn from your device’s activity to adjust Active hours automatically or let yourself choose the time range.
Windows 11 understands your daily activity and automatically chooses a timescale during which you usually do not use your PC. You can choose manually select the time if your daily usage does not follow a particular pattern. You need to tweak this setting to ensure that Windows updates do not come in the way of whatever you are doing during your work schedule.
8. Enable Dark Mode to Reduce Eyestrain
The Dark mode is also an important display setting for user interfaces in Windows 11. When turned on, it reduces the light emitted by your PC to help you with eye strain, which comes with prolonged screen time. You should also enable it to save energy consumption on your devices. Also, it will impact the real-world battery life of your Windows 11 laptop or tablet.
Here is how you can enable Dark mode on your Windows 11 PC:
- Open the Settings app.
- Go to Personalization.
-
Click on Colors.
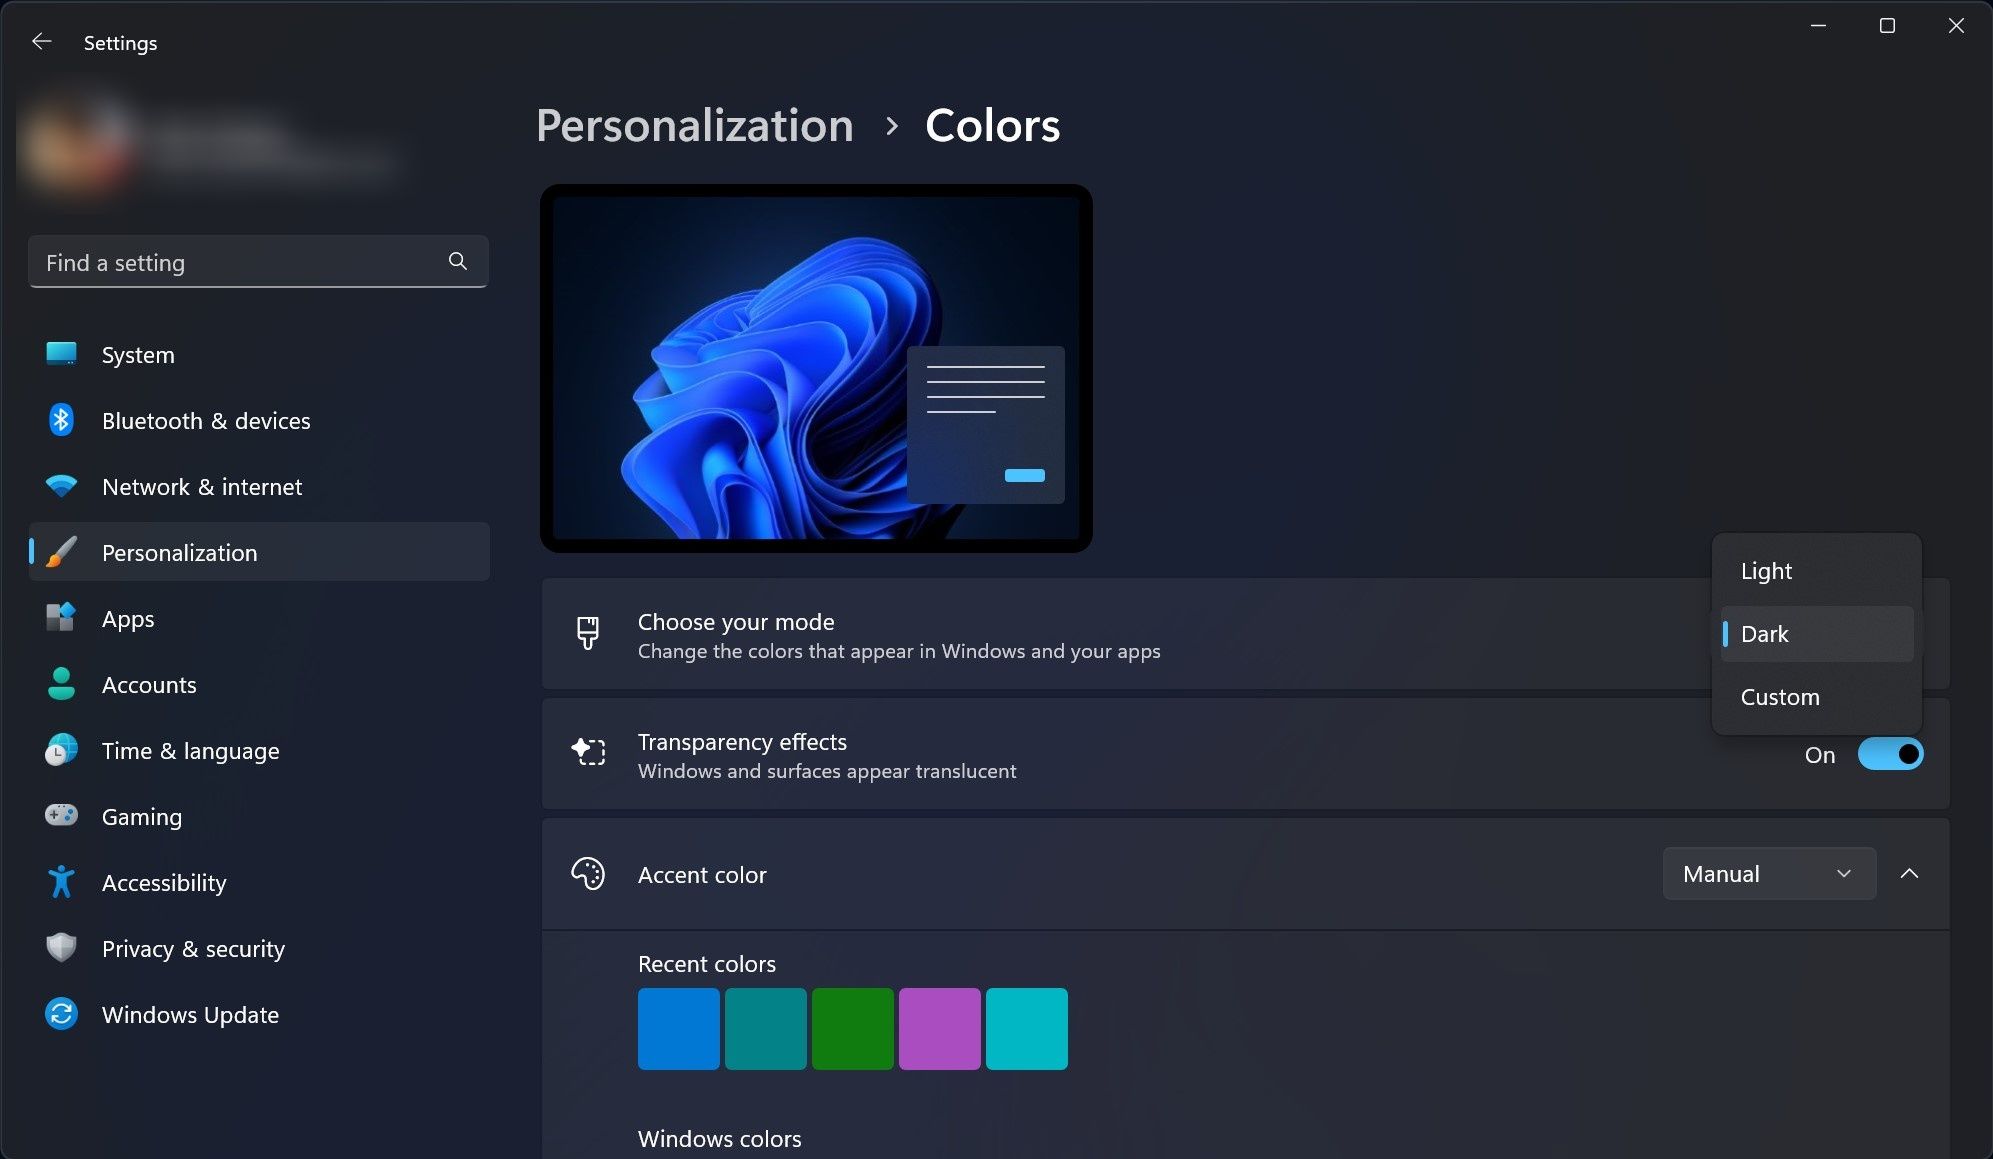
- In Choose your mode radio menu, select Dark.

However, unlike macOS, dark mode in Windows 11 is not available everywhere in the OS. On the bright side, the degree of inconsistency of dark mode in Windows 11 is something you can ignore because dark mode applies to most areas when turned on.
You Are Better Off Enabling the Above Windows 11 Settings
It is not the case that you will not be able to work on your Windows 11 PC without enabling the above settings. Whatever you do on your PC, with the changes to the Settings app, you will be able to do it in a more efficient manner. The above tweaks will be useful for both casual and advanced users.