Windows gives you much leeway in tweaking things, letting you play with different customizations of various settings on your PC. So naturally, this feature gets carried over to all the audio settings you may have changed around yourself.
But there might come a point where you have to reset your audio settings, especially if the settings have started to go bust somewhere. In this piece, we discuss the best ways to reset these audio settings in all their different forms. So let’s get started.
How to Reset Audio Settings on Windows 10
There are a lot of ways you can go about resetting your audio settings. For instance, you can tweak various sound settings from the Windows Settings menu. You can also use the sound control panel, tweak your audio drivers, etc.
In this article, we've tried to keep things simple by sticking with the two most straightforward ways to reset your Windows audio settings.
1. How to Tweak Sound via Windows Settings
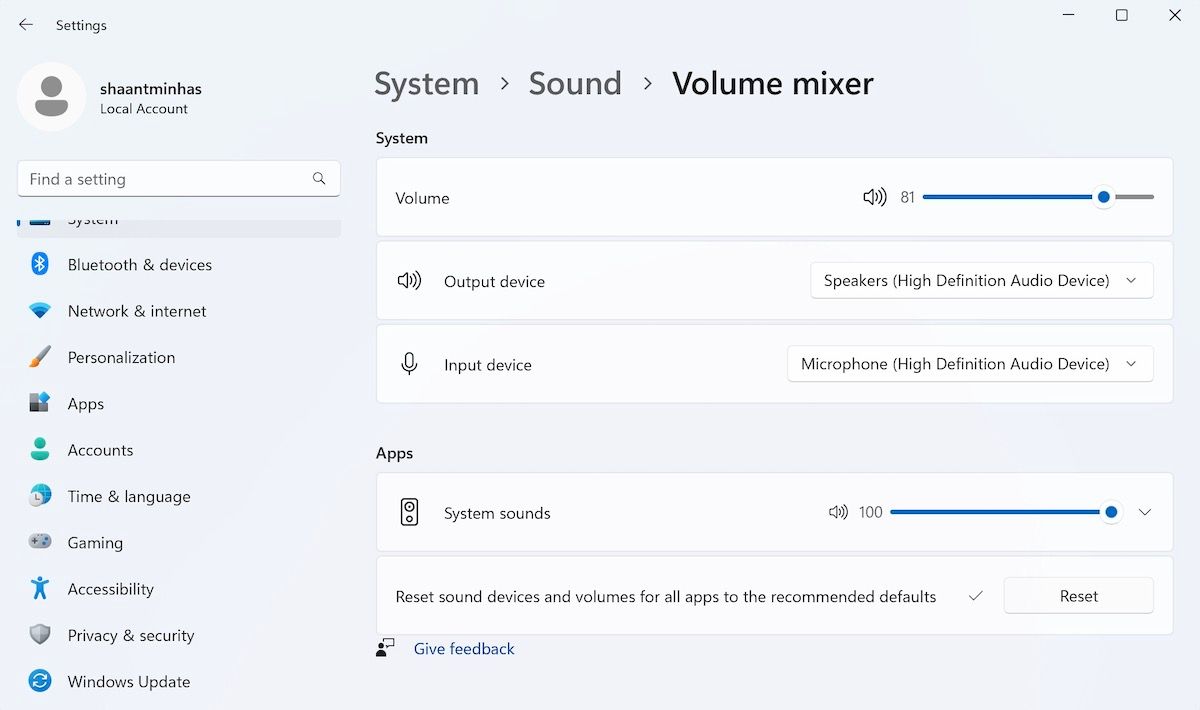
The Window Settings app is an excellent start to shake things up with your PC’s audio settings. Here’s how:
- Press Win + I to open the settings menu. Alternatively, head to the Start menu search bar, type in ‘settings,’ and select the best match.
- In the System menu, click on Sound.
- Select Volume mixer.
- Look for the Reset sound devices and volumes for all apps to the recommended defaults, and select Reset.
Once you click on reset, all your audio settings will be reset instantly. You can easily confirm the reset by looking for a checkmark next to the Reset button.
2. How to Reset Your Windows Audio via the Device Manager
Your computer drivers are what make all the components on your PC tick. So if something goes wrong with the drivers, you’ll have to sort them out before you can get back to work.
This holds for your audio drivers as well. If your audio has stopped working or is acting weirdly, then a quick reset of your audio drivers is well worth a shot. Again, you can do this pretty quickly; you only need to open the Device Manager and make the changes.
Here’s how you can get started:
- Press Win + S to open Windows Search, enter "device manager" and press Enter. Alternatively, use one of the other ways to open the Device Manager.
- Look for the Sound, video, game controller options and expand them to see the audio driver of your PC.
- Right-click on the driver and select Disable.
You’ll see a dialog box to confirm your action. Click on Yes to proceed. Windows will then recommend a restart. Save all of your work, click on Yes, and wait for your PC to boot up.
Again, launch the Device Manager and follow the above steps to get to your audio driver. Finally, right-click on your drive again and select Enable. This will enable your audio driver once again. Double-check if the audio issues persist.
Alternatively, you can update your sound driver. This can be super handy, especially if you haven’t updated your drivers in a long while. Check out our guide on how to update the audio drivers on Windows for more information.
Resetting Your Audio Settings on Windows
Now that you know the different ways to reset your audio settings, you don’t have to worry about getting stuck with quirky sound situations. In fact, we would even go one step further and say that this is a huge opportunity to go out of your way and experiment with a host of sound effects; after all, even if something goes sideways, you can always get back to your default settings from here.


