
Windows 11 comes with a fresh new look and has mainly got a positive response for its new interface. However, there are a couple of features that are not being welcomed by the users. For instance, the addition of the "show more options" entry to the right-click context menu.
Although it was introduced to simplify things, many users still prefer the old context menu from Windows 10. Fortunately, you can remove Show more options from the context menu on Windows 11 by following the below methods.
1. How to Remove "Show More Options" From the Context Menu With Folder Options
The Windows Folder Options in File Explorer is the go-to place to view and manage File Explorer settings. You can use it to enable compact view in File Explorer on Windows 11, manage file thumbnails, remove the "show more options" entry, and much more.
Here's how to use the folder option to remove the "show more options" entry from the context menu:
- Press the Win + E hotkey to open the File Explorer.
- Click the three horizontal dots at the top bar and choose Options.
- In the Folder Options, switch to the View tab.
-
Check the Launch folder windows in a separate process box.
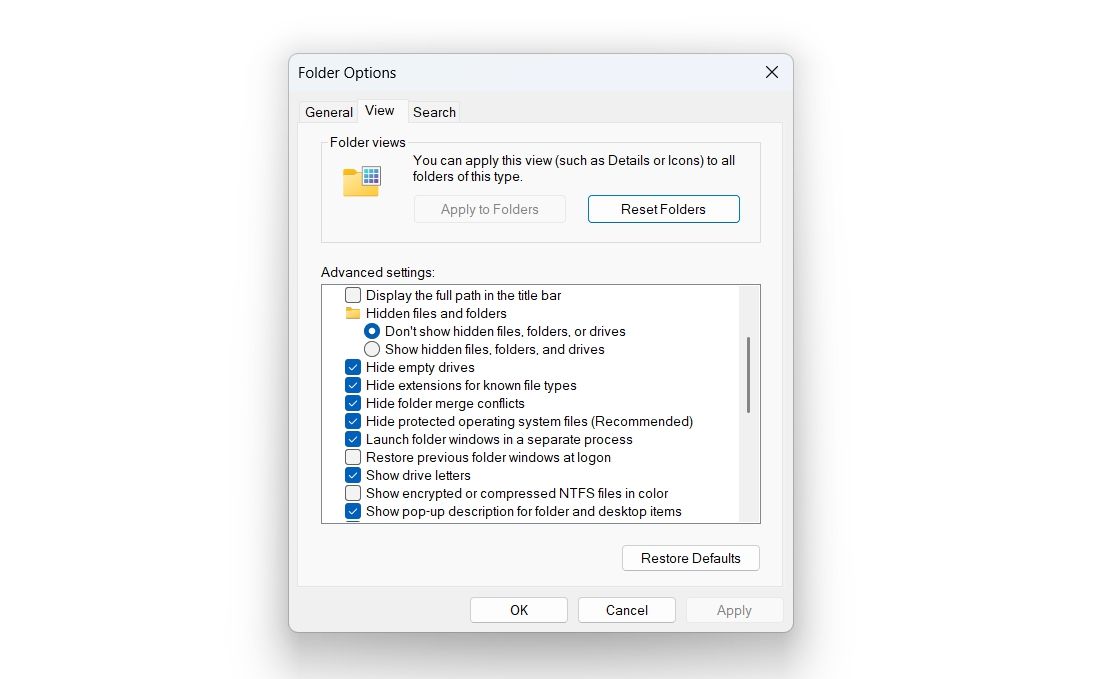
- Click Apply > OK to save the changes.

Next, restart your computer for the changes to take effect.
2. Remove Show More Options From the Context Menu Using the Command Prompt
If you're a power user, you can use Command Prompt to remove the "show more options" entry from the context menu. Here's how:
- Open the Start Menu by pressing the Win key.
- In the search bar, type Command Prompt and choose Run as administrator from the right pane.
- Click Yes to the UAC that crops up.
-
In the elevated Command Prompt window, type the following command and press Enter:
reg add "HKCU\Software\Classes\CLSID\{86ca1aa0-34aa-4e8b-a509-50c905bae2a2}\InprocServer32" /f /ve

After executing the command, you'll see the "The operation completed successfully" message to confirm that it went through.
Now, you will have to restart Windows Explorer to see the changes. To do that, open the Task Manager (see how to launch the Task Manager), right-click on Windows Explorer, and choose Restart.
Check if you can see the changes. If not, then you will have to restart your computer for the changes to take effect.
In the future, if you want to add the "show more options" entry to the context menu, then open Command Prompt with admin rights and run the following command:
reg delete "HKEY_CURRENT_USER\Software\Classes\CLSID\{86ca1aa0-34aa-4e8b-a509-50c905bae2a2}" /f
3. Remove Show More Options From the Context Menu Using the Registry Editor
Another quick way to remove the "show more options" entry is through the Registry Editor. Here's what you need to do:
Before making any changes to the registry, ensure you've created a restore point or back up the registry. This will ensure your system settings and files are secure, and you can quickly access them if something goes wrong.
- Open the Start Menu, type Registry Editor in the search bar, and press Enter.
-
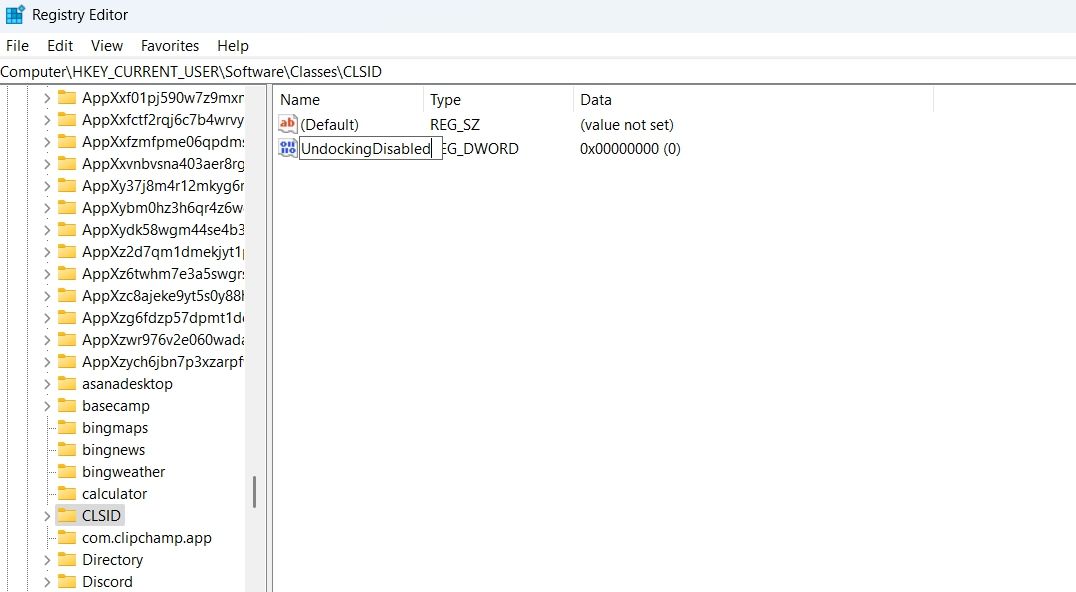
In the Registry Editor, navigate to the following location:
HKEY_CURRENT_USER\Software\Classes\CLSID - Right-click on the empty space on the right pane, click New, and then select DWORD (32-bit) Value from the context menu.
-
Name the value as "UndockingDisabled" and press Enter.
-
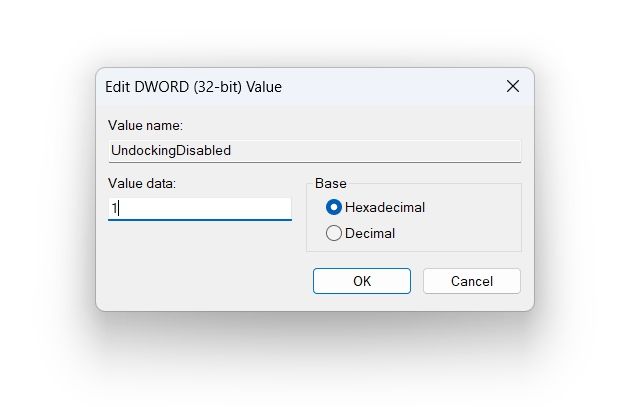
Double-click on the UndockingDisabled key, type 1 in the Value data, and click OK to save the changes.


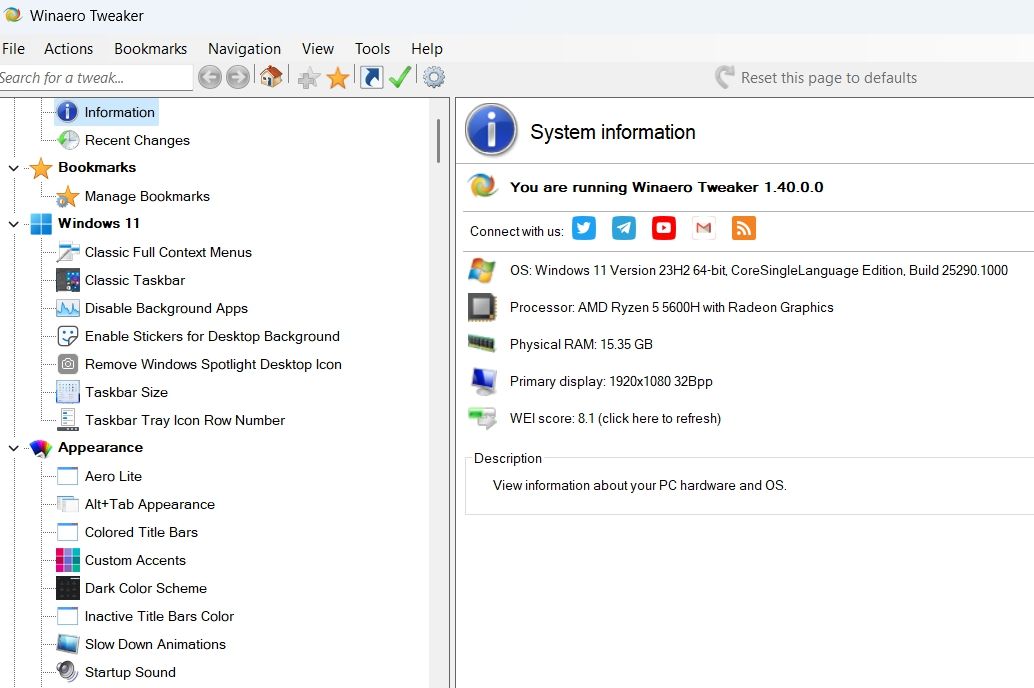
4. Remove the "Show More Options" Entry From the Context Menu Using Winaero Tweaker
There are plenty of third-party tools using which you can customize the look of your Windows 11 computer. For this guide, we will use Winaero Tweaker.
Here's how to download Winaero Tweaker and use it to remove the "show more options" entry from the context menu:
- Download the Winaero Tweaker zip file on your computer.
- Unzip the file, open the executable, and then follow the on-screen instructions to install it on your computer.
-
Launch Winaero Tweaker and choose the Classic Full Context Menus option from the left sidebar.
-
Check the Enable classic full context menus box.

- Click the Restart Explorer button that appears.


Enjoy an Old School Context Menu on Windows 11
The desktop context menu lets you quickly access areas like the personalization menu, display settings, and much more. In Windows 11, you get the new "Show more options" entry in the context menu. But if you prefer the old design, you can quickly disable the "Show more options" entry from the context using either of the above methods.