In the E-commerce space, digital payment solutions have contributed to a significant increase in revenue and overall growth of businesses by enabling and processing cross-border payments with ease.
PayPal offers a simple and flexible digital payment solution for managing online transactions. By incorporating PayPal into your web applications, you can ensure customers access a seamless and secure payment experience which in turn can lead to increased sales and overall brand confidence.
Read on to learn how to integrate PayPal into your React applications.
Set Up a PayPal Sandbox Account
PayPal Sandbox is a testing environment provided by PayPal so you can test payment integrations within your applications. It offers a simulated environment that includes all the payment features found in PayPal's live production environment.
Simply, the sandbox provides a platform for testing payment integrations without the need for real money.
Using the sandbox account, you can access a virtual PayPal account with test funds, which allows you to simulate various types of transactions and payment integrations.
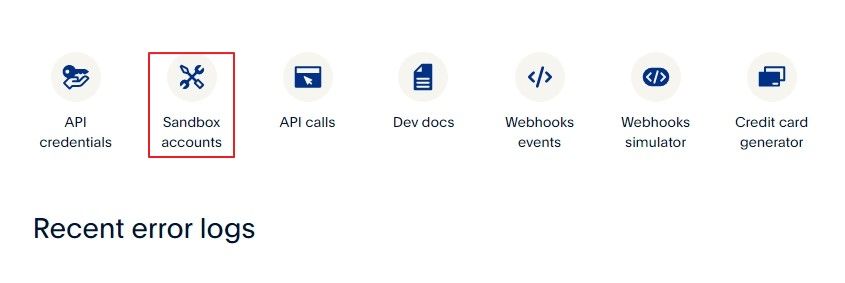
To create a sandbox account, head over to PayPal Developer Console and sign in with your PayPal account credentials. Next, on the developer dashboard, click on the Sandbox Accounts button.
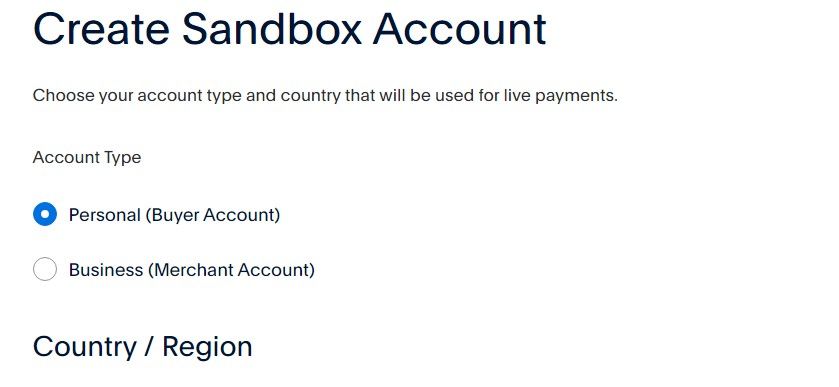
To process a PayPal transaction from your React application, you need two sandbox accounts: a business account and a personal account. These two accounts will help you simulate a complete transaction—from both a customer's view and a merchant's (business) view.
It's important to test the functionality of the payment integration on your application from both perspectives.
Click on the Create account button to set up the two accounts.
On the account settings page, create one of each type of account: personal, then business. You will use the personal account credentials to sign in to PayPal's sandbox personal account. On the other hand, you will use the credentials for the business account to create a project on the developer console to obtain PayPal's client ID.
Alternatively, instead of creating new accounts, you can use the default sandbox accounts provided by PayPal to test the payment integrations.
Create a PayPal Project
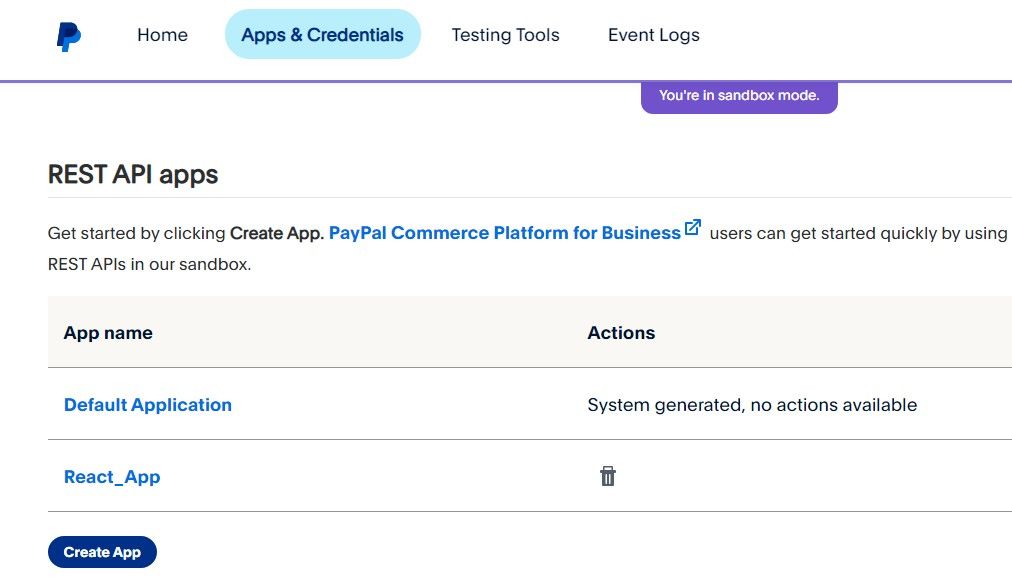
On the developer dashboard page, click on the Apps and Credentials button and click Create App button to set up a PayPal project. Next, fill in the name of your application, choose Merchant as the account type, and select the credentials for the business account you initially created.
Finally, copy the App's client ID.
Set Up the React Client
Create a React application, open the public/index.html file, and add your client ID in the format shown below in the head element section.
<script src="https://www.paypal.com/sdk/js?client-id=your-client-ID¤cy=USD"></script>
The script tag loads the PayPal JavaScript SDK, a library that provides client-side functionality for interacting with PayPal's API, and makes it available for use in the React components.
Using the SDK's functions, you can create a PayPal payment button that handles the payment flow which involves sending payment details to PayPal, authorizing the payment, and handling the payment response.
You can find this project's code in its GitHub repository.
Create a Product Component
In the /src directory, create a new components folder, and add two files: Product.js and PayPalCheckout.js.
Open the Product.js file and add the code below:
        import React, { useState } from "react";
import "./product.style.css";
import "../assests/laptop.jpg";
function App() {
  return (
    <div className="Product-container">
      <header className="Product-content">
        <div className="product">
          <img src={require("../assests/laptop.jpg")} alt="laptop" />
        </div>
        <div className="desc">
          <h2> MacBook Pro</h2>
          <p>
            Lorem ipsum dolor sit amet consectetur adipisicing elit.
           Maxime mollitia,molestiae quas vel sint commodi repudiandae
           consequuntur.
          </p>
          <h3>Price: $350.00</h3>
        </div>
      </header>
    </div>
  );
}

export default App;
This code renders a simple product component.
Create the PayPal Checkout Component
Add the following code to the PayPalCheckout.js file:
        import React, { useRef, useEffect, useState } from "react";
import PaymentFailure from "./PaymentFailure";
import PaymentSuccess from "./PaymentSuccess";

function PayPalCheckout() {
  const paypal = useRef();
  const [transactionStatus, setTransactionStatus] = useState(null);

  useEffect(() => {
    window.paypal
      .Buttons({
        createOrder: (data, actions, err) => {
          return actions.order.create({
            intent: "CAPTURE",
            purchase_units: [
              {
                description: "MacBook Laptop",
                amount: {
                  currency_code: "USD",
                  value: 350.00,
                },
              },
            ],
          });
        },
        onApprove: async (data, actions) => {
          const order = await actions.order.capture();

          console.log("success", order);
          setTransactionStatus("success");
        },
        onError: (err) => {
          console.log(err);
          setTransactionStatus("failure");
        },
      })
      .render(paypal.current);
  }, []);

  if (transactionStatus === "success") {
    return <PaymentSuccess />;
  }

  if (transactionStatus === "failure") {
    return <PaymentFailure />;
  }

  return (
    <div>
      <div ref={paypal}></div>
    </div>
  );
}

export default PayPalCheckout;
This code uses three React hooks: useRef, useState, and useEffect. It uses useRef to create a reference to a div element, which will act as a container for the PayPal checkout button.
It uses useEffect to create a PayPal button with the paypal.Buttons function, and then renders that button in the div element referenced by paypal.current method.
The paypal.Buttons function takes an object with several properties:
- createOrder: This function returns an object containing the details of the order that the user has created. The order details will include the specific details of the product or service such as the amount, product name, description, and currency.
- onApprove: This function runs when the payment is approved. It captures the payment and logs the success message to the console. It also sets the transactionStatus state to success.
- onError: This function runs when the payment encounters an error. It logs the error message to the console and sets the transactionStatus state to failure.
Finally, the component conditionally renders either the PaymentSuccess or PaymentFailure component depending on the value of the transactionStatus state.
These two components will only render after either, a successful transaction, or a failed one. Go ahead and create two files: PaymentSuccess.js and PaymentFailure.js in the components folder and add a functional component with a paragraph element that renders the status of the transaction.
Update the App.js Component
Open the src/App.js file and add the code below:
        import React, { useState } from "react";
import Product from "./components/Product";
import PayPalCheckout from "./components/PayPalCheckout";
import "./App.css";

function App() {
  const [checkout, setCheckOut] = useState(false);

  return (
      <div className="App">
        <header className="App-header">
          {checkout ? (
            <PayPalCheckout />
          ) : (
            <div className="Product">
              <button
                className="checkout"
                onClick={() => {
                  setCheckOut(true);
                }}
              >
                Add to Cart & Checkout
              </button>
              <Product />
            </div>
          )}
        </header>
      </div>
  );
}

export default App;
This code uses a conditional rendering approach to display either the PayPalCheckout component or the Product component. The useState hook initializes a state variable called checkout as false, which keeps track of the current state when the page loads.
Initially, React renders the Product component, including the checkout button. When a user clicks the checkout button, the onClick handler function triggers to update the checkout variable to true. This update prompts the App component to render the PayPalCheckout component instead.
Additional PayPal Payment Features
PayPal's payment features, such as One Touch and PayPal Credit, ensure your customers can enjoy a streamlined payment process that is secure, reliable, and convenient.
While you can build your own payment processing service from scratch, using a payment platform like PayPal is preferably a more flexible and efficient alternative. Essentially, with a Payment solution in place, you don't need to worry about managing the infrastructure required to set up a custom payment service.

