
Software design is an essential phase in software development. The design approach can affect the entire project and how you handle different requirements.
Developers have often used a monolithic architecture, bundling up all the software components into a single module. However, this approach can prove inefficient, particularly for larger applications.
Microservices aim to address these limitations. A microservice is a small, modular application that performs specific functions. Unlike monolithic applications, microservices allow for independent deployment and scaling. As a result, they are more flexible and easier to maintain.
The Microservice Architecture
The microservice architecture is a software design approach that breaks down a large application into independent services, with each service designed to address a specific business requirement.
These services run on dedicated resources, including separate database instances and computing power. Unlike monolithic systems, microservice applications are loosely coupled allowing for greater flexibility.

In a distributed system, server nodes deploy and execute microservice applications as separate processes—communicating with each other using communication protocols such as HTTP or via message brokers like RabbitMQ.
Essentially, this architectural approach enables the services to maintain their independence from one another while effectively operating within the software system.
In this tutorial, we'll guide you through implementing a simple user microservice that manages user data using Flask and PostgreSQL
Set Up a PostgreSQL Database
To get started, install PostgreSQL. If you don't have PostgreSQL installed, you can find out how to install PostgreSQL on Windows or how to install PostgreSQL on macOS.
Alternatively, you can configure a remote PostgreSQL database instance.
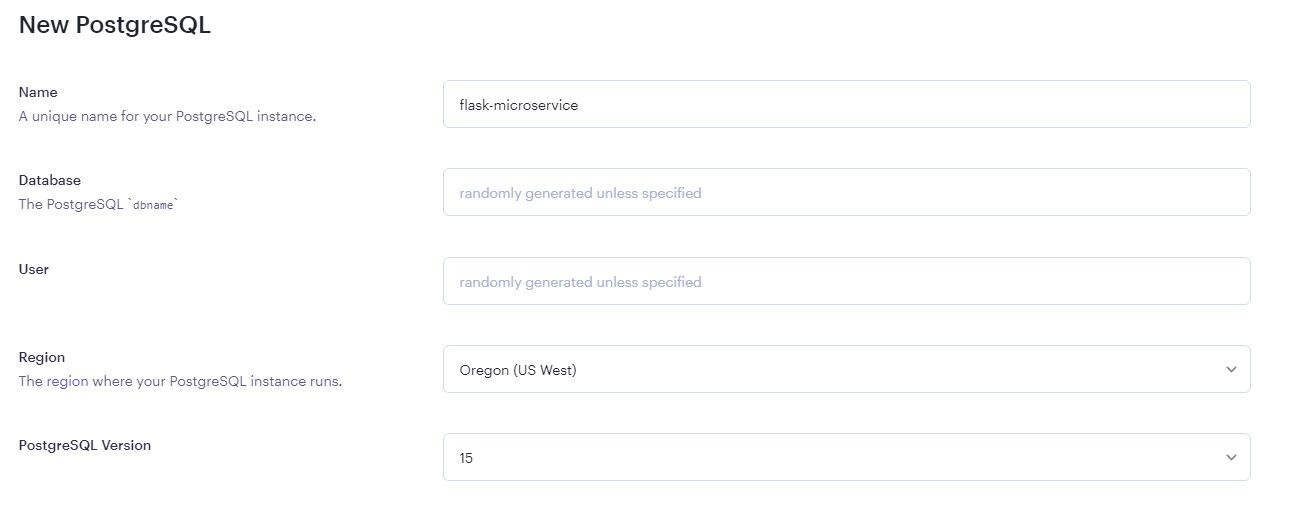
This guide will use Render's free tier to set up a PostgreSQL database. Follow these to spin up a PostgreSQL database instance on Render:
-
Head over to Render's website, sign up for an account, and log in to your dashboard page.
-
On your dashboard page, from the list of services displayed, select the PostgreSQL service.
-
On the database settings page, fill in the required details and make sure to select the free tier, and finally click Create database.


You can find this project's code in this GitHub repository.
Create a Flask Microservice
-
In your terminal, make a new directory and change into it:
        mkdir flask-microservice
cd flask-microservice -
Next, install virtualenv, to create an isolated virtual development environment.
pip install virtualenv -
Create a virtual environment in your project:
virtualenv venv -
Finally, activate the virtual environment.
        # Windows:
.\venv\Scripts\activate
# Unix or MacOS:
source venv/bin/activate
Install the Required Packages
-
Create a new requirements.txt file in the root directory and add these packages:
        flask
psycopg2-binary
sqlalchemy -
Next, install the packages.
pip install -r requirements.txt
Create a Flask Server
In the root directory, create a new file: service.py, and the following code:
-
Make the following imports:
        from flask import Flask, request, jsonify
from sqlalchemy import create_engine, Column, Integer, String
from sqlalchemy.orm import sessionmaker
from sqlalchemy.ext.declarative import declarative_base
import psycopg2 -
Create the Flask instance and configure the database connection.
        app = Flask(__name__)

engine = create_engine("postgresql+psycopg2://flask_service_fe0v_user:4785MhjfkdjfhjfjyUx67O2Nuzjchb2MQIP@dpg-chffjfjdkgfk54d6mb7860-a.oregon-postgres.render.com/flask_service_fe0v") -
Create an SQLAlchemy model for the database.
        Base = declarative_base()
class User(Base):
    __tablename__ = 'users'
    id = Column(Integer, primary_key=True)
    name = Column(String(50))
Base.metadata.create_all(engine)
print("Table 'users' created successfully.")
Session = sessionmaker(engine) -
Lastly, define the API routes for the microservice.
        @app.route("/api/user", methods=["POST"])
def create_user():
    data = request.get_json()
    name = data["name"]
    try:
        session = Session()
        new_user = User(name=name)
        session.add(new_user)
        session.commit()
        return {"id": new_user.id, "name": new_user.name, "message": f"User {name} created."}, 201
    except Exception as e:
        print(f"The error '{e}' occurred.")
        return {"error": "An error occurred while creating the user."}, 500
@app.route("/api/user", methods=["GET"])
def get_all_users():
    try:
        session = Session()
        users = session.query(User).all()
        if users:
            result = []
            for user in users:
                result.append({"id": user.id, "name": user.name})
            return jsonify(result)
        else:
            return jsonify({"error": f"Users not found."}), 404
    except Exception as e:
        print(f"The error '{e}' occurred.")
        return {"error": "An error occurred while getting all users."}, 500
if __name__ == "__main__":
    app.run(debug=True, host="0.0.0.0")
Test the Microservice
The above code demonstrates a simple user data microservice that adds and fetches data from a PostgreSQL database. Ideally, microservices mirror the REST API architecture since it allows for a flexible approach to building web services—this architecture fits well with the design pattern of microservices.
However, it's important to note that microservices can use other types of design approaches and communication protocols as well, depending on the specific needs of the system.
To test the service, spin up the development server and head over to Postman to make HTTP requests to the defined endpoints.
flask --app service run
In Postman, make a POST request to add user data.

Containerizing Microservices With Docker
Docker bundles applications and their dependencies in containers. This approach streamlines the development, deployment, and management of microservices in a production environment since each service can operate independently and communicate with other services using the configured communication protocol.
Before you get started, you need to first install Docker by following the steps on the Docker website. Then, build a Docker image from a Dockerfile that contains the necessary instructions for setting up the required dependencies to run the application in a container.
-
Create a Dockerfile in your project folder's root directory and add these instructions:
        FROM python:3.9-alpine
WORKDIR /app
COPY requirements.txt ./
RUN pip install -r requirements.txt
COPY . .
EXPOSE 5000
CMD ["python", "./service.py"] -
Run, the command below to build the Docker image.
docker build -t flask-microservice . -
Finally, run the Docker container.
docker run -p 5000:5000 flask-microservice
This will start a Docker container running the Flask microservice and expose port 5000 on the container to port 8000 on the host machine, allowing you to make HTTP requests from your web browser or Postman using the URL http://localhost:5000.
Adopting the Microservice Architecture
Microservices architecture has become a popular approach for developing scalable and robust software applications. By dividing the application into small, independently deployable services, microservices architecture makes it easier to maintain and scale the system.
While this architecture has potential benefits, it's not suitable not for all use cases. In any case, the specific business requirements of the project should primarily influence the adopted design approach.