There are over a billion websites on the internet. To ensure users’ accounts are safe, many web applications—from online banking to social media—require a login page.
Learn how to create a simple login page using the Tkinter module and familiarize yourself with the basic concepts of building GUI apps in Python.
The Tkinter Module
You can use Tkinter to build a login page that accepts and validates a username and password. Tkinter offers a variety of widgets like buttons, labels, and text boxes that make it easy to develop apps. Some applications you can develop using Tkinter include a To-Do Application, Music Player, a Pomodoro Timer App, and a Word Jumble game.
To install Tkinter, open a terminal and run:
pip install tkinter
How to Build a Login Page Using Python
You can find the source code for creating a login page using Python in this GitHub repository.
Import the required libraries and initialize the root window. Set the title and the size of the window. Using the configure() function, set the background color.
        import tkinter
from tkinter import messagebox
window = tkinter.Tk()
window.title("Login Page using Python")
window.geometry('750x550')
window.configure(bg='#8F00FF')
Define a function, login() which will make the key decision based on the user’s credentials. This simple demo hardcodes the valid credentials; a real app would probably fetch them from a database.
Store the credentials and use the get() method of each Entry widget to retrieve the data that the user entered. According to the data validation, display a message box with the appropriate title and message.
        def login():
    username = "makeuseof"
    password = "muo"

    if username_entry.get()==username and password_entry.get()==password:
        messagebox.showinfo(title="Login Successful!", message="You successfully logged in.")
    else:
        messagebox.showerror(title="Error", message="Invalid login.")
Define a Tkinter frame to act as a parent and give it a background color.
frame = tkinter.Frame(bg='#8F00FF')
Define three labels for login, username, and password. Pass the parent window you want to place the labels in, the text it should display, the background color, the font color, and the font style it should have.
        login_label = tkinter.Label(frame, text="Login Page Using Python", bg='#000000', fg="#DC143C", font=("Arial", 30))
username_label = tkinter.Label(frame, text="Username", bg='#8F00FF', fg="#FFFFFF", font=("Arial", 16, 'bold'))
password_label = tkinter.Label(frame, text="Password", bg='#8F00FF', fg="#FFFFFF", font=("Arial", 16, 'bold'))
Define two entry widgets to get the data from the user. Set the parent window you want to place it in along with the font styles. Use the show attribute as an asterisk to conceal the password the user types on the screen.
        username_entry = tkinter.Entry(frame, font=("Arial", 16))
password_entry = tkinter.Entry(frame, show="*", font=("Arial", 16))
Define a button for login that accepts the parent window as the frame you defined earlier, the text it should display, the background color, the font color, font style, and the command it should execute when clicked.
login_button = tkinter.Button(frame, text="Login", bg="#DC143C", fg="#FFFFFF", font=("Arial", 16), command=login)
Use the grid manager to place the three labels, two entries, and a login button in an organized tabular format. The login label will act as a header and occupy both columns. The sticky option specifies which edge of the cell the widget should stick to. On passing it as news (north-east-west-south), the program centers the text in both the horizontal and the vertical direction.
Place the labels on the left side, one below the other, and follow the same for the entry widgets on the right side. Similar to the header, place the login button occupying both columns. Give appropriate padding in the y-direction to all the widgets.
        login_label.grid(row=0, column=0, columnspan=2, sticky="news", pady=40)
username_label.grid(row=1, column=0)
username_entry.grid(row=1, column=1, pady=20)
password_label.grid(row=2, column=0)
password_entry.grid(row=2, column=1, pady=20)
login_button.grid(row=3, column=0, columnspan=2, pady=30)
Use the pack() to organize all the widgets in blocks and run the Tkinter event loop and listen for events until you close the window.
        frame.pack()
window.mainloop()
Put all the code together and your login page is ready for use.
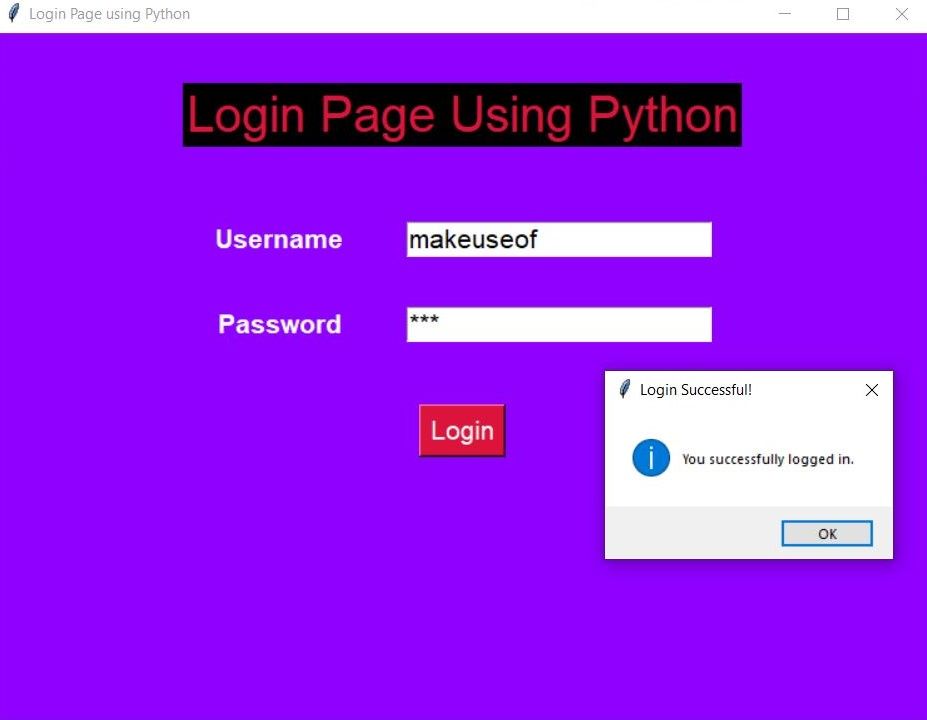
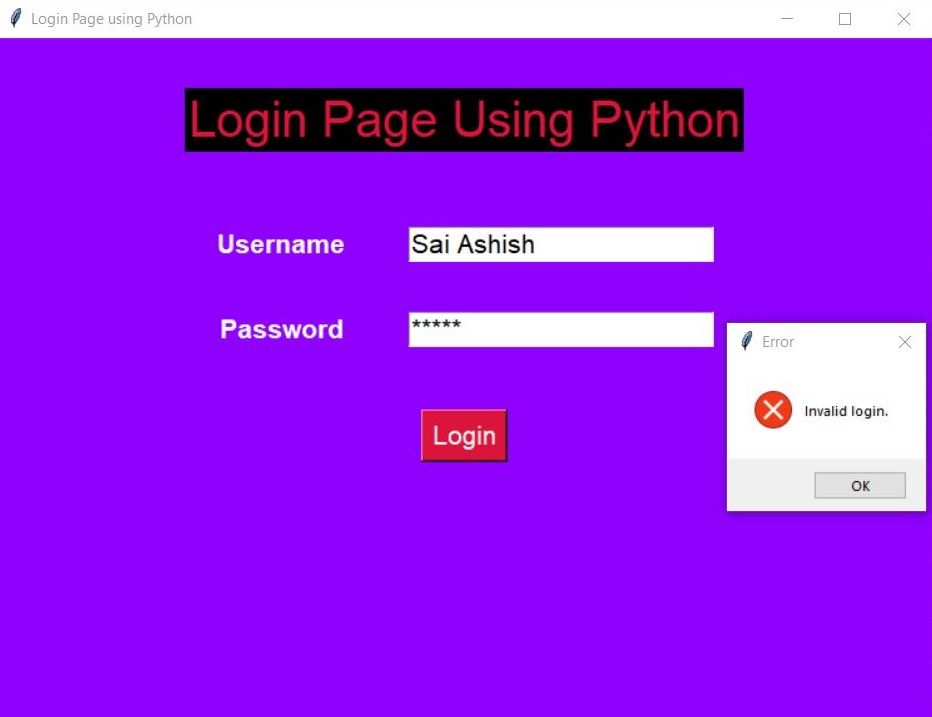
Sample Output of the Login Page App
On running the program and entering the valid credentials, the program displays a message box that the user can log in successfully.
On running the program with any other credential, the message box displays an error regarding the login as an invalid one.
Enhancing a Python Login Page
You can use a database such as MySql to fetch the records and validate it against the user credentials. The mysql.connector library helps you establish a connection between your Python Tkinter application and MySql database.
For enhanced UI, you can explore the customtkinter module. It is purely built on the Tkinter module and helps you to create modern fully customizable widgets that are not available as a part of the standard Tkinter library. Combining these two libraries, will amplify your GUI programming skills and set as a stepping stone in creating more sophisticated applications.


