https://static0.makeuseofimages.com/wordpress/wp-content/uploads/2023/01/license-plate-detection-featured-image.jpegLicense plate detection and recognition technology has many applications. It can be used in road systems, ticketless parking lots, vehicle access control residences, and more. This technology combines computer vision and Artificial Intelligence.You will use Python to create a license plate detection and recognition program. The program will take the input image, process it to detect and recognize the license plate, and finally display the characters of the license plate as the output.
Setting Up the Python Environment
To comfortably follow through with this tutorial, you need to be familiar with Python basics. This starts with setting up the program's environment.
Before you begin coding, you need to install some libraries in your environment. Open any Python IDE and create a Python file. Run each command on the terminal to install the respective library. You should have a prior installation of Python PIP on your computer.
-
OpenCV-Python: You will use this library for preprocessing the input image and displaying various output images.
pip install OpenCV-Python -
imutils: You will use this library to crop the original input image to a desired width.
pip install imutils -
pytesseract: You will use this library to extract the characters of the license plate and convert them into strings.
pip install pytesseract
What Tesseract OCR Is and How to Install It on Your Computer
Tesseract OCR is an engine that can recognize a language's characters. You should install it on your computer before using the pytesseract library. To do so:
- Open any Chrome-based browser
- Download the Tesseract OCR setup
- Run the setup and install it like any other program
Having prepared the environment and installed tesseract OCR, you are ready to code the program.
1. Importing the Libraries
Begin by importing the libraries you installed in the environment. Importing the libraries allows you to call and use their functions in the project.
        import cv2
import imutils
import pytesseract
You need to import the OpenCV-Python library as cv2. Import the other libraries using the same names you used to install them.
2. Taking the Input
Then point pytesseract to the location where the Tesseract engine is installed. Take the car image as the input using the cv2.imread function. Replace the image name with the name of the image you are using. Store the image in the same folder as your project to keep things easy.
        pytesseract.pytesseract.tesseract_cmd = 'C:\\Program Files\\Tesseract-OCR\\tesseract.exe'
original_image = cv2.imread('image3.jpeg')
You can replace the following input image with the one you would like to use.
3. Preprocessing the Input
Resize the image width to 500 pixels. Then convert the image to grayscale as the canny edge detection function only works with grayscale images. Finally, call the bilateralFilter function to reduce the noise in the image.
        original_image  = imutils.resize(original_image, width=500 )
gray_image = cv2.cvtColor(original_image, cv2.COLOR_BGR2GRAY)
gray_image = cv2.bilateralFilter(gray_image, 11, 17, 17)
4. Detecting the License Plate on the Input
Detecting the license plate is the process of determining the part on the car that has the characters of the license plate.
Performing Edge Detection
Begin by calling the cv2.Canny function which will automatically detect the edges on the preprocessed image.
edged_image = cv2.Canny(gray_image, 30, 200)
It is from these edges that we will find the contours.
Finding the Contours
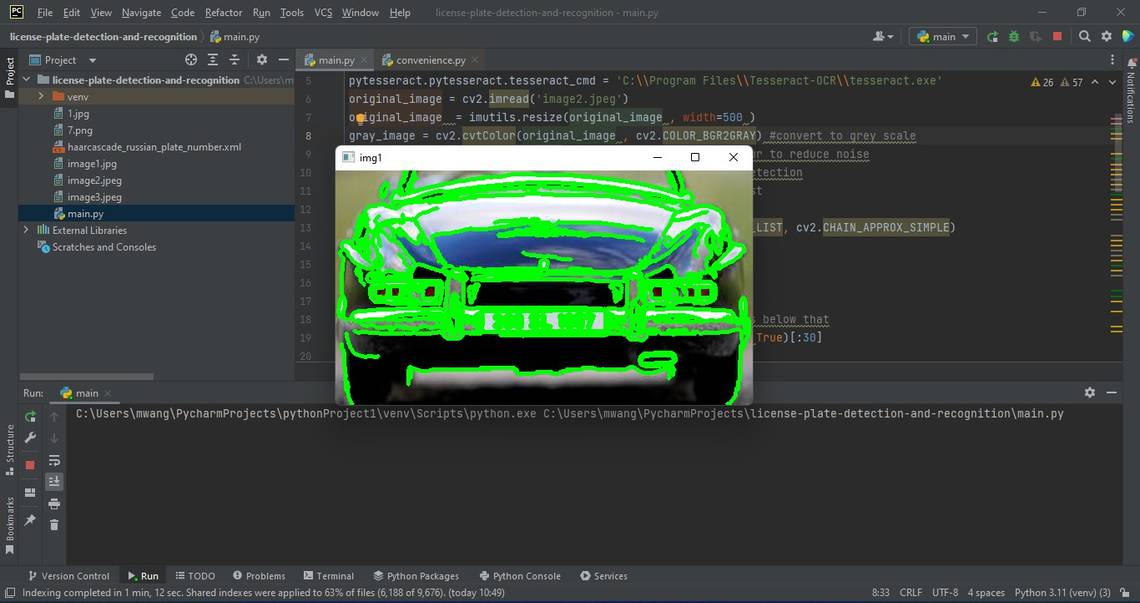
Call the cv2.findContours function and pass a copy of the edged image. This function will detect the contours. Draw around the detected contours on the original image using the cv2.drawContours function. Finally, output the original image with all the visible contours drawn.
        contours, new = cv2.findContours(edged_image.copy(), cv2.RETR_LIST, cv2.CHAIN_APPROX_SIMPLE)
img1 = original_image.copy()
cv2.drawContours(img1, contours, -1, (0, 255, 0), 3)
cv2.imshow("img1", img1)
The program draws all the contours that it finds on the car image distinctively.

After finding the contours you need to sort them to identify the best candidates.
Sorting the Contours
Sort the contours based on minimum area 30. Ignore the ones below that as they are less likely to be the license plate contour. Make a copy of the original image and draw the top 30 contours on the image. Finally, display the image.
        contours = sorted(contours, key = cv2.contourArea, reverse = True)[:30]

# stores the license plate contour
screenCnt = None
img2 = original_image.copy()

# draws top 30 contours
cv2.drawContours(img2, contours, -1, (0, 255, 0), 3)
cv2.imshow("img2", img2)
There are now fewer contours than there were at the beginning. The only contours drawn are the ones approximated to contain the license plate.
Finally, you need to loop over the sorted contours and determine which one is the number plate.
Looping Over the Top 30 Contours
Create a for loop to loop over the contours. Look for the contour with four corners, and determine its perimeter and coordinates. Store the image of the contour containing the license plate. Finally, draw the license plate contour on the original image and display it.
        count = 0
idx = 7

for c in contours:
    # approximate the license plate contour
    contour_perimeter = cv2.arcLength(c, True)
    approx = cv2.approxPolyDP(c, 0.018 * contour_perimeter, True)

    # Look for contours with 4 corners
    if len(approx) == 4:
        screenCnt = approx

        # find the coordinates of the license plate contour
        x, y, w, h = cv2.boundingRect(c)
        new_img = original_image [ y: y + h, x: x + w]

        # stores the new image
        cv2.imwrite('./'+str(idx)+'.png',new_img)
        idx += 1
        break

# draws the license plate contour on original image
cv2.drawContours(original_image , [screenCnt], -1, (0, 255, 0), 3)
cv2.imshow("detected license plate", original_image )
After looping, your program has identified the contour containing the license plate. It draws on the license plate contour only.

5. Recognizing the Detected License Plate
Recognizing the number plate means reading the characters on the cropped image of the license plate. Load the license plate image you previously stored and display it. Then, call the pytesseract.image_to_string function and pass the cropped license plate image. This function converts the characters in the image to a string.
        # filename of the cropped license plate image
cropped_License_Plate = './7.png'
cv2.imshow("cropped license plate", cv2.imread(cropped_License_Plate))

# converts the license plate characters to string
text = pytesseract.image_to_string(cropped_License_Plate, lang='eng')
The cropped license plate is shown below. The characters on it will be the output you will later print on the screen.
Having detected and recognized the license plate, you are ready to display the output.
6. Displaying the Output
This is the final step. You print the extracted text to the screen. This text contains the characters of the license plate.
        print("License plate is:", text)
cv2.waitKey(0)
cv2.destroyAllWindows()
The expected output of the program should be similar to the image below:

The license plate text can be seen on the terminal.
Sharpen Your Python Skills
Detecting and recognizing car license plates in Python is an interesting project to work on. It is challenging, so it should help you to learn more about Python.
When it comes to programming, practice is core to the mastery of a language. To practice your skills, you need to work on interesting projects.