If you love paper crafting but don’t love the cost, time, or effort that comes with it, you’ll be excited to know you can create the same effects with Procreate. The result looks authentic and is forgiving if you make any mistakes. Follow along to see how easy it is to create paper cut-out effects using Procreate.
1. Draw the Scene

Pre-drawing your intended scene will help you visualize how the layers will take effect. While you could do this by drawing each layer as you go, it makes it easier to know what your drawing is going to look like from the start.
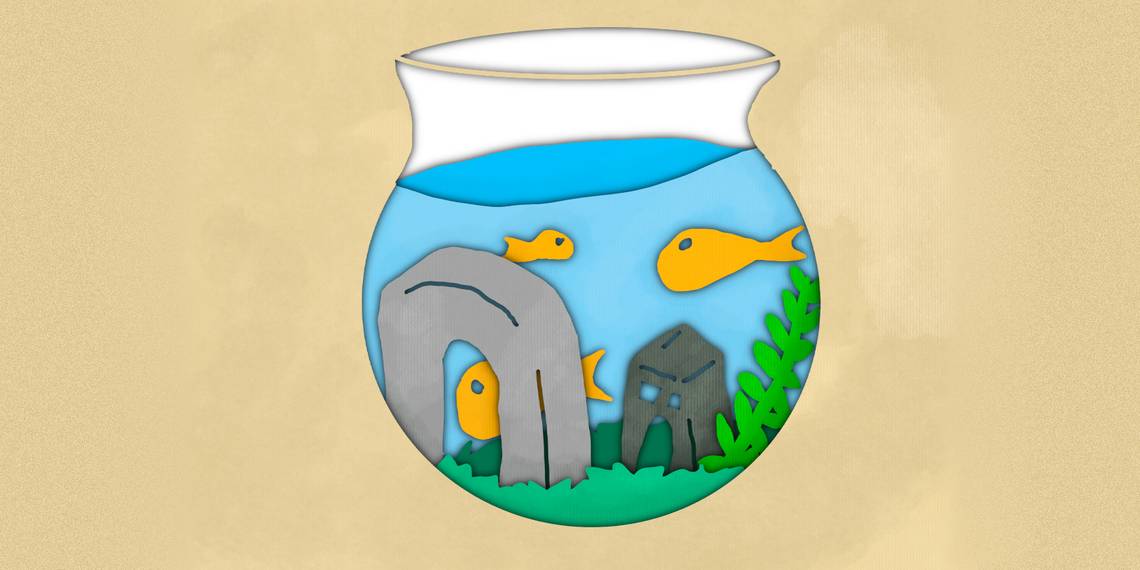
For this tutorial, we’re going to create a fish tank. We’ll have layers of stones, plants, fish, arches, castles, and finally, the water itself. The top layer will denote the shape of the tank, giving us a great frame to build upon. You can follow along or draw your own scene following the same technique.
The great thing about digital paper layering is that you don’t need all the layers to connect to the frame. In traditional papercut art, the paper cannot float in midair, so all elements need to attach to the frame.
If you want to keep that traditional vibe, you can draw every element touching the edge of the frame, but don’t feel like you must. The point of doing this digitally is that you’re not restricted by paper. Once you’ve got a sketch of your scene, you can begin to add your paper layers.
2. Draw the Frame
To create the first layer of your papercut illustration, you need a frame to display the rest of the image in. You can use a rectangular frame around the inner edge of your canvas, a circular frame for a traditional effect, or your frame can include part of the illustration aspects. For example, a forest scene may use the edge of trees as part of the frame.
For this tutorial, the frame will be shaped like a fish tank. Since fish tanks are made of glass, and are clear, this makes a great frame reference. You could also draw a window or simply empty space as you’re looking into a landscape.
Go to Layers > + to add a new layer and then tap the Color Picker to choose a color. Check out our guide to creating a Procreate color palette or our further guide on how you can use the Procreate color picker.

Then go to Brushes > Calligraphy > Monoline or use any other simple Procreate brush. Draw the outline of your frame. Ensure that it is a closed loop with no gaps. Try to keep the lines as steady and clean as possible.
When drawing a line—straight or curved—in Procreate, hold the screen with your finger while your Apple Pencil is at the end of the line. This will straighten any straight lines and make perfect curves of any curved lines. This works for drawing circles, too.
Once you've drawn the outline of your frame, drag from the color swatch to the outer background of your frame layer to add color to the background. You should be left with an empty frame shape in the middle and a singular background color around the outside of your outline.
The empty space in the middle will become your layered artwork. If you have a sketch of your intended art underneath, you'll see the sketch through the gap in your frame.

If you run into any issues with Procreate while creating this art piece, check out our list of common Procreate problems and how to solve them. We also have some tips to fix your Apple Pencil if it glitches in Procreate.
3. Add Paper Layers

Go to Layers > + to add a new layer. Then tap and hold the new layer to drag it underneath the frame layer. You’re going to draw whichever layer is closest to the viewer in the scene. In the fish tank scene, this is going to be the stones along the bottom of the tank.

Tap the Color Picker to choose your color. Then continuing with the Monoline brush, draw an outline around the closest object in your drawing. Make sure that you close the loop by continuing your line underneath the frame and back around. Anything under the frame in the image won’t be seen, so it doesn’t matter if it’s messy behind the frame layer.
You can temporarily uncheck the frame layer in the Layers section to see your next drawing properly.
Drag your color from the color swatch to the inside of the outline. If you have any gaps, use the brush to color them in and make a solid piece.

Continue this with all your layers. Make sure each element is on a new layer and drag each layer to the bottom of the Layers panel as you get further back in the paper layers. If you hid any layers while coloring or drawing, recheck the checkboxes, so they’re all visible.
Once you’ve finished, you shouldn’t be able to see your sketch layer anymore. Swipe the sketch layer to the left with one finger and tap Delete or uncheck it on Layers.
4. Create Shadows
Think about traditional paper-layered artwork; sometimes they’re placed in boxes, which creates shadows. Those shadows highlight the layers between each sheet of paper. Let’s replicate that in your digital drawing. First, tap the Color Picker and set the color to black.
To get absolute black—and this works for white, too—is to double-tap somewhere near the black—or white—area of the color spectrum. It will default to the absolute black—or white—to save you trying, and failing, to find it yourself.
Tap the top layer in the Layers panel—your frame layer. Swipe the layer to the left with one finger and tap Duplicate. Tap the bottom of those two layers. Using two fingers, swipe the layer to the right to apply Alpha Lock. The thumbnail will show a transparent background.

Tap the layer and choose Fill Layer. This fills the Alpha-Locked layer with the current color swatch. Then using two fingers, swipe the layer to the right again to remove Alpha Lock, otherwise the shadow won't apply.

To add the shadow effect, we’re going to add a Gaussian Blur to this new black layer. Go to Adjustments > Gaussian Blur.

Hold the screen with your finger or Apple Pencil and slowly drag to the right. You’ll see the Gaussian Blur progress line with a percentage at the top of the window. Keep dragging until you’re happy with the amount; we recommend 7%.

Repeat this process with all layers in your illustration. By the end, you should have double the amount of layers; each colored layer has a paired black layer with the blur applied.
If you want to take it a step further, you could easily animate your papercut artwork. Read our guide on how to animate in Procreate.
5. Add Paper Texture

To give your digital illustration a faux-paper effect, use a textured brush to add a paper-like texture to your layers. We recommend Tarkine in the Textures set.
Choose the layer you wish to work on and add Alpha Lock. Use the Eyedropper to select the layer’s color. Then go to the Color Picker and choose a hue slighty darker. Turn the Opacity down a little and use a small size brush.
With the darker color, draw your textured brush along the edges of where the shadow hits your layer. For example, on the stones layer, draw a dark texture around the bottom rim of the frame. Then go back to the Color Picker and choose a lighter shade of the original color. Paint the lighter texture over the rest of the layer, where the light would catch if it were paper.

Once you're happy with your work, don't forget to add your artist signature to your Procreate masterpiece.
Create Digital Papercut Art in Procreate
Once you’ve mastered this digital paper cut-out technique, you can create crafts without spending money on all the extra crafting materials. This eco-friendly art style captures the traditional essence of paper crafts. It’s a simple process, but it produces some impressive results.
Experiment with different frame shapes, scenes, and textures to see what more you can do.