Phrozen Sonic Mighty 4K


The Phrozen Sonic Mighty 4K offers a user-friendly, large format resin 3D printer for the masses that delivers on quality and speed. It comes with some budget concessions to keep it competitively priced; this won't appeal to all users. But if you're ready for bigger, high-resolution prints and can commit to the price point then it's a great printer for all skill levels.
- 4K Print Resolution
- Printing Area of 9.3"
- 22 cm Z-axis
- Brand : Phrozen
- XY Resolution: 52µm / 4K (3840 x 2160 px)
- Build area: L20 x W12.5 x H22 cm
- Light Source: 405nm ParaLED Matrix 2.0
- Layer Thickness: 0.01-0.30mm
- Printer Size: L8.56 x W8.56 x H17.32 inches (L28 x W28 x H44 cm)
- Impression resolution for large prints (52µm)
- 9.3" 4K Monochrome LCD build plate
- Large build plate
- User-friendly for all skill levels
- Customization options
- No network connectivity (only USB)
- Small touch panel (2.8"), the same as Sonic Mini 4K
- Plastic resin vat won't appeal to everyone
- 8.66" short Z-axis
The Phrozen Sonic Mighty 4K's name invokes a sense of grandeur; it does so for good reason. The Sonic Mighty 4K delivers large, high-resolution prints at speed, with its 9.3" monochrome LCD. If you're already impressed with the quality of resin printing but want to go larger, let's look at why the Mighty is great at realizing those ambitions.
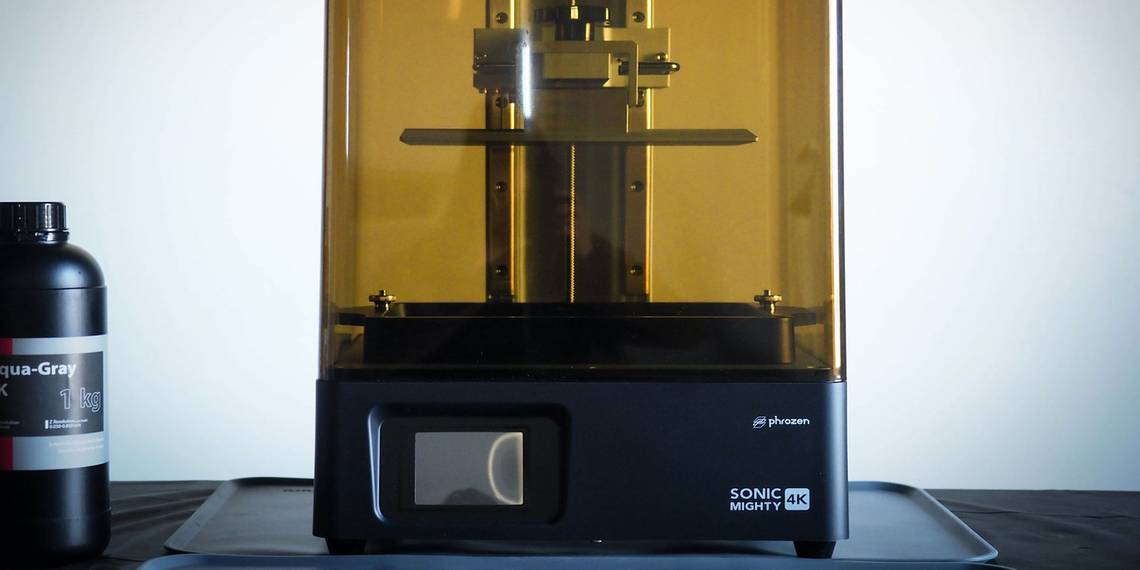
Phrozen Sonic Mighty 4K Design
It's an oversimplification to think of the Mighty 4K as a larger-sized version of the Phrozen Sonic Mini 4K. However, the Mighty 4K does follow the design aesthetic and layout.
For starters, the Sonic Mighty 4K shares the same 2.8" touch panel as the Mini 4K on the front of the unit. Given the increased printer size, it could easily house more; the touch panel still works responsively. This is the first notable cost-cutting decision by Phrozen that balances out its other offerings.

As found on the Mini 4K, the Sonic Mighty 4K utilizes only a USB-A port on its side panel. With resin printers, USB connectivity is the reliable standard, so this one doesn't come as a surprise. However, those after networking compatibility will need to look elsewhere.
On the very back panel, the Mighty 4K houses its power button and fan. While it takes a bit more reach to power on/off the device, the placement of the touch panel and USB already guides your hand in that direction.
Overall, veterans of the Mini 4K will feel right at home using the Mighty 4K. For new users, Phrozen's simple layout makes it easy to use out of the box.
Sonic Mighty 4K Technical Specifications
To achieve those epic high-resolution prints, Phrozen makes good use of its technology while offering a size-up to crucial aspects of the machine.

The Sonic Mighty 4K utilizes the same 405nm ParaLED Matrix 2.0 light source of the Sonic Mini 4K. However, it comes with an unrivaled 9.3" monochrome LCD ready to deliver on its 3840 x 2160 pixels. Together the two can print and cure layers remarkably fast.
The Mighty 4K, however, comes in at 52µm resolution. While a technical downside, it isn't much of a departure from the 50µm of the Mighty's other large-format rivals. So while it's a quality difference, it's not plainly distinguishable to the eye.

From a size perspective, the Mighty 4K also boasts an impressive 7.87 x 4.92 x 8.66 inches build volume. While the X and Y-axis size puts it a notch above its rivals, its Z-axis isn't as ample
So while the Mighty 4K loses a little height, it isn't the end-all for the device. Due to the nature of weight distribution on the build plate and how larger models can benefit from angling, the extra 9.3" print area seems even more valuable. However, the 8.66-inch Z-axis is plenty of height to experiment with.
Setting Up the Phrozen Sonic Mighty 4K

Before starting with the Mighty 4K, you'll want to perform both the LCD test and the Z-calibration. With both tests, Phrozen does a good job of providing on-screen prompts to guide you along your way. The Z-calibration is especially important since if done improperly it can lead to many failed prints.
For those unfamiliar, you'll remove the vat (secured by two thumbscrews), loosen the four hex bolts, and place a piece of paper upon the LCD screen. Afterward, you can power on the Mighty 4K to use the Z-calibration option under tools. The build plate will descend, and you'll wait until the on-screen directions tell you to tighten the hex bolts anew.
If the paper remains tight on all sides, then you'll have succeeded. If not, it can help to only lightly loosen the bolts and tighten them in a cross-directional pattern while pressing down firmly on the build plate. Another pair of hands can help immensely.
In some cases, you'll need to repeat the process more than once since there's a certain degree of feel to the process. The handles above the four hex bolts can obstruct as well.
Slicer Software and Settings

When it comes to exporting your models for printing, the Mighty 4K doesn't deviate much from the norm. It works well with ChiTuBox software, and Phrozen also provides a copy of the software on the included USB drive. You can load the Mighty 4K and all of its supported resin profiles, so you can tweak your settings before slicing and printing.
For those that aren't a fan of the ChiTuBox software, Lychee Slicer also works as a viable alternative for your files. Overall, the basic process remains the same for either slicer. Load in a model, set up its placement, and check supports and/or rafts (whether adding manually or using a presupported model) to make sure it prints safely in full.
Afterward, you'll slice, save your file, and move it to your USB for printing. While this largely summarizes the process, it's important to note the emphasis on different settings. The defaults for the Mighty 4K work well for much smaller to medium prints; you'll want to tweak those as you begin to work larger.
Familiarizing yourself with the setting terminology is an essential part of learning resin printing, and some less talked about settings such as lift distance become more crucial when dealing with larger prints.
The Sonic Mighty 4K Vat and Printing Process

Another budget decision with the Mighty 4K was the choice of a plastic resin vat. While Phrozen offers an aluminum resin vat for the Mighty 4K, it's a separate purchase entirely. With plastic vats, longevity is a concern and durability, but it can prove difficult to test these in a standard review period.
However, I can note that I experienced no actual issues with the plastic vat while testing. During my initial prints, I tested the pour spout, cleaned it thoroughly each time, and placed it on and off the Mighty 4K several times.
As a measure to keep the Phrozen competitively priced against other large resin printers, I didn't feel like it detracted from the functionality. However, I do appreciate that the option to upgrade the vat to an aluminum one exists.

With the Phrozen OS, it's very easy to select your sliced files, start a print, and come back hours later to see the results. To test this process, I tried an assortment of different model sizes from Bestiarum Miniatures.
As Bestiarum Miniatures already uses Phrozen products and offers highly detailed presupported models, they worked great with the 4K aqua grey resin that Phrozen sent for testing. If you'd like to try printing any of their models, you can check out their Patreon or their MyMiniFactory.

During the printing process, I kept the room well-ventilated. The aqua grey 4K resin does only produce a low odor, but you'll still want to use gloves and be wary of any fumes.
Once finished, the large build-plate and handles do make it very easy to transfer your prints for post-processing. Adhesion was never a real issue despite the included sandpaper that came with the printer. However, you'll want to make sure you're getting a proper exposure time for all layers.
Is The Sonic Mighty 4K Best for Budget-Friendly Prints?

With the Phrozen Sonic Mighty 4K there's a fine balance between competitive pricing and budget pricing with the printer. With larger format printers, shipping costs, tariffs, and availability are constant considerations for the consumer. And Phrozen does a good job at trying to slash its costs without cutting quality.
While I wouldn't recommend the Mighty 4K to an absolute beginner due to its price point, it's great for those looking to upgrade. If you're really after large-scale ambitious builds, the Mighty 4K comes at an enticing price for what it offers.
Repairs and Customization for the Mighty 4K
Since 3D printers ultimately have consumable parts, it's important to know when and what needs to be replaced. While Phrozen does have a section for parts on its official store, not all parts for the Might 4K are available yet.
The first replacement you'll need is a new FEP film, typically after around 50 prints. A new one costs around $20m and can usually be purchased from a more local retailer instead.
The LCD screen is rated for 2000 hours. So if your prints take 10 hours on average, this will need to be replaced after 200 prints, though in reality it will likely last longer. We expect a replacement screen of this size and resolution to cost around $300.

Compared to other technology where it's less certain if you can exchange a part when the time comes, this shouldn't be an issue with the Mighty 4K. If you're having difficulty, Phrozen also offers detailed instructions for most questions and also stays active on all of their social platforms.
Should You Buy The Phrozen Sonic Mighty 4K?
If you're looking to size-up and steadily produce bigger prints, the Phrozen Sonic Mighty 4K will reward the ambitious. For those on a time crunch, you can also utilize the build plate and impressive print times to bulk print faster.
Its price point and some design decisions may not make it for everyone. For many, however, it's a great 3D printer to add to your collection.