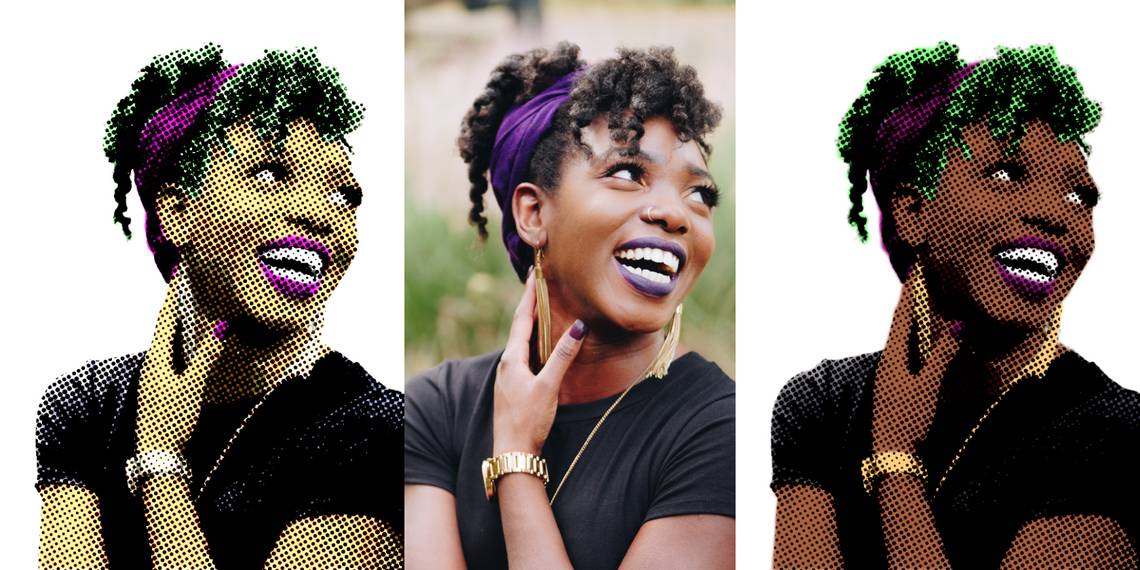
Pop art is an iconic art style that transports us back in time. All hail the pop art hero, Andy Warhol, and a shoutout to Roy Lichtenstein too. Today, you can make yourself look like the muses of their work, with halftone, abstract colors, and bold lines and shadows. Caroontify your portraits with this fun pop art style in only 10 steps in Photoshop.
Step 1: Open Your Image
You can use a color photo or one that is already black and white. Since part of this process involves coloring the image yourself, don’t worry about existing colors. Typical pop art style focuses on singular portraits, but in your recreation in Photoshop, use any image you like.

If you want to follow along with our example, download this photo by Eye for Ebony for free on Unsplash.
Step 2: Convert to Smart Object, Crop, and Resize
To work non-destructively, we’re going to convert our image to a smart object. This means everything is easily reversible without affecting the quality of the original image.
Select the image layer in the Layers panel, right-click on it, and choose Convert to Smart Object.
Before we crack on with making a pop art masterpiece, it’s best to check the size of your image. Since we’ll be using filters, a larger image won’t be as effective. If you want to crop your image, do that first using the Crop tool (C).

To resize, go to Image > Image Size and set the Resolution to 72. If your image is landscape, set the width to 1200. If your image is in portrait orientation, set the height to somewhere between 870 - 1200. Once resized, select OK. Press Ctrl + 0 (Windows) or Cmd + 0 (Mac) to fit your image to the canvas.
Step 3: Select Your Subject
There are different ways to select your subject, and it largely depends on what your subject is. For portraits, we can use the Subject Select tool.

Select any selection tool from the toolbar, like the Magic Wand tool (W). Then choose Select Subject in the upper settings bar. If you don’t see this option, go to Select > Subject. The selection shows marching ants around your subject, but it may need refining. Click the arrow next to Select Subject to choose between the Adobe Cloud or Device selection.
If your image has stray hairs or low-contrast color differences between the subject and background, you may have to refine the selection. Photoshop has made it easier to preserve hair selections.

Select the Lasso tool (L). In the upper settings bar, choose Add to Selection or Subtract from Selection, then draw over the areas you need to add or remove until you’re satisfied.

On the Layers panel, with your subject layer selected, choose Add layer mask at the bottom of the panel. This masks your subject so you can work non-destructively. Right-click the image layer and choose Duplicate Layer. Do this twice, so you have a total of three.
Rename the layers by double-clicking the titles, then click the eye icon on the top and bottom duplicates to hide them, so you can only view the middle layer.
Step 4: Add a White Background Layer
Select the bottom layer, then hold Ctrl (Windows) or Cmd (Mac) while selecting Create a New Layer on the Layers panel. A new transparent layer will open under the selected layer. Select the transparent layer.
In the toolbar, double-click the Foreground swatch to open the color picker. Type FFFFFF into the hex code box, and click OK. Then use the Fill tool (G) to fill the new layer with white. Now it looks like your subject has a plain white background.
Step 5: Make the Image Black and White
If you used a full-color image, now is the time to make it black and white. If you already used a black and white image, skip to step 6.

Select your image’s thumbnail in the Layers panel, then select Create new fill or adjustment layer > Black & White.
Step 6: Combine the Layers as a Smart Object
To ensure all effects are applied correctly, some layers need to be combined into one smart object. We’ve already made the individual subject photo a smart object, but now that we’ve added an adjustment layer, we need to do it again.

Select your main image layer and the Black & White adjustment layer by holding Shift while selecting each one. Right-click either of the layers and select Convert to Smart Object. Now those layers will merge into one smart object layer.
Step 7: Add a Color Halftone Filter

This is the step that turns your portrait into a pop art piece: adding halftone. Go to Filter > Pixelate > Color Halftone. Set the Max Radius to 6 and set each of the Channels to 60. Click OK.

There’s no preview option for this filter, so if you’re unhappy with it, you’ll need to undo it and go back to the filter to toggle the settings.
Step 8: Brighten Your Image With Levels

On the Layers panel, click Create new fill or adjustment layer > Levels. Set the light end of the Levels spectrum to 100. This will brighten your image, but you can change the levels to your own preference.
Select the main image layer on the Layers panel, and choose Linear Burn in the Blend Modes dropdown.
Step 9: Change the Exposure
Remember those hidden layers? Click the eye icon on the top layer, then select the layer. Select Create new fill or adjustment layer > Black & White. Then select the layer again and click Create new fill or adjustment layer > Exposure.

The exposure settings will be different for every image and your personal style, but for our image, set the Exposure to +5.21, the Offset to -0.2269, and the Gamma Correction to 0.01. Toggle the sliders to see what suits your chosen photo the best.
On the Layers panel, select both smart filter layers and your top duplicated layer—hold Shift while selecting the top and bottom-most of the group to select them all in one go—then right-click and select Convert to Smart Object.

Set the Blend Mode of your new layer to Linear Burn.
Step 10: Add a Pop of Color
Now you can add color to your portrait to finalize the pop art effect. There are two different ways to add color to your portrait, both are very simple.
Option 1: Use the Original Photo

If your original image was full color, you can use this technique. Remember the final hidden layer at the bottom? Simply select the eye icon on that layer to view it again. The blending modes and adjustment layers on the other layers create a cool color effect that works successfully for a pop art portrait.
As well as this great halftone effect, you can also make your photos look like paintings in Photoshop, or even make an interesting photo mosaic in Photoshop.
Option 2: Paint With the Brush Tool
If you want to color your portrait in a more abstract way, you can use the Brush tool to paint areas with color. Create a new layer and move it under your halftone portrait but above your bottom-most original image. Hide the layers above by clicking the eye icon on those layers.

With your transparent layer above the original, you can use the original image as a reference and paint the colors directly to your empty layer. Use the Brush tool (B) to paint directly where you want, or use the Lasso tool (L) to draw and select areas for precision before painting with the Brush tool or using the Fill tool (G).

Feel free to create multiple layers for each area of color you’re adding, or you can paint them all on one layer.

Once you’re happy, reveal the other layers again to see your pop art creation. You can hide or delete the original image layer at the bottom of the panel.

Now that you have your abstract colors, you may want to adjust or delete any of the adjustment layers to your preference. We think ours looks better without the Levels adjustment layer.
Turn Your Portraits Into Pop Art
After this easy tutorial, you can take your portraits back in time with the iconic pop art style. Whether you want to keep the color realistic or go abstract, a pop art portrait is a fun way to present your photos and show off your artistic side. You can experiment with colors, halftone effects, or bold lines and see what you can come up with.