How often have you created a content calendar only to forget about it weeks later? Or worse, you're constantly searching your desk for that sticky note you used to jot down your latest idea—your coworker’s never going to see it that way either.
There’s definitely a solution to help you get organized. A ready-made one that's available at no cost. Plus, the software may already be sitting on your desktop. Notion’s Blog Editorial Template is the ideal solution for planning, organizing, and drafting all your content. Keep reading to learn how to use and customize it.
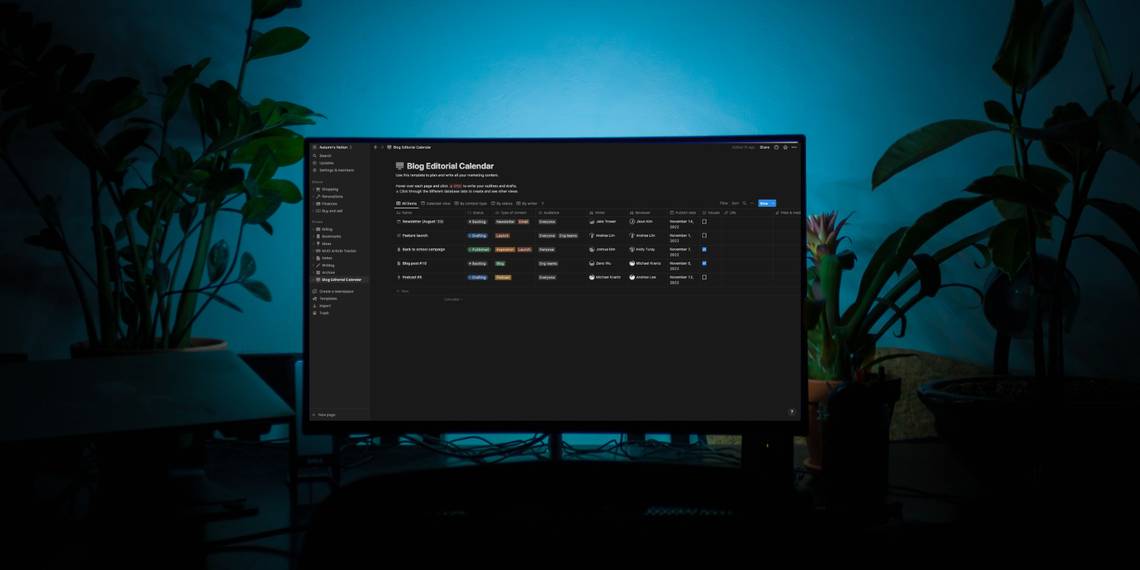
How to Use Notion’s Blog Editorial Calendar Template
If you've previously used Notion's Content Calendar template, its Blog Editorial Calendar template is more robust, yet minimal in the way that it offers everything you need and nothing more.
To get started with Notion’s Blog Editorial Calendar template:
- Go to Templates near the bottom of the list in the sidebar.
- Navigate to the Marketing heading on the left. Below it, you’ll find it in the list.
- Select it and click Get template in the bottom-right corner.

Notion filled the template with placeholder information, so you can see it in action, and it has everything you need already included. Here’s a quick overview of its properties, or columns, and how to use them.
Name
The Name column goes beyond the title of your piece. Each item under this heading is clickable. Hover over it, select Open, and you’ll be right inside the draft of the corresponding title. Here, you can use content blocks to write your piece, add headings, insert media, create lists, or help text stand out with quotes and callouts.

Status
Status gives you a quick overview of your progress. The options here are categorized by To-do, In progress, and Complete. If you want to edit these, click anywhere in the column to bring up the options menu and select Edit property.

A sidebar will open where you can swap the names by clicking them or add extra options by clicking the add symbol beside the desired category. You can also change this to a simple checklist by selecting Show as and choosing Checkbox.
Type of Content
The Type of Content column uses a Multi-select property, allowing you to assign tags to your pages. To edit them, click anywhere in the column to bring up the options. From there, hover over the one you want to change, click the three dots to the left and:
- Select Delete to get rid of it.
- Choose a color to swap its hue.
- Use the text field to rename it.
Click anywhere in the column and start typing a word to create a new option. Hit enter on your keyboard or click Create to add it.

If you want to use this page exclusively for blogging, you could use this column to tag your topics.
Audience
The Audience column works the same as the Type of Content one, except the tags indicate who the content is for. It’s excellent for large companies and publications to distinguish between internal and external content. But, if you only target one group, you can delete this by clicking the title and selecting the option from its menu.
Writer and Reviewer
The Writer and Reviewer columns use Person properties to show who is working on a particular project and their role. To assign someone, click on the column and select who you want to add from the list of options. If they’re not on the list, you can add them using the Share menu at the top-right of your screen. Doing this will give them access to the page so that they can help you plan and draft your content.
You can also tag your teammates anywhere on a page by typing @ and their names.
Publish Date, Visuals, and URL
The Publish date column shows everyone the date you want to post or send your piece. That way, everyone knows to submit their work before then. You and your coworkers can also ask Notion to give you reminders of upcoming schedules right in the column.
The Visuals column is a simple checklist to show whether or not graphics, images, and videos are ready to go. And the URL column is the link to the live post.
Notion’s Blog Editorial Calendar Template Views
The views along the top of your database help you see your workload in different layouts.
- All items—this is the default view where you can see everything, and you’ll likely do the bulk of your work here.
- Calendar view—allows you to see your publish dates within a calendar.
- By content type—here, Notion breaks your page up by the tags you use in this column.
- By status—in this view, you can see a quick overview of where you're at with each project.
- By writer—this is an overview of everyone’s workload.

How to Add Extra Properties to Your Blog Editorial Calendar
To add extra properties or columns to your page:
- Click the add symbol beside the title of the column furthest to the right. A sidebar will appear with a list of options.
- Select the one you’d like to use.
- Type the title into the property menu, and once you click out of, it will stay.

Some suggestions for additional columns are:
- Files and media—if you use supporting documents in your work often.
- Created by—this displays who added the assignment. It's an effortless way to show who to report to or go to with questions.
- Text—an excellent way to communicate quick notes without your teammates needing to click on the page.
- Priority—use a Select property to communicate a piece’s urgency.
- Number—track and display your key performance indicators using a Number property.
Can You See Previous Changes to Posts in Notion?
The benefit of using page history is that you can see any changes you or your teammates make to a Notion page. That way, you can identify changes others make and revert to a previous version if a blooper occurs.
If you’re using the Free Plan in Notion, you can see a 7-day page history. And the others are as follows:
- Plus Plan, 30 days.
- Business Plan, 90 days.
- Enterprise Plan, unlimited.
You can always leave notes for each other on changes in the comments section as well. Or, if you’re worried about royally messing up someone’s work, you can duplicate the page and make edits there.
Get Your Ideas Flowing With Notion
With content creation, organization and planning are half the battle. Not only is it helpful to have a place to jot down and work out your ideas, but keeping it all together will help you spend more time creating and less time searching for notes.
Notion offers the best template to help you finally get on top of your editorial calendar and get writing. Why not give it a try?