The CSS margin, border, and padding properties are used on any given HTML element to create a unique effect. They work together to ensure that your web page is organized and presentable.
Of these three properties, the border property might seem more familiar as it’s usually easily identified on a web page. However, using the border property wouldn’t look as presentable as it does on most websites if the developer didn’t also edit the padding and margin properties.
In this tutorial, you’ll learn about the box model and how each of its layers works together to organize the content on a website.
What Is the CSS Box Model?
The CSS box model is essentially a box that encloses each HTML element. The box model consists of four layers (as you can see in the image below), and each layer has a unique purpose.

The first layer is found in the center of the box model. This is the position given to each HTML element. In the image above the auto x auto value is currently being displayed from the center position, but this value will be replaced with the width x height of each HTML element.
The padding property is located between the HTML element and the border property, and the margin property is located on the outer side of the border property. The padding and border properties don’t usually have visible default values for a given CSS element. However, a default margin property value is found on some HTML elements, namely the p element—which has a default value of 16px on both the top and bottom.
Using the CSS margin Property
The margin property has four sub-properties, namely margin-top, margin-right, margin-bottom, and margin-left. These properties are used individually to create the desired margin size on a specific side of an element, or as a group by simply using the shorthand margin property.
Structure of the margin Property
        Selector {
margin: margin-top margin-right margin-left margin-bottom;
}
The example above represents the basic structure of the margin property. The first value in the value stack assigned to the margin property targets the top, the second value targets the right, the third targets the left, and the fourth targets the bottom of an element.
Using the margin Property Example
        p{
    margin:  20px 10px 20px 10px;
}
The code above effectively assigns a margin of 20px on the top, 10px on the right, 20px on the bottom, and 10px on the left of all p elements on a specific web page. However, the same effect that the code above produces can be achieved with less code:
        p{
    margin: 20px 10px;
}
The code above will produce the same result as the preceding code snippet. The first value assigned to the margin property will target the top and bottom, and the second value will target the right and left sides of all p elements on a web page.
If there’s a case where the margin that should be assigned to all four sides of an HTML element is the same, you can use the following code to achieve this:
        p{
    margin: 20px;
}
The code above assigns a margin of 20px to all four sides of the p elements on a web page.
Unpacking the CSS border Property
In the CSS box model, the border property is the third layer. Like margin, the border property has several sub-properties that you can use in a stack value. But, unlike the margin property, not all border sub-properties need to be present for the border property to function correctly. There’s only one property that needs to be present: the border-style property.
Basic border Property Structure Example
        Selector{
border:  border-style;
}
The border-style property in the example above can take the form of one of several values. For example, if you want a solid border around all of the paragraphs on your web page, the following code can help:
        p{
border: solid;
}
The border property also allows a developer to target specific sides of an HTML element with the following four sub-properties:
- border-left
- border-right
- border-top
- border-bottom
If there’s ever an instance when you need to place a border on only one side of an element, you can use the appropriate sub-property from the list above.
Unpacking the border-style Property
Though it’s not always visible, every HTML element is surrounded by the border property. Your inability to see the border property in some instances is because the default value of the border-style property is none. You can assign many different values to the border-style property, some of the more popular ones being:
- solid
- double
- dotted
- dash
Using the border Property With a Stack Value
Three values can be assigned to the border property to achieve a specific result. These values are the border-width, border-style, and border-color properties. Therefore, if you want to create a solid red border around a paragraph with a width of 2px, the following code will accomplish this:
        p{
border: 2px solid red;
}
You can also use the stack value on one side of an element by replacing the border property in the example above with the sub-property that targets the appropriate side. For instance, if you want to target only the left side of all paragraphs with the same stack value above, you can simply replace “border” in the example above with the “border-left” property.
Using the CSS Padding Property
The CSS padding property is very similar to the margin property. The padding property has four sub-properties, padding-top, padding-right, padding-bottom, and padding-left. You can use each sub-property individually or feed them as a stack value to the padding property.
Like margin, if only two values are assigned to the padding property, the first one will target the top and bottom sides of the element, and the second will target the left and right sides. If only one value is provided, all sides will have the same padding size.
The following three sets of code will produce the same result on all of the p elements on a web page.
Using Four Padding Values
        p{
padding: 20px 20px 20px 20px;
}
Using Two Padding Values
        p{
padding: 20px 20px;
}
Using One Padding Value
        p{
padding: 20px 20px;
}
Using the CSS Box Model
Using the border, margin, and padding properties will help you to organize your web page, no matter what kind of page it is. Here's how to use them in tandem:
Basic HTML Document Example
        <!DOCTYPE html>
<html lang="en">
<head>
    <meta name="viewport" content="width=device-width, initial-scale=1.0">
    <title>The Box Model</title>
</head>
<body>
    <div class="box">
        <h1>Heading One</h1>
        <p>
        Lorem ipsum dolor sit amet consectetur adipisicing elit.
        Impedit rem recusandae id est. Rem, quod odio. Doloremque nemo libero,
        fuga suscipit dignissimos soluta iusto ullam ducimus rerum labore necessitatibus facilis.
        Lorem ipsum dolor sit amet consectetur adipisicing elit.
        Impedit rem recusandae id est. Rem, quod odio. Doloremque nemo libero,
        fuga suscipit dignissimos soluta iusto ullam ducimus rerum labore necessitatibus facilis.
    </p>
    </div>
    <div class="box">
        <h1>Heading Two</h1>
        <p>
        Lorem ipsum dolor sit amet consectetur adipisicing elit.
        Impedit rem recusandae id est. Rem, quod odio. Doloremque nemo libero,
        fuga suscipit dignissimos soluta iusto ullam ducimus rerum labore necessitatibus facilis.
        Lorem ipsum dolor sit amet consectetur adipisicing elit.
        Impedit rem recusandae id est. Rem, quod odio. Doloremque nemo libero,
        fuga suscipit dignissimos soluta iusto ullam ducimus rerum labore necessitatibus facilis.
    </p>
    </div>
</body>
</html>
The code above will produce the following output in the browser:

The image above displays two div elements, each of which contains a heading and a paragraph. Each div element has a margin, border, and padding of 0px, a width of 1042px, and a height of 112.438px as you can see in the box model below.

Using the border property provides a clearer perspective of what's happening on the page.
Using the border Property
          .box{
            border: solid;
        }
Using the CSS code above will produce the following output in your browser:

Now that the border property is visible it has a default width of 3px, as seen in the box model below.

As you can see from the box model above, the margin property is at the outer side of border. Therefore, you can use it to create some space between the two touching div elements.
Using the margin Property
                .box{
            border: solid;
            margin: 20px;

        }
Introducing margin with the code above will create the following output in your browser:

That's a bit better, isn't it? There's adequate space between the div elements. All sides of each div element now have a margin of 20px, as you can see in the box model below.

Now you can focus on the inside of the border, which is where the padding property falls in the box model.
Using the padding Property
.box{
border: solid;
margin: 20px;
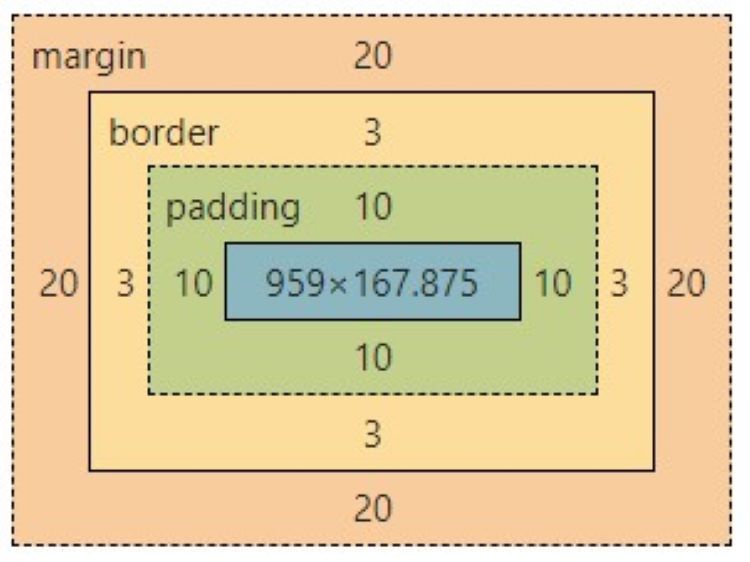
padding: 10px;
}
The code above will produce the following output in your browser:

As you can see from the image above, the text within the border has now moved away from the edges because of the padding property. The box model below shows that all the layers in the box model are now in use.
 Experiment With CSS Properties
Now you have an understanding of the box model and how each element within it works together to achieve a specific result. You can try to assign a stack value to the border property and change the border color to red, or you can replace the border property with its border-left sub-property and see what happens.
There’re a lot of other CSS properties for you to explore, and with the CSS cheat sheet, you can experiment with every one of them.