If you have ever used your Google account to sign in to an application then you might have noticed how easy it is. You only need to click one button and don't have to type your email or password. While this seems simple, what happens under the hood is quite complex. However, tools like Passport make it easier.
In this tutorial, you will learn how to implement Google authentication in Node using Passport and Express.
What Is Passport?
Passport (or Passport.js) is a Node authentication middleware that provides more than 500 strategies for authenticating users including social authentication using platforms like Google and Twitter.
You will use passport-google-oauth2 strategy to authenticate users on Google.
Creating a Google Authentication System in Node
This is an overview of the authentication system you will create:
- When a user clicks on the login button, they will be sent to the Google sign-in page where they will sign in.
- Google will redirect the user to your application with an access token. The access token gives you permission to access the profile information of that user.
- Send the access token to Google to get the profile data.
- Create a new user or retrieve the existing user from the database.
- Use JWTs to protect sensitive routes.
How to Set Up Google Authentication in NodeJS Using Passport
Follow the steps below to authorize users with Google OAuth,
Step 1: Create a Google Client ID and Client Secret
Before using Google to sign in users to your app, you need to register your application with Google to get the client ID and client secret to use when configuring Passport.
Log in to the Google Cloud console and follow the following steps to register your app.
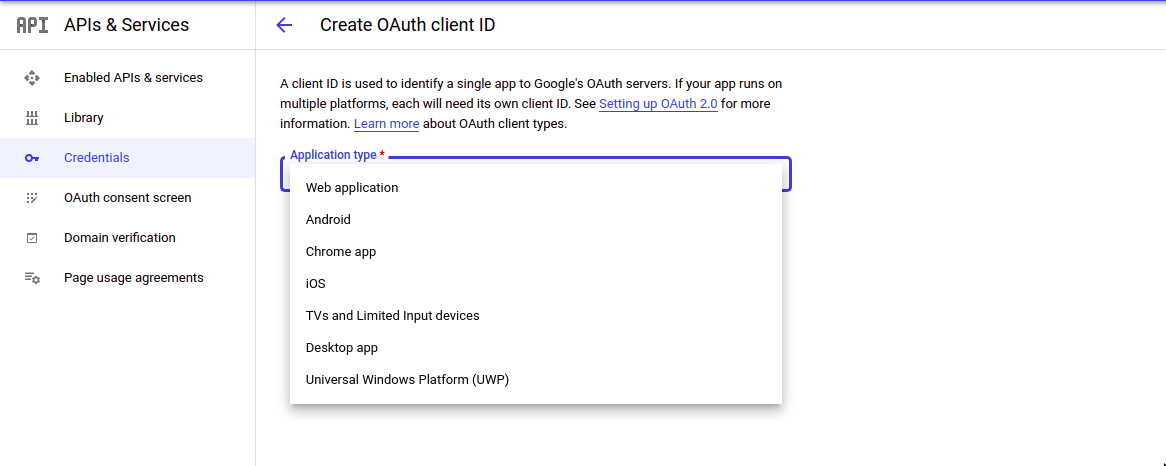
Create a new project. In the menu bar, select Credentials and on the drop-down list, select OAuth client ID.
For the application type, select Web application. Add the preferred name for your application in the Name field.
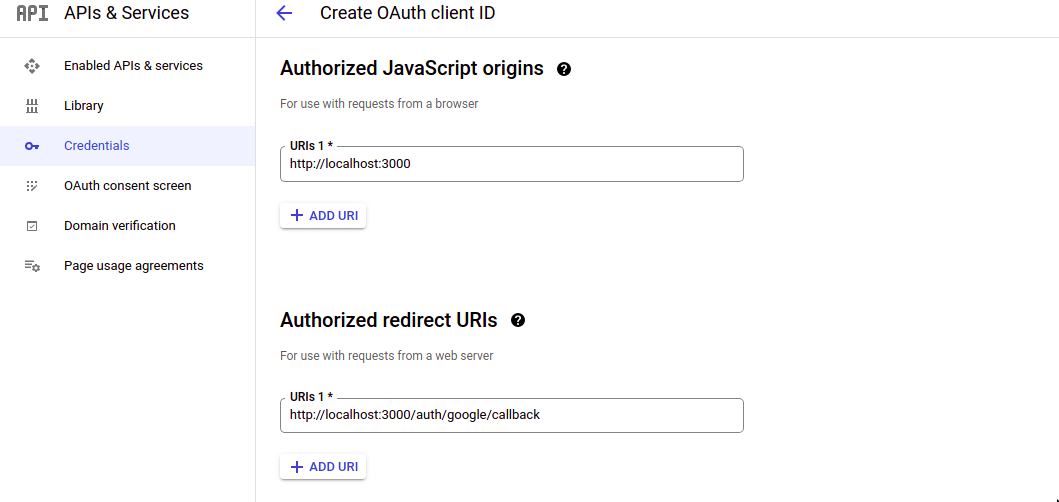
Under authorized redirect URIs, use http://localhost:3000 and http://localhost:3000/auth/google/callback for authorized redirect URIs.
Click create to create the OAuth client. Since the app credentials are sensitive, you'll need to create a .env file and add the client ID and client secret to it.
CLIENT_ID = <client-id>

            CLIENT_SECRET = <client-secret>
Step 2: Set Up Node Server
Create a folder, user-google-auth, and navigate to it.
        mkdir user-google-auth
cd user-google-auth
Initialize npm to create package.json.
npm init -y
Since you will be using express to create the server, install it by running the following command.
npm install express
Open the folder with your preferred text editor and create a new file app.js. It will serve as the entry point of your application.
Create the NodeJS server in app.js.
        const express = require("express");
const app = express();
const PORT = 3000;
app.listen(PORT, () => {
  console.log(`Listening on port ${PORT}`);
});
Step 2: Set Up MongoDB
You will store the user data received from Google in a MongoDB database. Before saving the user information, you need to define the structure in which the data will be stored. Mongoose is perfect for this. It provides a pretty straightforward way of creating data models.
Install mongoose.
npm install mongoose
Create a new file userModel.js, and create the user schema.
        const mongoose = require("mongoose");
const { Schema } = mongoose.model;
const UserSchema = new Schema({
  google: {
    id: {
      type: String,
    },
    name: {
      type: String,
    },
    email: {
      type: String,
    },
  },
});
const User = mongoose.model("User", UserSchema);
module.exports = User;
In userModel.js, you have imported mongoose and created a new schema.
Notice that you are grouping the information from Google. This is especially useful when you are also using other authentication methods and a user uses more than one. It makes preventing double registration easier.
Next, create db.js.
        const mongoose = require("mongoose");
mongoose.Promise = global.Promise;
const dbUrl = "mongodb://localhost/user";
const connect = async () => {
  mongoose.connect(dbUrl, { useNewUrlParser: true, useUnifiedTopology: true });
  const db = mongoose.connection;
  db.on("error", () => {
    console.log("could not connect");
  });
  db.once("open", () => {
    console.log("> Successfully connected to database");
  });
};
module.exports = { connect };
Connect to the database in app.js.
        const express = require("express");
const app = express();
const PORT = 3000;
const db = require("./db");
db.connect();
app.listen(PORT, () => {
  console.log(`Listening on port ${PORT}`);
});
Step 3: Set Up Passport
Install passport and passport-google-oauth2.
npm i passport passport-google-oauth2
Create a new file, passportConfig.js, and import the Google strategy from passport-google-oauth2 and userModel.js.
        const GoogleStrategy = require("passport-google-oauth2").Strategy;
const User = require("./userModel");
Use your app credentials to configure passport with Google OAuth.
        module.exports = (passport) => {
    passport.use(new GoogleStrategy({
        clientID: process.env.CLIENT_ID,
        clientSecret: process.env.CLIENT_SECRET,
        callbackURL: "http://localhost:3000/auth/google/callback",
        passReqToCallback   : true
      },
      async (request, accessToken, refreshToken, profile, done) => {
        try {
            let existingUser = await User.findOne({ 'google.id': profile.id });
            <em>// if user exists return the user</em>
            if (existingUser) {
              return done(null, existingUser);
            }
            <em>// if user does not exist create a new user</em>
            console.log('Creating new user...');
            const newUser = new User({
              method: 'google',
              google: {
                id: profile.id,
                name: profile.displayName,
                email: profile.emails[0].value
              }
            });
            await newUser.save();
            return done(null, newUser);
        } catch (error) {
            return done(error, false)
        }
      }
    ));
}
Once you receive the profile information from Google, check whether the user exists in the database. If they do, simply return the found user. If the user is new, create a new document in the database and return the created user.
Note that you are working with env variables so use the npm package dotenv to access them in your application.
Install dotenv.
npm install dotenv
Use dotenv in app.js.
require("dotenv").config()
In app.js, pass passport to passportConfig.js
        const passport = require("passport");
require("./passportConfig")(passport);
Step 4: Create Authentication Routes
You need three routes to:
- Redirect the user to the Google sign-in page to get the access token.
- Retrieve user data using the access token received.
- Redirect the user to the profile page after successful authentication.
        <em>// Redirect the user to the Google signin page</em>
app.get(
  "/auth/google",
  passport.authenticate("google", { scope: ["email", "profile"] })
);
<em>// Retrieve user data using the access token received</em>
app.get(
  "/auth/google/callback",
  passport.authenticate("google", { session: false }),
  (req, res) => {
    res.redirect("/profile/");
  }
);
<em>// profile route after successful sign in</em>
app.get("/profile", (req, res) => {
  console.log(req);
  res.send("Welcome");
});
Step 5: Protect Private Routes
Now that you have logged in as a user, how can you restrict some parts of your application to authenticated users only? One way to go about it is using JSON Web Tokens(JWTs). JWTs offer a secure way of transmitting the information. To authorize users using JWTs, your application will:
- Generate a token using the user data.
- Pass the token to the user (the user will send back the token with requests that need authorization).
- Verify the token sent back.
- Grant access to the user if the token presented is valid.
Install jsonwebtoken to work with JWTs.
npm install jsonwebtoken
In app.js, import jsonwebtoken.
const jwt = require("jsonwebtoken")
Modify the Google callback URL to sign the user and generate a token.
        app.get(
  "/auth/google/callback",
  passport.authenticate("google", { session: false }),
  (req, res) => {
    jwt.sign(
      { user: req.user },
      "secretKey",
      { expiresIn: "1h" },
      (err, token) => {
        if (err) {
          return res.json({
            token: null,
          });
        }
        res.json({
          token,
        });
      }
    );
  }
);
If you log in, you will receive the token.
Next, use passport-jwt, a JWT strategy provided by Passport to verify the token and authorize users.
npm install passport-jwt
In passportConfig.js, add the JWT strategy.
        const JwtStrategy = require("passport-jwt").Strategy;
const { ExtractJwt } = require("passport-jwt");
module.exports = (passport) => {
    passport.use(new GoogleStrategy(
      <em>// Google strategy</em>
    );
    passport.use(
      new JwtStrategy(
        {
          jwtFromRequest: ExtractJwt.fromHeader("authorization"),
          secretOrKey: "secretKey",
        },
        async (jwtPayload, done) => {
          try {
            <em>// Extract user</em>
            const user = jwtPayload.user;
            done(null, user);
          } catch (error) {
            done(error, false);
          }
        }
      )
    );
}
Here, you are extracting the token from the authorization header where it is stored—which is much safer than storing it in the request body.
Once the token is verified, the user object is sent back to the request body. To authorize users, add the passport JWT authentication middleware to protected routes.
        app.get(
  "/profile",
  passport.authenticate("jwt", { session: false }),
  (req, res, next) => {
    res.send("Welcome");
  }
);
Now, only requests that provide a valid token will get access.
Next Steps
This tutorial showed you how you can use Passport to sign in users to your application using their Google account. Using Passport is much simpler than other forms, and you'll save a lot of time through using it.
Passport also provides other authentication strategies to use with other identity providers, like Twitter and Facebook. So, it's worth checking those out as well.


