Microsoft Defender makes it easy to scan your Windows computer for viruses and malware. Several scans are available, including a quick and offline scan.
But did you know that you can also use Microsoft Defender to scan your removable and external drives? Here's how.
Which Types of Microsoft Defender Scan Include Removable Drives?
You can set Microsoft Defender to do Limited Periodic Scanning, even when using alternative antivirus software on your computer. These will be Quick Scans, covering areas where malware threats are commonly found. These scans can include removable drives if they are connected at the time.
Aside from a Quick scan, Defender also allows Full, Custom, and Offline scans. Custom scans can be used to check removable drives, but surprisingly, your drives won't be included in a Full scan by default. If you want your removable drives to be scanned during a Full scan, you need to enable it at a system settings level.
How to Scan Removable Drives With a Microsoft Defender Custom Scan
A custom scan is the best option if you only want to scan specific files or folders. You can use the custom scan to check folders on a removable drive, but not the drive itself. Even when scanning a large folder, a custom scan should only take moments to complete.
- In Windows 10, open the Settings app and click Update & Security. This is Privacy & Security in Windows 11.
- Click Windows Security and then click the Open Windows Security button to launch the app.
- Open Virus & threat protection > Scan options, then select Custom scan.
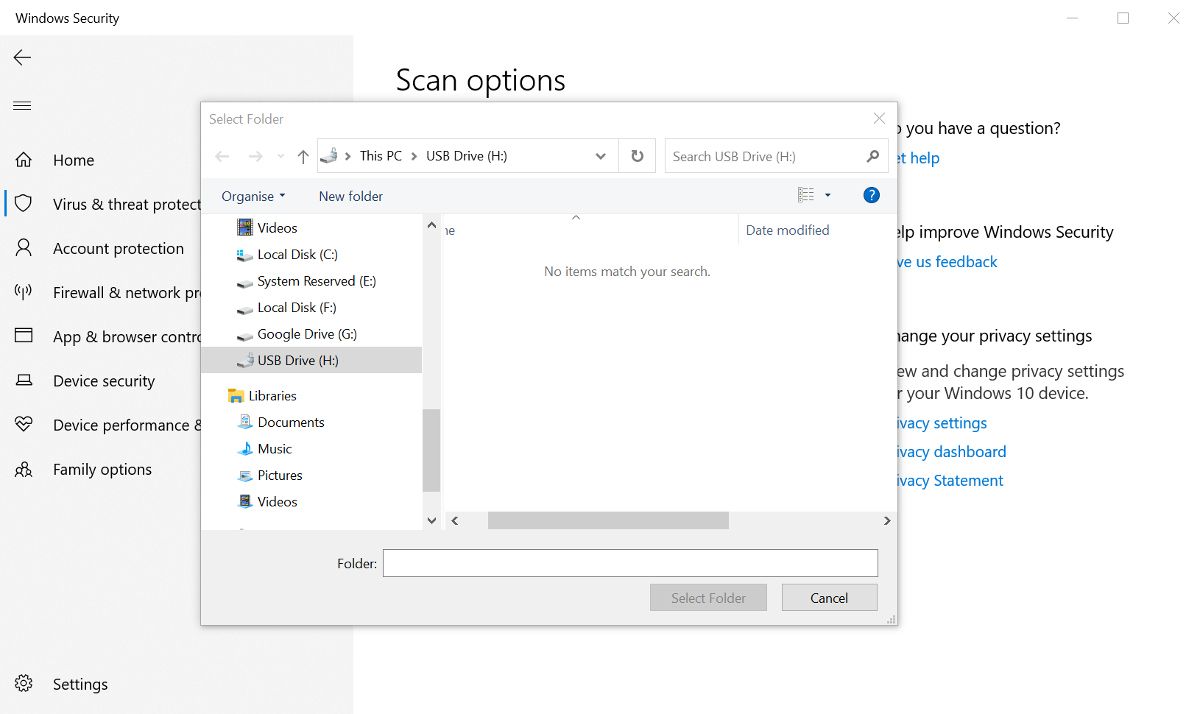
- Click the Scan now button, and then navigate to the removable or external drive you want to scan.
You can't scan the whole drive, but you can check any file or folder on the drive. You could move all the files on the drive into a single folder and use the custom scan to check the whole folder. Although this isn't practical on a large 1TB drive, it is an option to more easily scan a smaller USB flash drive.
How to Add Removable Drives to Full Scans in PowerShell
As mentioned earlier, a full virus scan won't include your connected external or removable drives by default. If you want external drives to be included in a full scan, you need to tell Defender to do so. There is no simple option in Windows Security to enable this feature, but you can enable it in PowerShell. Here's how you do it.
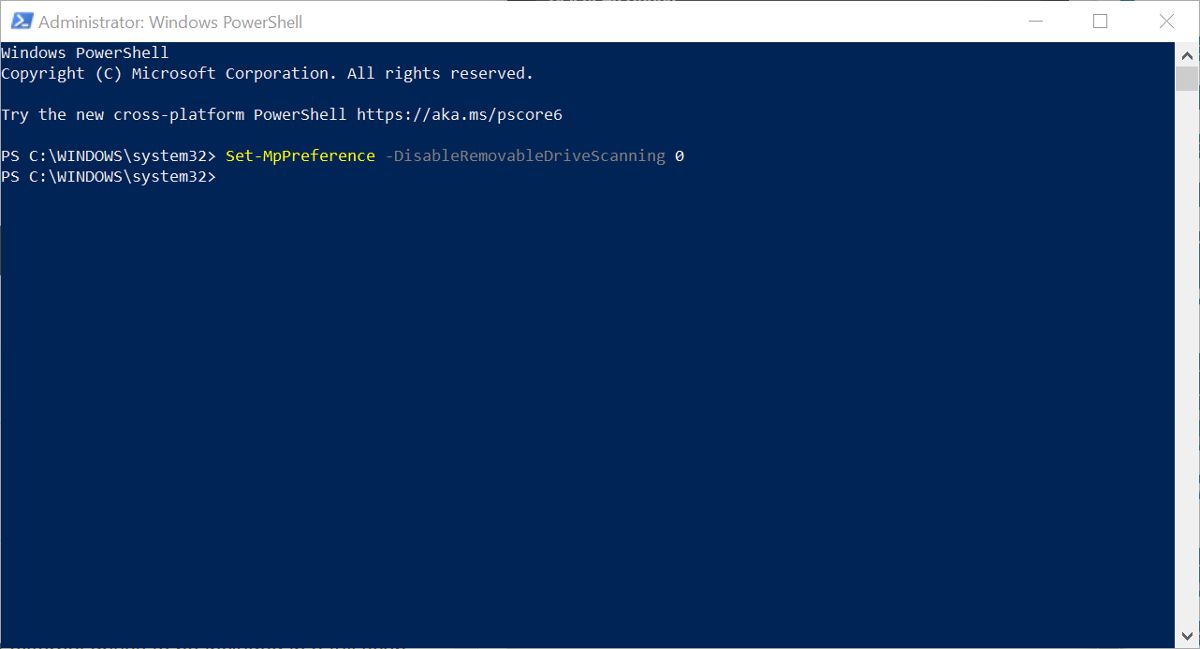
- Type PowerShell into Windows Search and choose Run as Administrator. You need to have elevated privileges to make this type of change to Defender.
- In PowerShell, type the following: Set-MpPreference -DisableRemovableDriveScanning 0. This will enable removable drive scanning during a full scan.
- You can then close PowerShell. The next time you do a full scan in Defender, any connected external drives will be scanned.
- If you want to disable removable drive scans, in PowerShell type: Set-MpPreference -DisableRemovableDriveScanning 1.
Be aware that by adding a large external drive to a scan, the time to complete the scan may increase a lot.
How to Include Removable Drives in a Full Scan With the Group Policy Editor
As long as you are using a Pro or Enterprise edition of Windows, you can also enable removable drive scanning in the Local Group Policy Editor.
- Search for and open the Local Group Policy Editor. This will be displayed as Edit Group Policy in the search results.
- In the panel on the left of the Group Policy Editor, select Computer Configuration. This displays a few folders in the main panel on the right.
- Click on Administrative Templates > Windows Components > Microsoft Defender Antivirus > Scan.
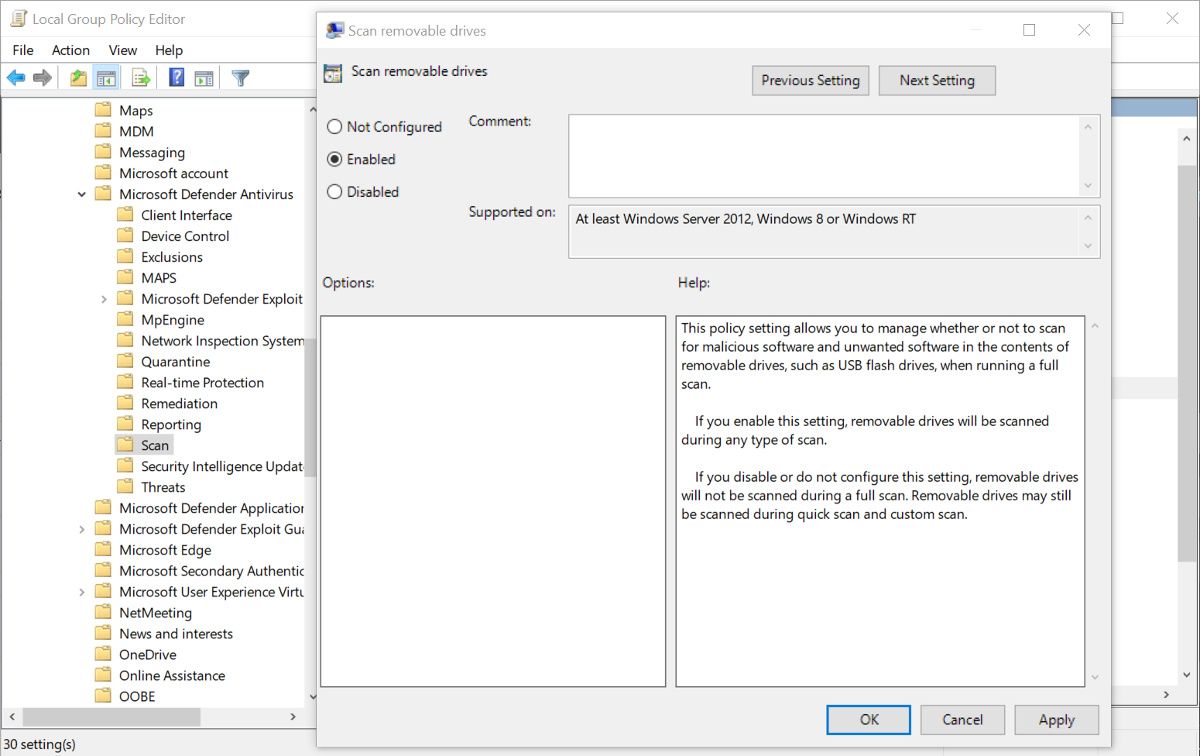
- Double-click on Scan removable drives in the list of settings that are displayed.
- In the new window that opens, change Not Configured to Enabled. Click Apply and then click Ok.
You can then close the Local Group Policy Editor. The next time you perform a full scan in Defender, any attached removable drives will also be scanned. If you want to disable removable drive scanning, repeat the steps above, but change the setting to Not Configured or Disabled.
Scanning Your Removable Drives in Microsoft Defender
It isn't always obvious which of the Microsoft Defender scan options will include external or removable drives. And it is surprising that a Full scan doesn't by default. But with a simple change, your options for scanning your external drives and keeping your computer virus-free become much better.


