Microsoft Defender is generally very good at protecting your Windows PC. It usually scores highly in antivirus detection tests and is regularly updated with new security features. One of the things it doesn't do is automatically scan a USB drive when it is plugged in.
There is a way to enable this feature in Defender, but it requires more work than simply flicking a switch in Settings.
Why Doesn't Microsoft Defender Automatically Scan USB Drives?
Earlier versions of Defender on previous versions of Windows did have the option to scan removable USB drives. This option has since been removed from the main Defender settings.
There doesn't seem to be any official explanation for why automatic scanning is no longer available. It is likely to be due to the potential for data loss or corruption. If a USB drive is connected, scanning starts, and then the USB drive is removed before the process is complete, data on the drive could be lost.
If you have Real-time Protection enabled, files on a removable drive will be scanned before they are executed. Unfortunately, that is sometimes too late to prevent infection. It also doesn't help prevent an infected USB drive from being shared with a user who doesn't have that feature enabled.

You can manually scan files on a removable USB drive with Defender with a Custom Scan. But even using this method won't let you scan the entire drive and all files. You will have to select files individually.
Enable Automatic USB Drive Scanning
You will need to make a couple of changes to the Windows Registry to enable automatic USB drive scanning. Editing the wrong thing in the Registry Editor can cause serious problems, so it is advisable to create a Registry backup before you start.
- Open the Registry Editor by typing Regedit in Windows Search and selecting the relevant result. You don't need to choose Run as Administrator.
- If you don't see an address bar at the top of the editor pane, click View > Address Bar to enable it.
- Either navigate to it or copy/paste the following path into the address bar: HKEY_LOCAL_MACHINE\SOFTWARE\Policies\Microsoft\Windows Defender.
-
Right-click Windows Defender in the left pane, select New > Key and change the name of the key to Scan.
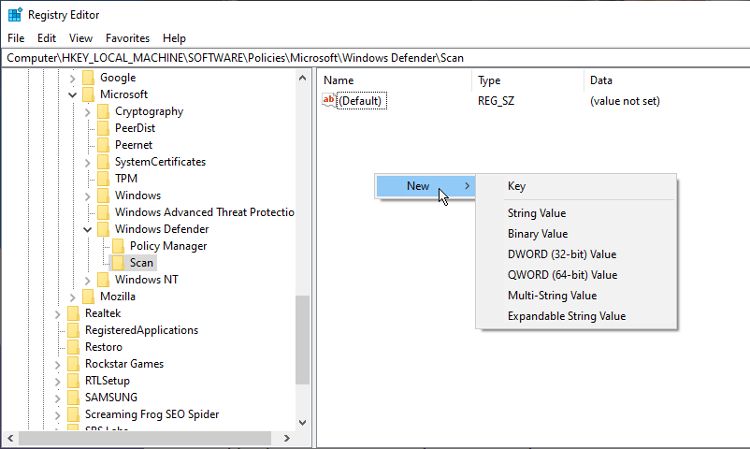
- Select the new key and right-click in the right pane. Create a new 32-bit DWORD value.
- Rename that DWORD as DisableRemovableDriveScanning. Ensure you use precisely this spelling and formatting.
-
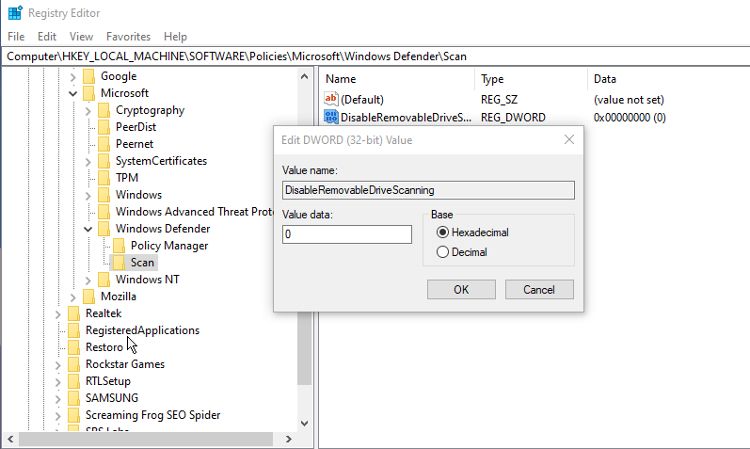
Finally, double-click the new DWORD, make sure the Value Data is set to 0, and click Ok.


You can then close the Registry Editor. The automatic scanning of removable USB drives should now be enabled. It will only be active if you are using Microsoft Defender as your antivirus protection. If you are using a third-party antivirus, you will need to check if a similar feature is offered with that software.
Microsoft Defender's Limited Periodic Scanning, which is available even if you use a third-party antivirus, doesn't include automatic scans of USB drives.
Getting Automatic Drive Scan Notifications
Unfortunately, the notifications for USB Drive scanning are pretty limited. You won't see any messages to show that the scan is starting, in progress, or has finished.
But don't worry, you will be alerted when malware is detected. Microsoft Defender should open automatically and show you options to quarantine or delete the infected file.
If your USB drive has a LED light to show activity, you might notice that it stays lit or flashes for longer when the removable drive is first inserted. This is a good indication that the USB drive is being scanned for malware automatically.
Scanning Removable USB Drives Automatically
If you regularly need to connect removable USB drives to your PC, knowing that they will be automatically scanned is a real plus. However, enabling this feature requires you to be careful not to disconnect a USB drive during the scan. Doing so could result in lost data.