Your Gmail might already match the standard system you've adopted, but syncing it with Google Task takes it to the next level.
You can utilize Google Tasks within Gmail to prioritize actionable emails into specific lists. Learn how to turn your emails into tasks and create to-do lists right inside your inbox.
What Is Google Tasks?
Google Tasks is an application that comes integrated into most of your Gsuite products. It also comes as a standalone app you can download to your phone. It helps you create a to-do list by allowing you to add and manage tasks without leaving your inbox.
The application makes it easy to capture daily chores like cleaning the house or grocery shopping. However, it also makes it easier to integrate your emails as tasks. You can separate high-priority and low-priority emails without archiving or deleting them.
Additionally, using Tasks helps you manage all your actionable items from one central location rather than hopping between Google Calendar, Gmail, Google Docs, and Google Sheets.
You can use it for free, and it's already part of your Gmail inbox. It's an essential feature of Gmail to increase productivity.
How to Add Tasks in Gmail
Once you log into your Gmail account, you'll see a sidebar on the right-hand side, including an icon for Google Tasks. Click on this icon to open the application.

Add a New Task in Gmail
- Click Add a task.
- Enter a title and click enter.
- Click the Pencil icon.
- Fill in a description, add a date and time, or add subtasks.
-
Click the back arrow.
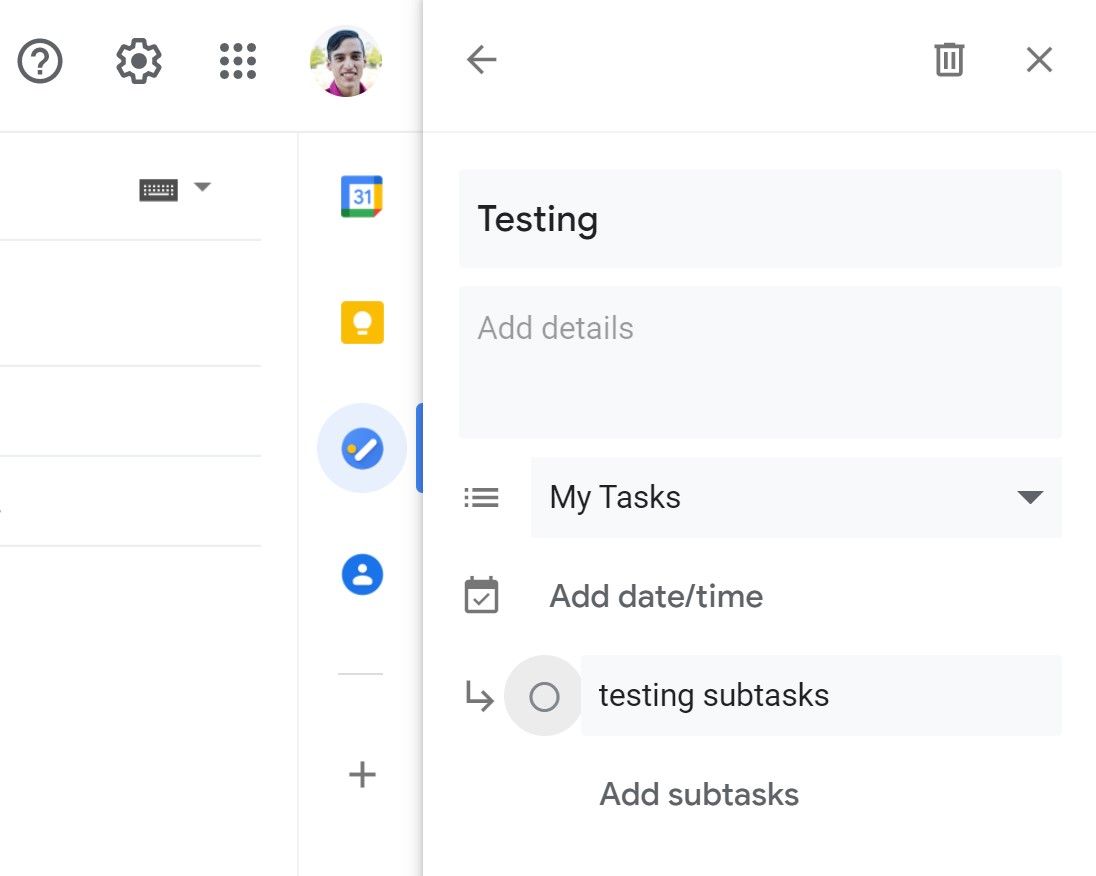

When you initially add your task, you will only be required to fill in the title, but if you want more information added to the task, click the pencil icon.
This will allow you to add a description for your task, add a specific date and time, and add subtasks.
Adding a date and time will automatically sync your task with your Google Calendar and create an event for the task.
This can work well with the full list of Gsuite integrations from Google. Adding a subtask will create more tasks underneath your original task. In case you have a bigger project, you need to break it down into smaller chunks.
Add an Email to Google Tasks

- Open Google Tasks.
- Click and drag the email into Tasks.
Your email is automatically added to Tasks after you drag it into the correct area. You can still edit the task with the same options you had before, except this time, Google has added a link to the email in your task.
When you click on the email link, it will open up that email inside your inbox. This makes it easy to see the email's details without needing to search for it in your inbox.
Managing Your Google Tasks
Get the full experience from your Google Tasks by rearranging task order, renaming lists, deleting lists, deleting tasks, learning keyboard shortcuts, copying reminders, and more.
Reorganizing your to-do list can help keep top priority items out of the way, so they don't get lost or forgotten.
To do this, click and drag your items in the correct order you need. You can even drag items into subtasks so they fall under a parent task, or you can take your subtasks and make them their parent task.
In order to sort your list by date, click on the three dots and select Date. You can also revert to your customized order by clicking on My Order.

You can also view all of the tasks that you've marked complete. Click on the arrow at the bottom of your Tasks.
From here, you can delete specific completed tasks or mark a task incomplete so that it shows back on the main screen. You can bulk delete these tasks from the options menu.

What makes Google Tasks so powerful is the ability to create different lists for the tasks you have. For example, you could create a separate list for work, personal, and groceries.
Creating and Managing Lists in Google Tasks

- Click My Tasks.
- Click Create New List.
- Enter the name of the list.
- Click Done.
Once you've created your list, Google Tasks will automatically open your new list, and you can start adding tasks immediately.
To switch back to another task, click on My Tasks again and select the list of your choice. You can rearrange your list order by clicking on the six dots and dragging your list to the position you want.
You can rename your list at any time, and you can also delete the entire list if you'd like. If you need to change a task from one list to another list, click on the pencil icon and select the correct list from the dropdown.
You can reorder the list using the methods outlined above. To exit out of your task screen, click the X in the top right, and the sidebar will disappear, leaving only the icons for easy access.
Other Task Integrations
Google Tasks comes integrated into your Google Calendar, Google Docs, Google Drive, Google Sheets, and Google Slides platforms.
These integrations allow you to add links to specific files you may need to access to complete a particular task. When you click these links, you'll automatically open up the file or document in a separate tab and still have your Google Tasks app accessible.
This will streamline your efficiency and ability to get more done by having everything you need in one location. You'll receive notifications for your tasks if you set up a specific time and date from your calendar.
Streamlining Your Tasks
Google Tasks is an efficient way to streamline your entire inbox and Gsuite products. You can prioritize actionable items without having to manage your full inbox.
By integrating Google Tasks with the rest of your Gsuite products, you'll have a central to-do list without needing to log into multiple platforms. Get organized from one location, no matter where you are in the world.