We all know how sleek and polished macOS looks. It's not surprising that many Windows users are jealous and wish to emulate the aesthetic of Apple's macOS. And the good news is that you don't have to purchase a brand-new Mac to get a similar look.
Fortunately, it's possible to recreate a similar visual experience on Windows using some third-party programs and some easy tweaks.
1. Use a macOS-Themed Desktop Background
Before moving on to the actual steps for customizing your Windows looks, first, you have to change the current wallpaper of your Windows PC.
Many websites offer a variety of macOS wallpapers, such as WallpapersHome, WallpaperAccess, and WallpaperCave. Simply search for "macOS wallpaper", and you will find a wide selection of images to choose from.
Once you have found an image you like, download and open the image. Right-click anywhere on the image and click Set as > Background to apply it to your desktop.

Installing WinDynamicDesktop
If you're finding it hard to download a macOS wallpaper on the web, you can install WinDynamicDesktop to get access to a wide range of macOS wallpapers.
Follow the below-given steps to get started with WinDynamicDesktop:
- Download it from the WinDynamicDesktop Microsoft Store page.
-
Open it, enter your location in the initial setup, and click OK.

-
WinDynamicDesktop will provide you with a variety of wallpapers to choose from. Select the wallpaper that best suits your taste and click the Apply button.
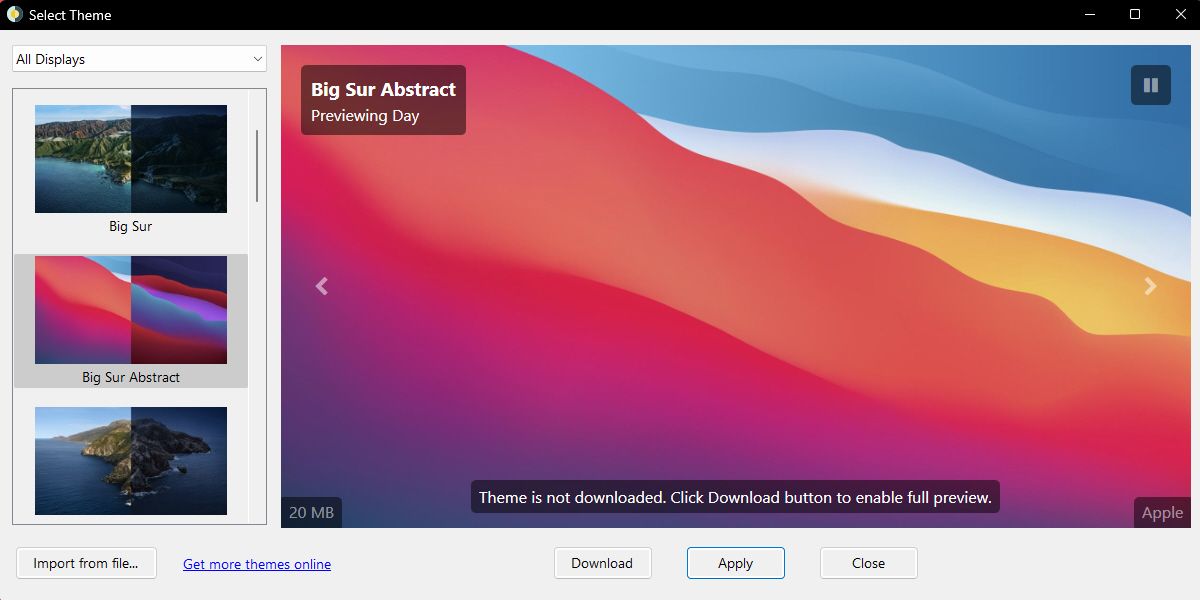


It'll automatically download the selected wallpaper and apply it to your desktop.
Want to know the best part about using WinDynamicDesktop? WinDynamicDesktop downloads two different versions of a wallpaper. One version of the wallpaper is optimized for light mode, and the other version is optimized for dark mode. The good thing is that it will automatically switch the wallpaper depending on the time of day.
2. Install a macOS-Style Cursor
The default Windows cursor is quite basic and does not provide the same level of aesthetic as macOS. Thankfully, there is a way to customize the Windows cursor to make it look more like its macOS counterpart.
To make your cursor look more like a macOS cursor, you can use a macOS cursor theme, which is available for free on DeviantArt.
Here's how to install the macOS-style cursor theme on Windows:
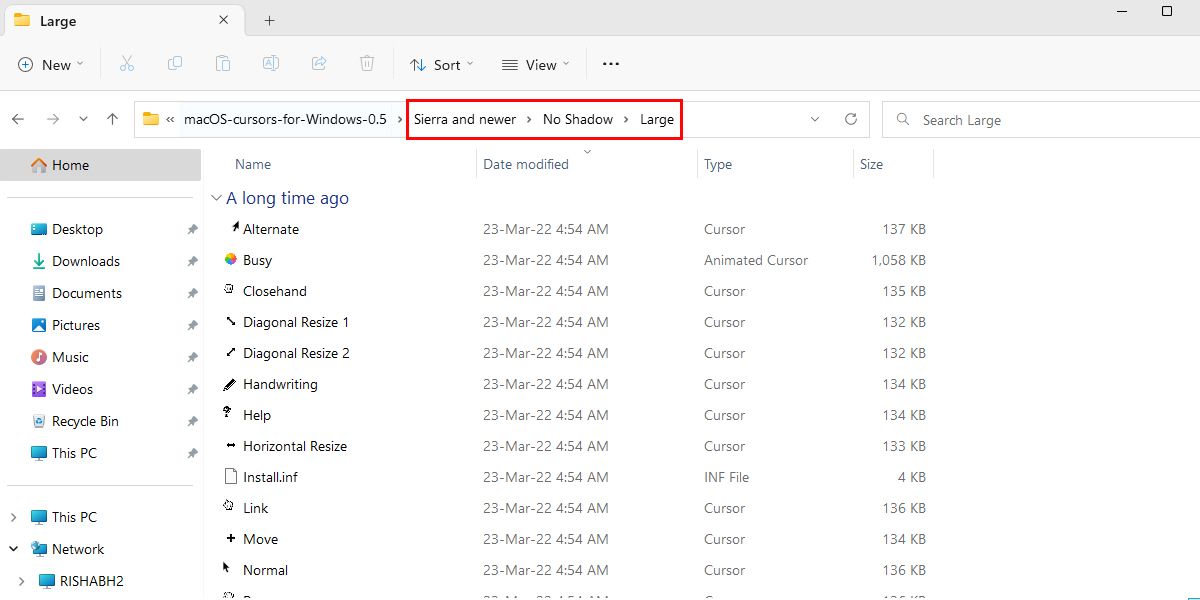
- Download the macOS Cursor theme from DeviantArt and unzip the downloaded file.
-
Navigate to the extracted folder and enter the folder named Sierra and newer > No Shadow > Large. For this guide, we will install the large and no-shadow cursor theme. You can choose which variant you want to install by navigating to the desired folder.
-
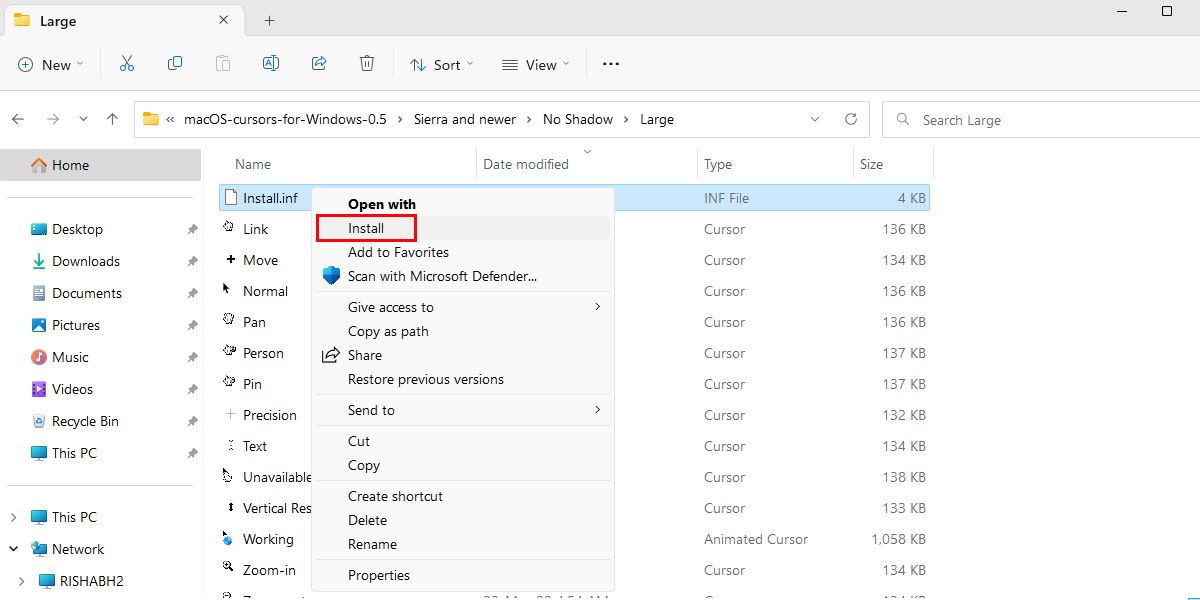
Right-click on the Install.inf file and click Install from the context menu.
-
Select the macOS cursor scheme and click the Apply button in the Mouse Properties window.
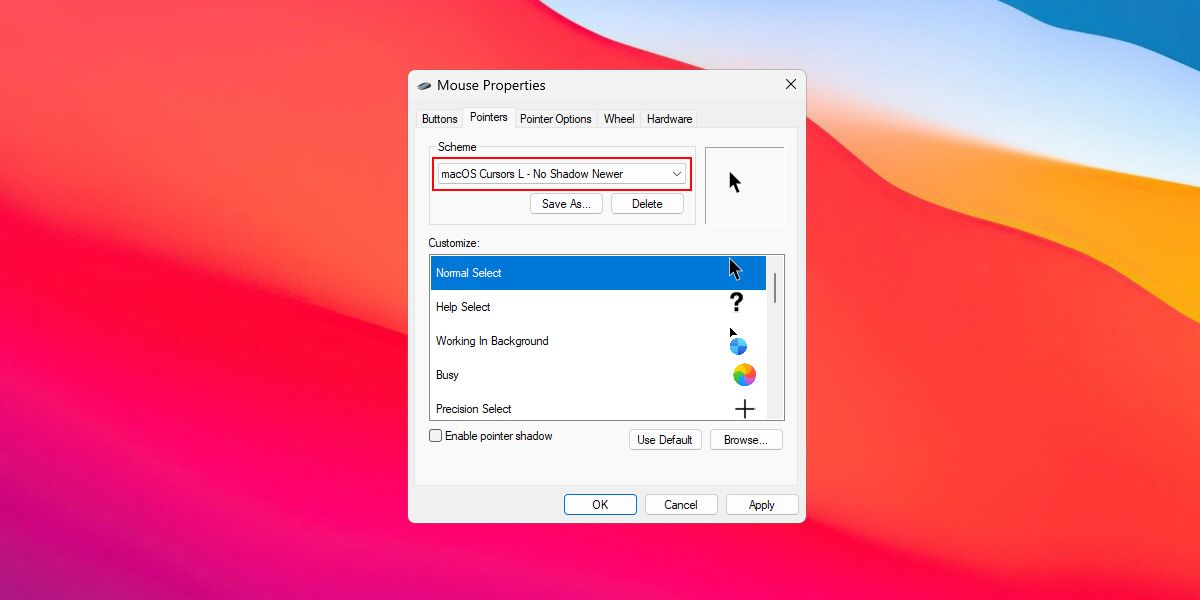
- Click Yes to replace the default Windows cursor theme with the macOS cursor theme.


That's it. With that, you are done, and you should now be able to enjoy the macOS cursor theme on your Windows desktop.
If you've never used macOS before, you may not like the normal scheme of the macOS cursor. So, if you want to change it, go inside the No Shadow > XtraLarge folder and perform the same steps mentioned above.
3. Make a Mockup macOS Dock Using MyDockFinder

One of the most obvious differences between Windows and macOS is the dock. On macOS, the Dock is similar to the taskbar on Windows, which is always visible at the bottom of the screen.
If you want to replicate the macOS Dock on Windows, you can use a third-party program like MyDockFinder. MyDockFinder is a paid app that allows you to add a macOS-style dock to your Windows desktop.
It provides a wide range of customization options, including the ability to change the dock's color, size, and position. It is a good alternative for those who want a more powerful and customizable dock than free alternatives.
The best part is that it offers a straightforward user interface, making it easy to customize the dock with just a few clicks. Additionally, it offers an intuitive drag-and-drop feature that allows you to quickly reorder the applications on your dock.
If you're looking for a free alternative to MyDockFinder, look at our article showing how to add a Mac-style dock using free tools on Windows.
To start with it, you must purchase it from Steam for $4.99. Once you download it, it'll automatically show a dock on your screen. If you want to customize it further, right-click anywhere on the dock and select Preferences.
Download: MyDockFinder ($4.99)
4. Clone the macOS Menu Bar Using Droptop 4
Droptop 4 is a free Rainmeter skin that adds a macOS-style menu bar to your Windows desktop. The menu bar is a horizontal bar at the top of the screen that displays a list of menus and options, such as the app menu, notifications list, brightness control, and volume control, to name a few.
The interesting part is that you completely control the menu bar with Droptop 4. It allows you to add different folders per your liking, pin different shortcuts to apps, install Droptop community apps, and more.
Follow the below-given steps to customize the menu bar with Droptop 4:
- Download and install Rainmeter first from Rainmeter.net.
-
Follow the on-screen instructions during the installation to set up Rainmeter. Once done, download Droptop 4 Base version from Droptopfour.com.

-
Open the downloads folder and double-click the .rmskin file. It'll open the Rainmeter Skin Installer. Click Install to let Rainmeter apply Droptop 4 skin and activate the menubar.

-
Click Continue to start the Droptop 4 setup. Select your language and follow the instructions on the screen.


Once you complete the setup process, Rainmeter will automatically apply the Droptop 4 skin to your desktop, and the menubar will display at the top of your screen.
If you've previously installed MyDockFinder, you need to disable its menu bar first. To do that, go to MyDockFinder preferences and disable or toggle off the Enable myFinder option.
The good thing is that you can even drag and drop your favorite applications into the menu bar to quickly access them anytime. Additionally, Droptop 4 allows users to easily access folders and files, with the ability to hide specific items from view.
5. Install macOS Widgets Using Rainmeter
While the previous tweaks will give your Windows operating system a macOS-like look and feel, you can take it one step further by adding macOS-style widgets to Windows. For this purpose, DeviantArt.com is a great website, as it enables you to access a collection of pre-made macOS widgets for your desktop.
Note that the widgets we're going to add are all Rainmeter based. Rainmeter is free software that allows you to customize and personalize the look of your desktop. It helps you apply custom widgets and skins (themes) to Windows.
We recommend creating a restore point before moving further. It will help you roll back your PC to a previous state in case the theme installation fails. If you're a newbie, check out our guide on creating a restore point on Windows for help.
Here's how to install macOS widgets on Windows:
-
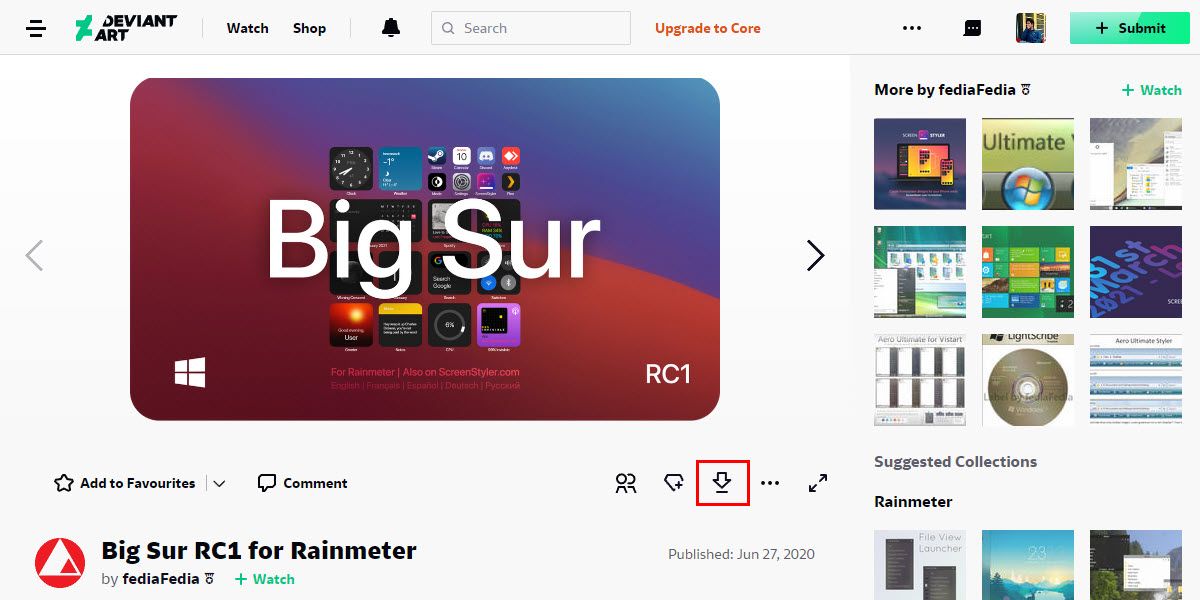
Download the Big Sur for Rainmeter widget skin from DeviantArt by clicking the download icon.
- Extract the downloaded zip file, and under the extracted folder, double-click on the BigSur.rmskin file to open it.
-
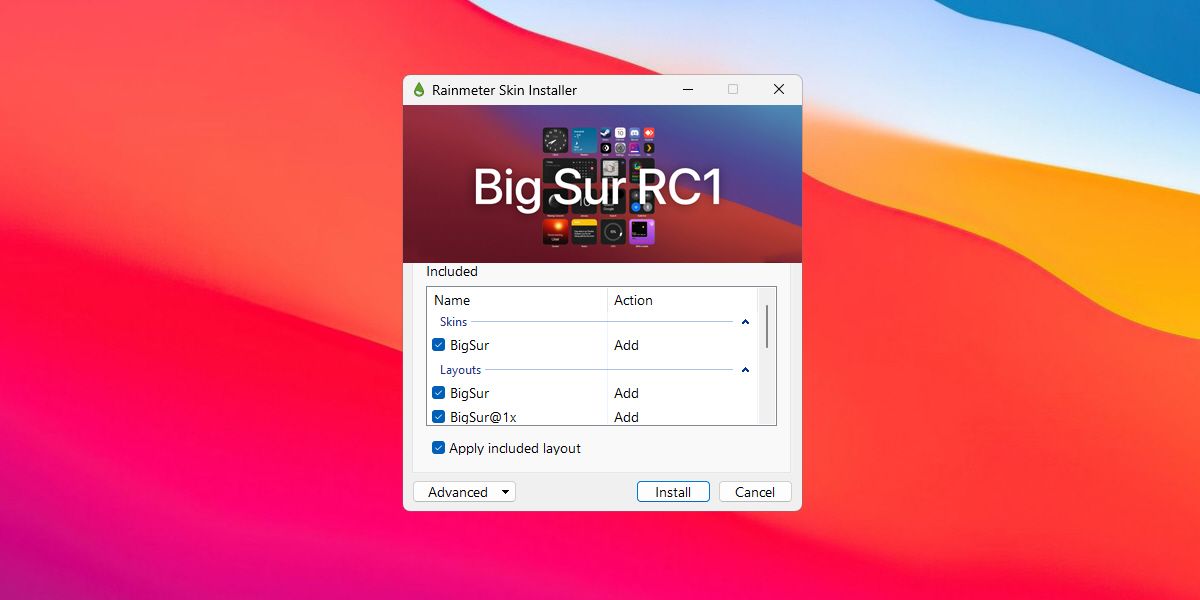
Rainmeter will automatically detect the file and launch the Rainmeter Skin Installer. Click Install to apply the macOS widget skin.


You can then customize the theme using Rainmeter's settings and options. If you want to customize a widget, right-click on it and choose Settings.
Isn't that easy? Similarly, you can search on DeviantArt for more widgets or even desktop icon packs to further personalize your desktop like macOS.
Get the macOS Look on Windows in No Time
You can make your Windows experience look and feel more like macOS with a few simple tweaks. So, if you're tired of looking at the boring Windows desktop, transform your Windows PC into macOS and experience something new.
So, what are you waiting for? Give it a try and find the perfect macOS look and feel for your Windows system. You can even download similar tools from the internet and find the perfect combination that suits your needs.