Windows 11 contains lots of built-in customization options. You can easily change the wallpaper, accent colors, fonts, and even the style of the icons. But even after making those changes, Windows still looks like, well, Windows. What if you want to make Windows look like Linux?
There are many Linux distros, each with a distinct design style and UI. Ubuntu is widely considered one of the more attractive and usable versions. And with just a little work and some third-party software, it is possible to make Windows 11 look just like it.
But First, Create a System Restore Point
It is always a good idea to create a new system restore point before a project like this. Although customizing the UI and adding themes is relatively safe, there is potential for problems to occur.
A few minutes taken to create a restore point now can save hours of frustration later if things go wrong.
Make Windows 11 Look Like Ubuntu, the Quick Method
There are lots of good themes available for Windows 11 that will make it look like Ubuntu with a few clicks. But you're going to have to pay for the convenience.
You can find some great Ubuntu skin packs on DeviantArt and Skinpacks.com. The exact installation method will vary, but they usually have clear instructions. The average price is between $4.99 and $9.99, so not a huge amount.
Make Windows 11 Look Like Ubuntu, the DIY Method
You can make Windows 11 more like Ubuntu without spending anything but time. This method aims to make Windows 11 look like a default install of Ubuntu, not one of the Ubuntu variations such as Budgie.

1. Change the Accent Color
Let's start with the easiest change: the accent colors. Ubuntu uses a core set of colors, as shown on the official Ubuntu website.
- Open Settings > Personalization > Colors, and scroll down to Accent Color.
- Set the Accent Color to Manual and click View Colors.
- In the accent color picker, click on More and then enter #E95420 in the hexadecimal field. Click Done.
- Back in the Colors settings, make sure Transparency Effects are On.

You can also change to Dark Mode, as it looks closer to how the current version of Ubuntu looks.
2. Hide the Desktop Icons
The Ubuntu desktop is generally much cleaner than the average Windows desktop. It doesn't have app and file icons all over it.
Right-click anywhere on the desktop and choose View > Show desktop icons. Once this is deselected, your icons will vanish. You can get them back by repeating the process if you need to.
3. Change the Mouse Cursor
The mouse cursor style might seem a small change, but it helps give Windows 11 the look of Ubuntu. Download the Ubuntu Cursors pack and extract the files from the compressed folder.
- Open Settings > Bluetooth & device > Mouse > Additional mouse settings.
- Select the Pointers tab, and with Normal Select highlighted, click Browse.
- Navigate to the extracted Ubuntu Cursors folder, select the Ubuntu Normal Select cursor, and click Open.
- Repeat this for all the other mouse cursors, then click Apply.

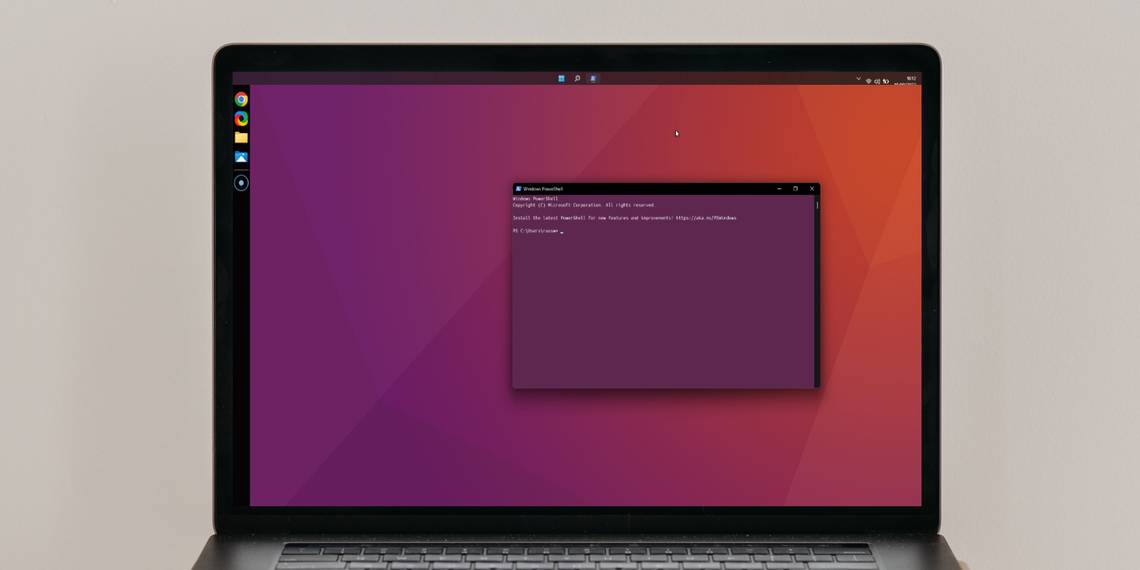
4. Customize the PowerShell Font and Color
The standard terminal in Ubuntu uses a particular font and color scheme. You can change the style of PowerShell to look like the Ubuntu terminal. You can get the official font from the Ubuntu website. Download the file and extract the contents to a folder.
- Open Settings > Personalization > Fonts.
- Select all the font files in the extracted folder, and drag them into the fonts window.
- Now open PowerShell. You can just search for it in Windows Search.
- Right-click on the top bar and select Properties from the menu.
- In the Font tab, select Ubuntu Mono.
- In the Colors tab, select Screen Text and change the color to White. Select Screen Background and change the RBG values to 94, 39, and 80.
- Click Ok and close PowerShell.

7. Hide the Taskbar
Now to deal with the Windows Taskbar. You can do this the quick and easy way or the more complete way.
The easy way is to open Settings > Personalization > Taskbar. Then select Automatically hide the taskbar. It will still be available should you need it, but it won't be on the screen and spoiling the Ubuntu look.
The more complete way requires an extra bit of software: Taskbar Hider.
- Download the program version relevant to you (32-bit or 64-bit) and extract the file.
- Double-click the program file to run it, and choose the hotkey you want to use.
- You can also set it to automatically hide the Taskbar when Windows starts up.
- Click Ok, and then press the hotkey you chose to hide the Taskbar.
If you prefer, you can move the taskbar to the top of the screen to emulate the top bar of Ubuntu. You will need to use a tool like Taskbar11, which lets you change the location and size of the bar. It also allows you to remove most taskbar icons. It won't look exactly right, but it can get quite close to the Ubuntu style.
8. Add a Linkbar
One of the key features of Ubuntu is the Linkbar. Luckily, you can download a very similar Linkbar tool for Windows.
- Download the Linkbar file and then right-click it and select Extract all.
- Double-click on the Linkbar64 file, and choose who can use it: everyone or just you).
- You have to select a folder. This is where items you add to the link bar will be stored. Then click Apply.
- Right-click in the Linkbar and choose Settings. Change the color to Black.
- Set the Position on screen option to Left and the Order of shortcuts to Up to down.
- To add items to the Linkbar, right-click on it and choose New > Shortcut.
- Click Browse and find the app you want to add. You can select a shortcut to the app or the app .exe file. Repeat this for all apps you want to add.

9. Change the Desktop Wallpaper
Changing the desktop wallpaper on Windows 11 is one of the quickest ways to make it look like Ubuntu. There are lots of suitable wallpapers available online that use the recognizable purple and orange Ubuntu color scheme. Our favorite collection can be found at Wallpaper Access.
10. Install WSL and Ubuntu
This final step is completely optional. If you are happy just having Windows look like Ubuntu, you don't need to do anything more. But for the full Ubuntu experience, you will need WSL.
- Open PowerShell as an Administrator and type: wsl - install.
- Download and install Ubuntu from the Microsoft Store. This may take a while as it is around 600MB.
- Once it is installed, you can open Ubuntu from the Start Menu. You can also place a shortcut to it in the Linkbar.
- A terminal window will open, allowing you to enter Linux commands as if your Windows computer was a Ubuntu computer.

Reverting to Windows 11 Default Style
Hopefully, you created a restore point, as we recommended at the beginning. If so, you can restore Windows using System Restore if you don't like the end result.
If you didn't, or if you don't want to lose other changes you have made, you can reset each step.
- Uninstall software such as the Linkbar and Taskbar Hider.
- Change the accent color to whatever you prefer.
- Change the mouse pointer back to default.
- Unhide the desktop icons.
- Revert the PowerShell style back to default.
If you went for the quick method of installing a Ubuntu skin pack or theme, you can usually uninstall it in Add or Remove Programs. Check the instructions for the individual theme or skin pack for additional uninstall advice.
Make Windows Look Like Ubuntu Linux
If you want to bring some of the Ubuntu style to Windows 11, you can do so quite easily. Buying a pre-made skin pack is the quickest and most complete method. But with a few pieces of free software and some easy style changes, anyone can make Windows 11 look more like Ubuntu without spending a cent.