Having a server is the best way to easily share and back up files or stream media across multiple devices. You can create that server pretty easily and pretty cheaply with just a Mac mini.
There are a few ways to set up a Mac mini to have it specifically act as a server rather than a computer. Which one you choose depends on your needs in a server.
We’ll help you figure all that out, and help you decide if the Mac mini is the best device to use as your server. Let’s get started!
Turning a Mac mini Into a Server the Simple Way
Fortunately, macOS already has many sharing features available that make turning a Mac mini server incredibly easy, particularly when everything is on the same network.
If you’re looking to make a server mostly to access or back up your own files, and to share across devices rather than several users at once, this is the perfect setup method for you.
First, there are a few hardware adjustments to make. Namely, you have to make sure your Mac mini is set up to stay powered on and won’t go to sleep due to inactivity so you can continuously access it.
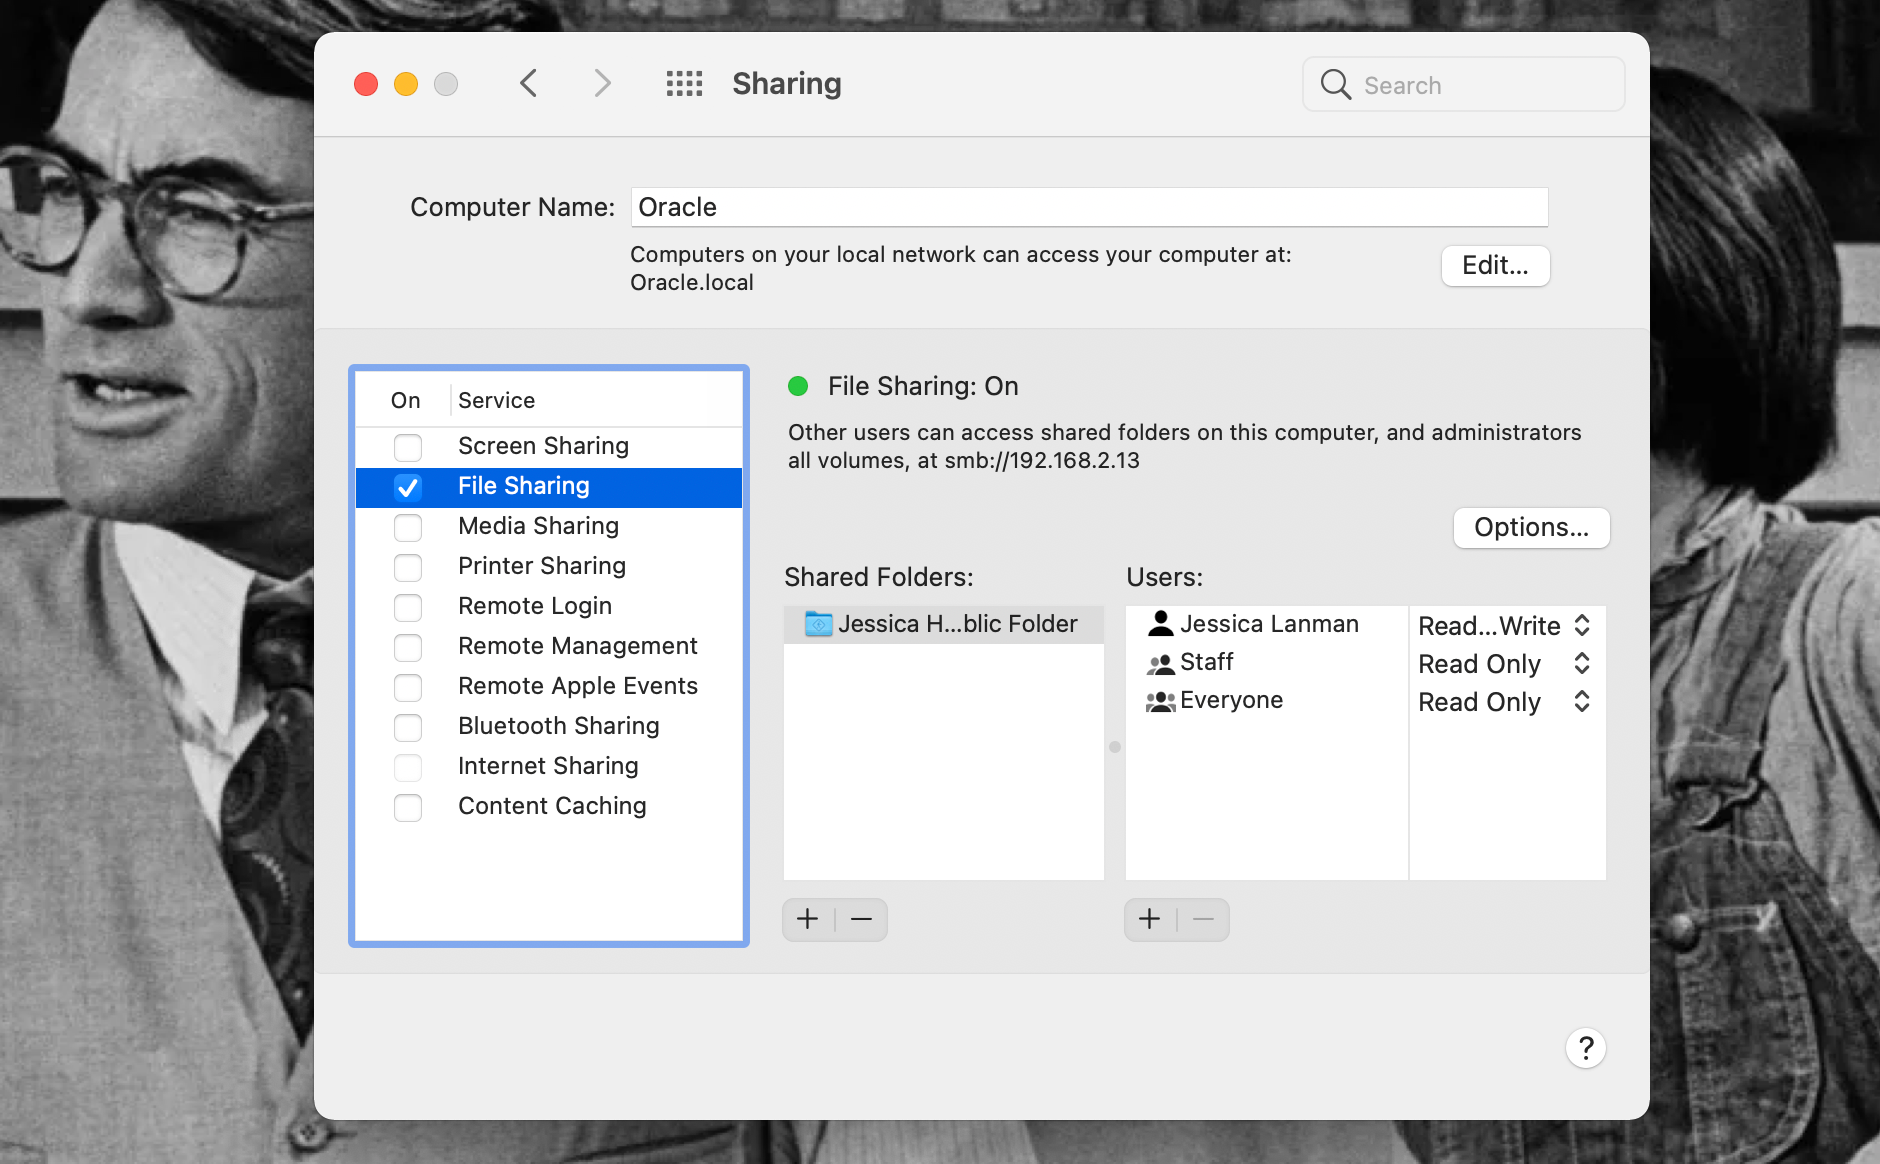
Once that’s done, you can set the Mac mini up for file sharing by opening System Preferences and clicking on Sharing. Note that this is different than the Family Sharing option.
Check the box for File Sharing under the Service menu on the left. Then hit the plus button (+) under the Shared Folders menu that appears to add folders you want accessible via the server.
You can also adjust which users can access the server from here and what they can do with the files—see and copy them, only see them, only copy them, or not access them at all.
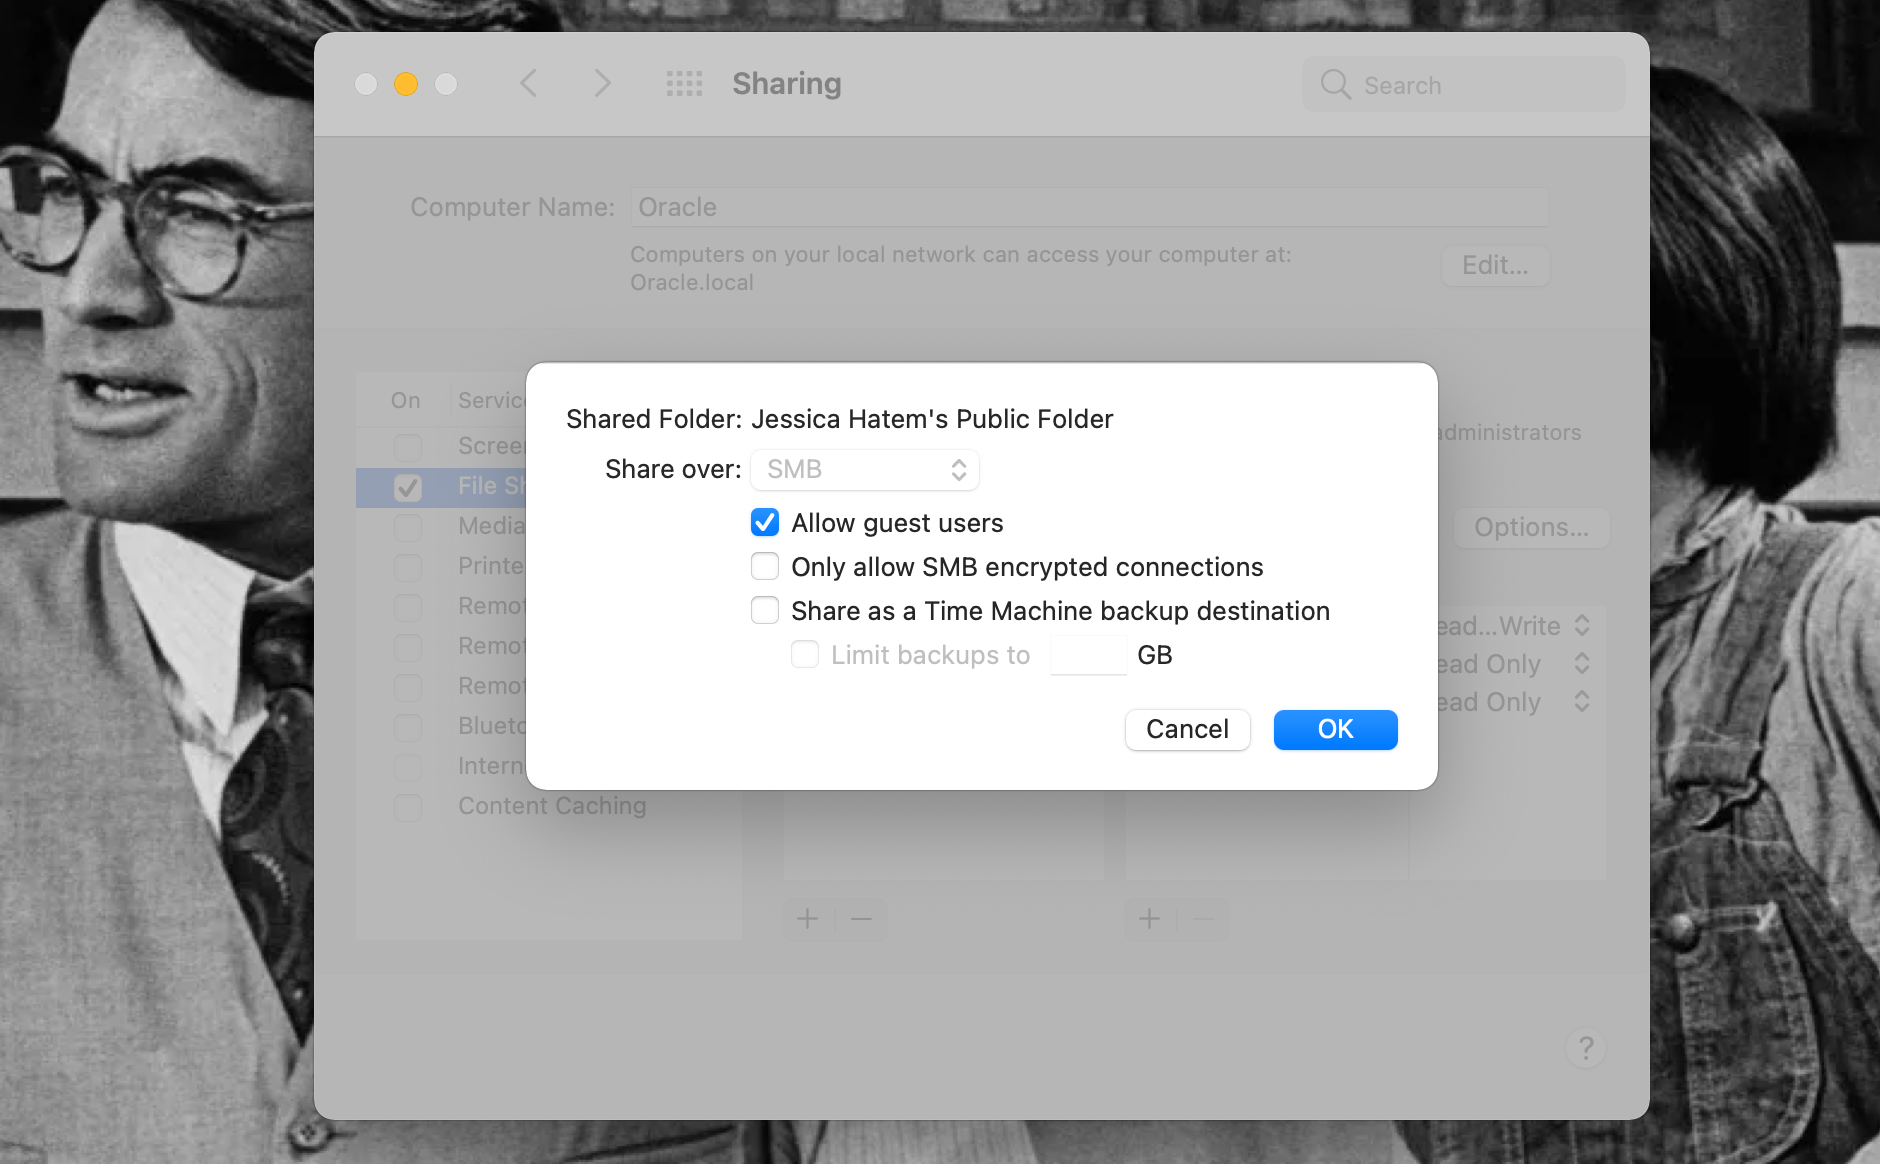
You can also allow guest access so more users and devices can reach your server. To allow that, control-click on a shared folder, and select Advanced Options Make sure the Allow guest users box is checked and then hit OK.
To use a Mac mini as a backup server, in the Advanced Options on a shared folder check the Share as a Time Machine backup destination box. Other devices will be able to send backup files there afterward!
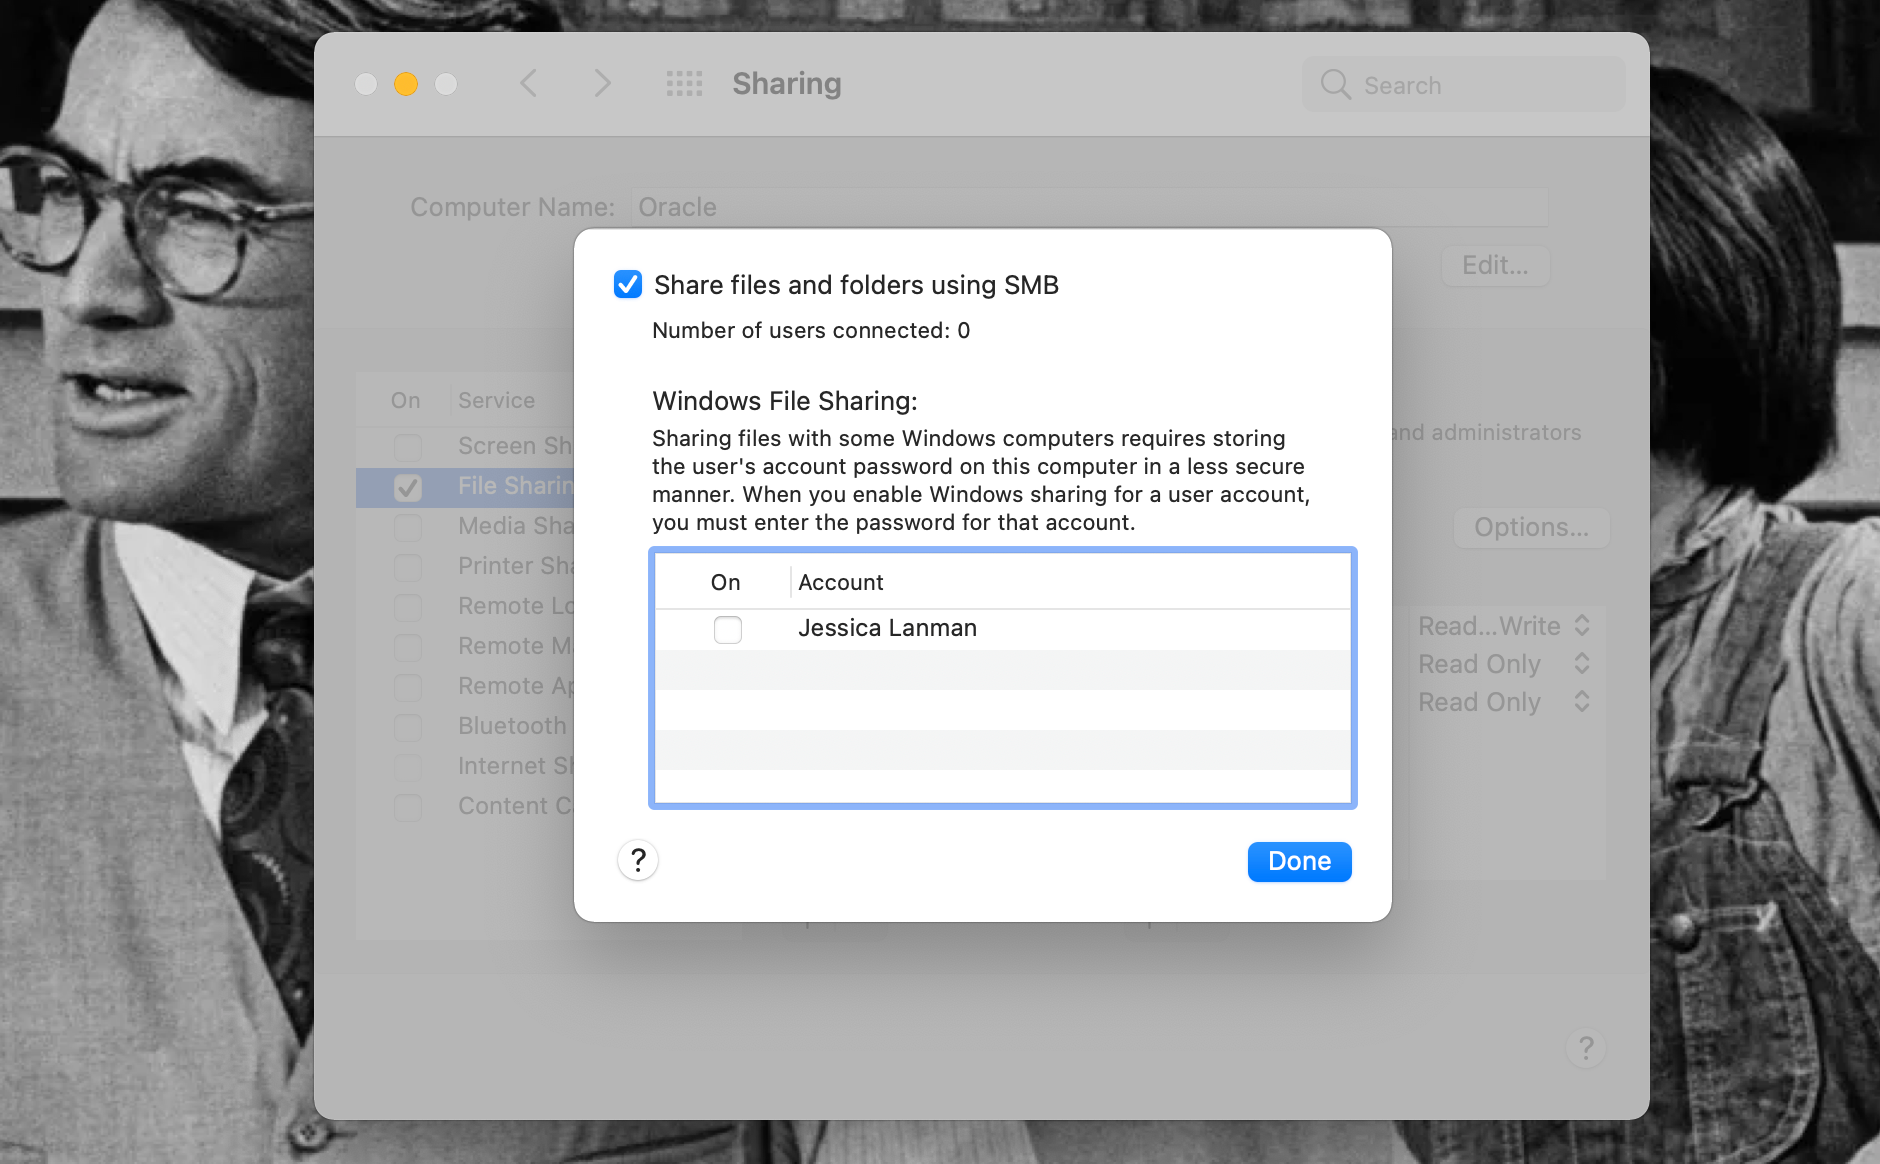
All of these steps will allow Apple devices to access your Mac mini as a server. To let Windows devices and users gain access, in the Sharing window click the Options button and make sure the Share files and folders using SMB box is checked.
You’ll then need to check the box next to the Account name for the Windows computer or device accessing the server. Input the password for that device when prompted, and that device should now be able to access your Mac mini server whenever.
To access your server on a Mac open a Finder window and look for the server name under Locations in the sidebar. Double-click on the server name and click Connect As. Log in as a guest, as a user, or with Apple ID as you see fit.
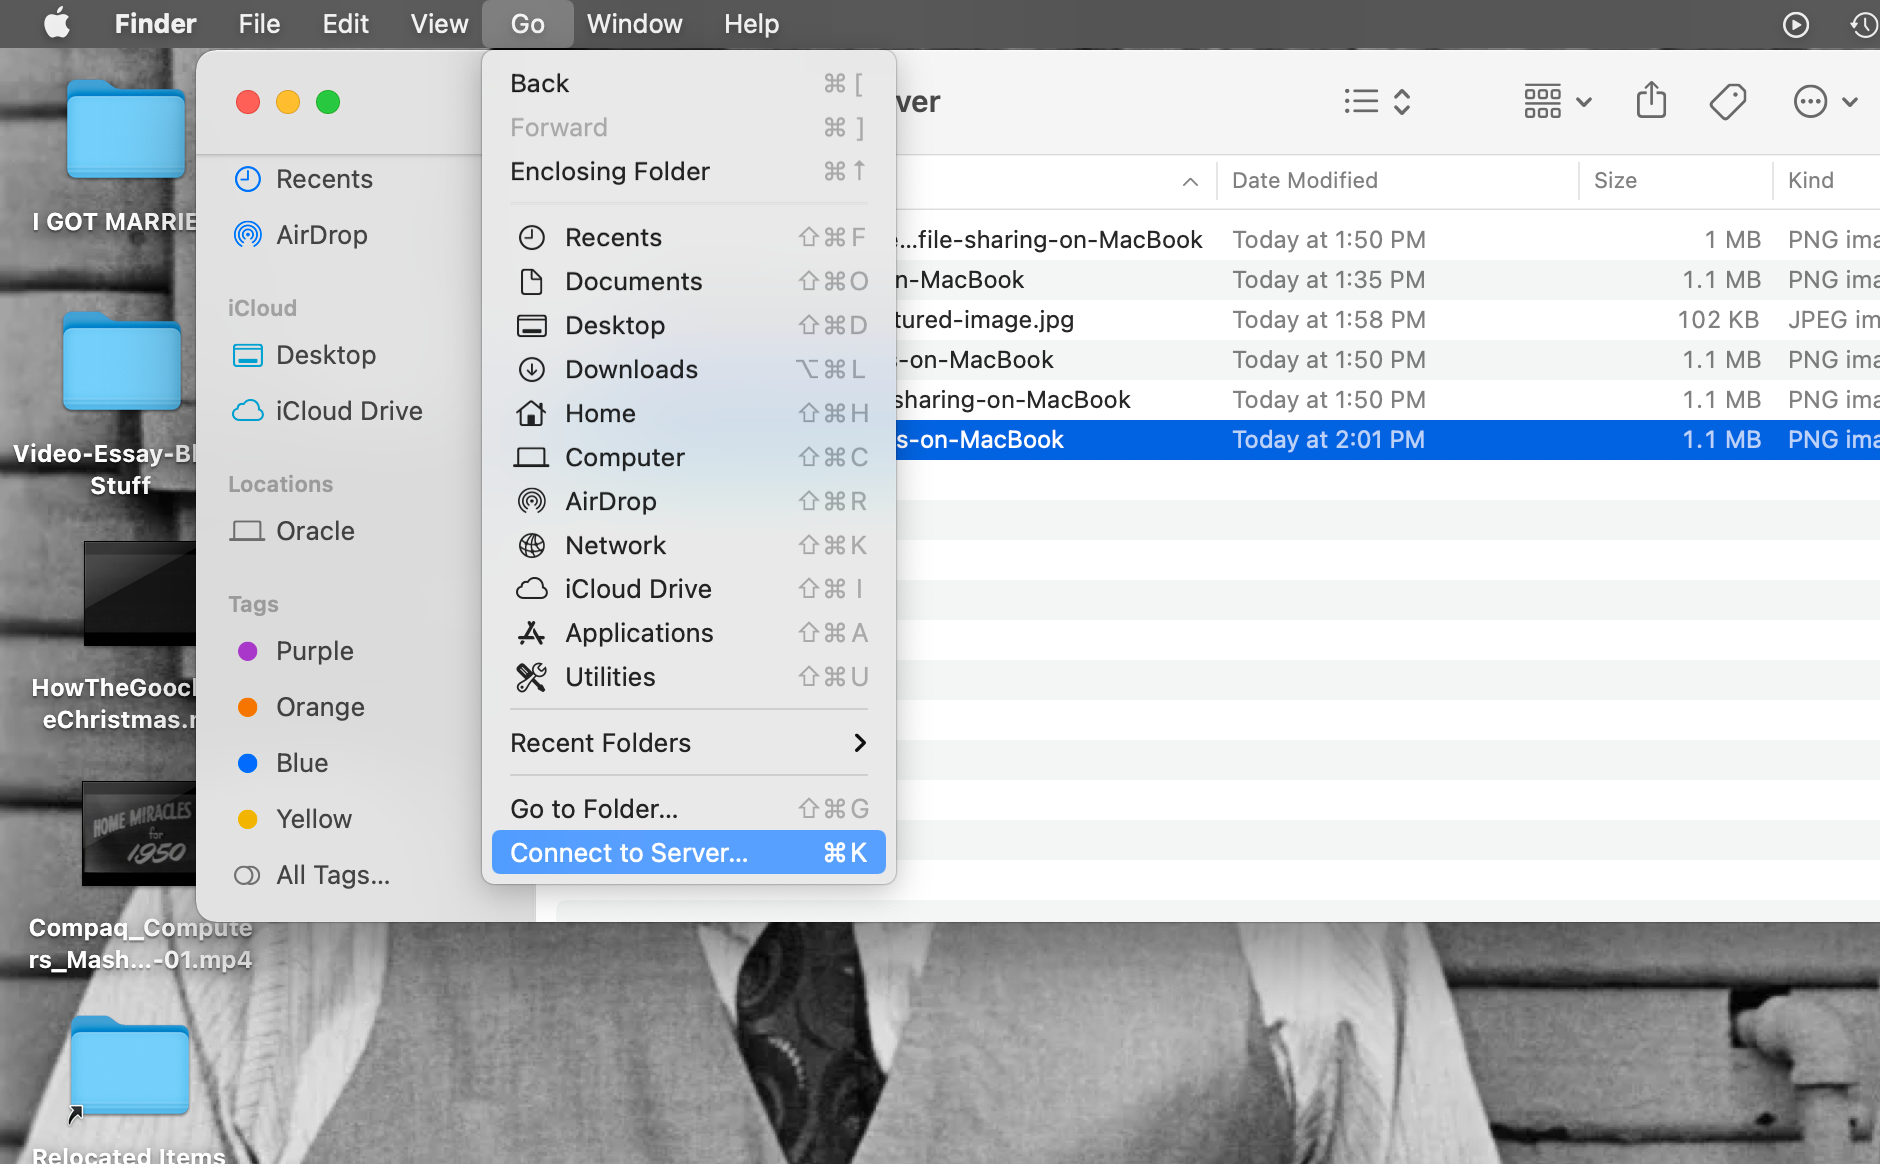
You can also click on the Go menu at the top of the screen when you’re in Finder. Then click Connect to Server and select your server name. Or input the SMB address found in the Sharing settings on your Mac mini.
For Windows computers and other devices, connect to the server by going to Network and double-clicking on the server name there.
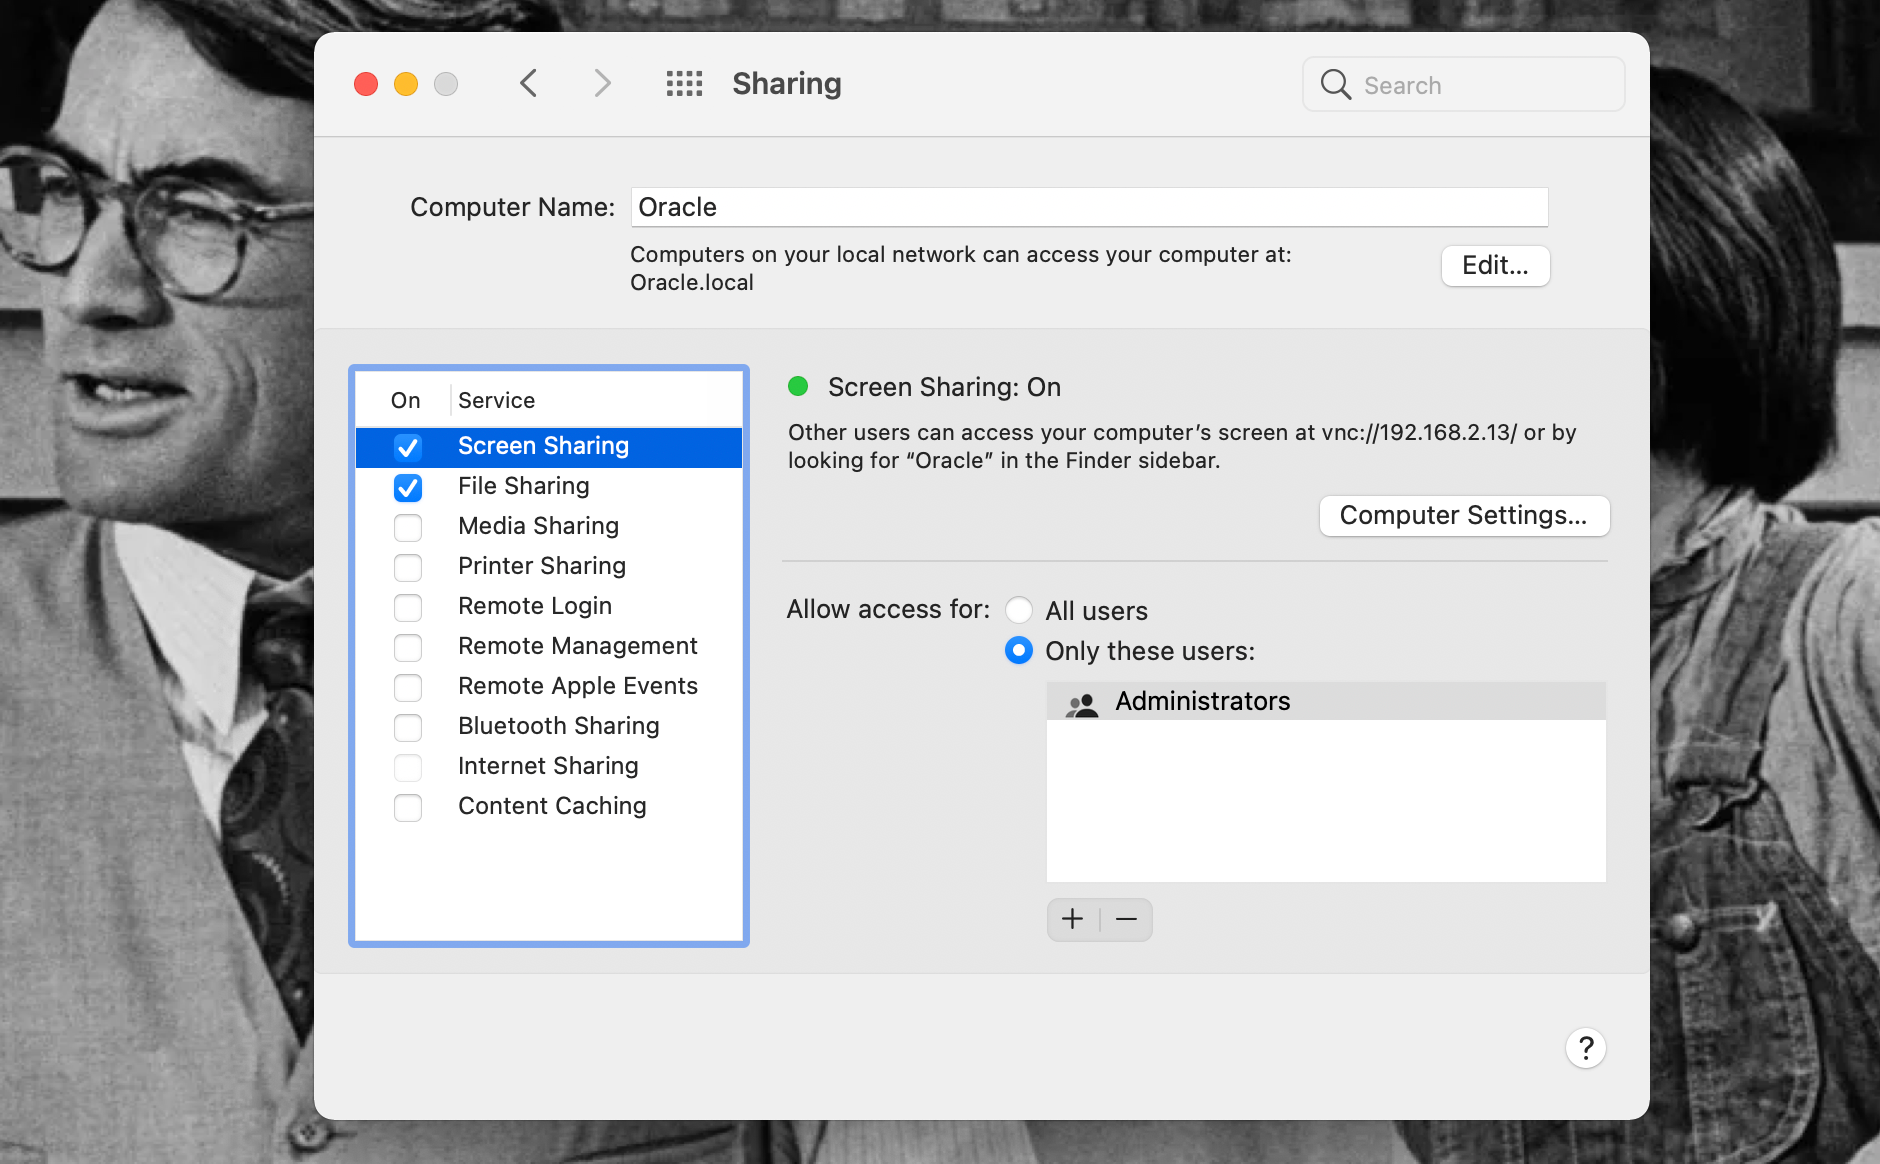
To remotely access the screen of your Mac mini server, simply check the Screen Sharing box. Here you’ll add or remove users you want to have this access, much like you did with the file sharing.
Remote access will be available via Finder on Mac devices or by inputting the IP address listed in VNC viewers on other devices. With this you’ll be able to see your Mac mini’s screen and adjust things on the server without being near it.
Upgrading for More
Many features built into the Mac mini can make it into a good private server. But if you want multiple people accessing your server, or to stream media from it, you’ll need some additional hardware in addition to the macOS features we described above.
Thankfully the Mac mini is easily outfitted with such hardware. With four Thunderbolt ports fast enough for external accessories that add things like storage, the Mac mini is pretty customizable.
It’s also a rare Apple product that can be physically opened and altered by users, should you want to add or alter hardware inside of the machine.
That might not be necessary with recent Mac mini models. The M1 chip available in them makes them really powerful computers—more powerful than their Intel chip predecessors. These Mac minis can have up to 2TB of storage and 16GB of RAM.
The more activity the server will be seeing from different users and devices the more computing power you’ll want. So it’s great that you can just buy a Mac mini that can handle a lot right off the bat.
If you have an older version of the Mac mini, though, it can still be customized with things like external hard drives. If you’re tech-savvy you can even install dual hard disks into some models to make them more capable computers, and therefore better servers.
Storage is really key if you want to use your Mac mini as a media server. Regardless of the Mac mini model you’re starting with, you’ll need the space for photos, videos, and music. Ensuring your Mac mini is also a solid computer should help media files play well from the server to whatever device you’re using.
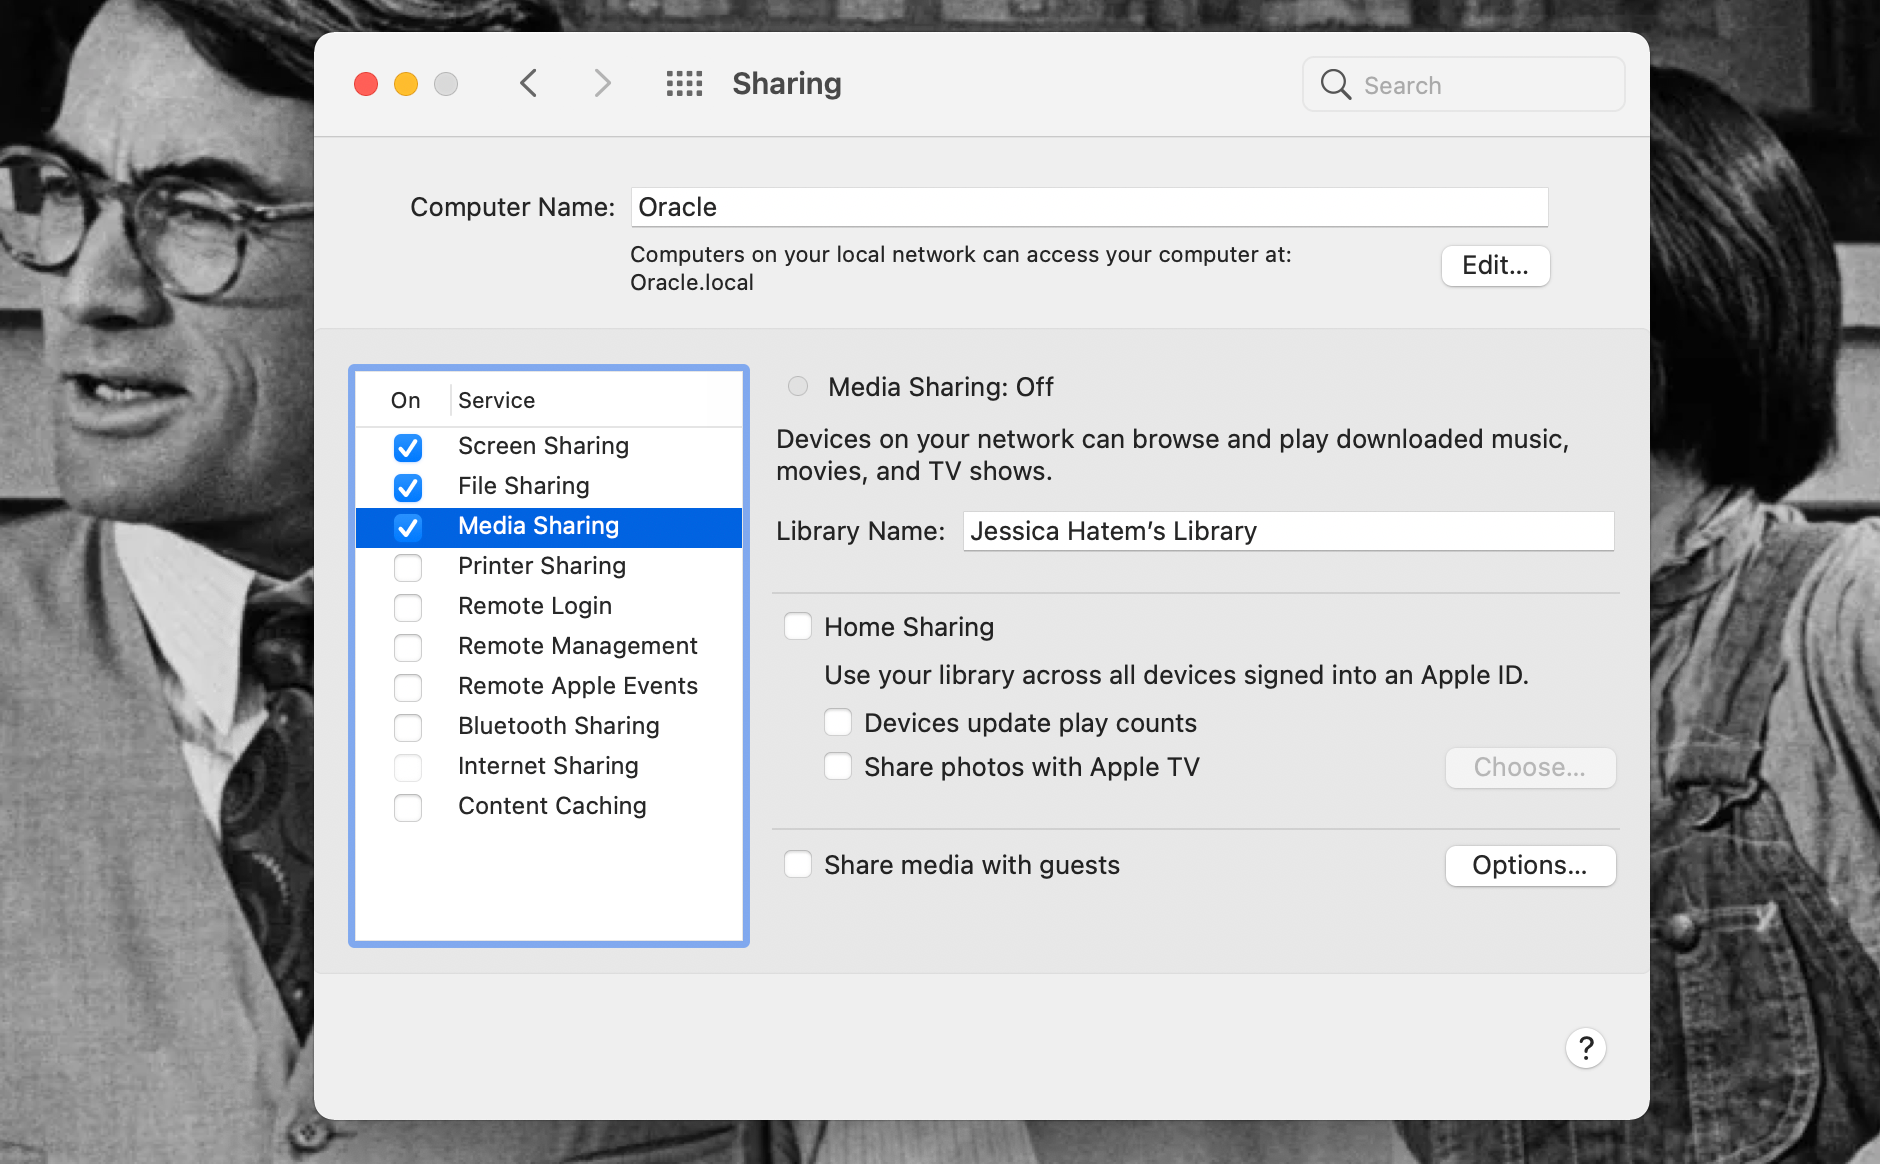
At least macOS makes setting your Mac mini up as a media server fairly simple. In System Preferences > Sharing, just check the Media Sharing box.
You’ll be told you need to select a sharing service for the sharing to be fully turned on. If you select Home Sharing, you’ll allow devices logged in with a particular Apple ID to access all access the media library on the Mac mini.
If you select Share media with guests any device will be able to access the media library. If you click on Options you’ll be able to set a password for the media, though, and decide what media is and isn’t available for others to access.
You can also upgrade this experience by using an app like Kodi, Plex or Emby to help manage your media library.
Accessing your Mac mini server when not on the same network will take obtaining Remote Access or Remote Desktop software and ensuring your server exceeds any technical requirements that might have. If you plan to do that a lot you’ll need to make sure your Mac mini is prepared for that too.
Is the Mac mini a Good Server?
When it comes to using the Mac Mini as a server for file sharing, remote desktop access, backups, and media streaming, it can definitely hold its own.
Devices designed to be servers might ultimately be more powerful and better for groups of people all accessing files at once. But the Mac mini can absolutely let you set up a personal server pretty cheaply with just a few clicks.
We’d definitely recommend setting up a personal server at home, and doing so with the Mac mini. Hopefully, our tips will help you turn your current or future Mac mini into the server of your dreams and help you keep your files safe and accessible in another great way!

