When you run into a problem with file permissions on Linux, quite often the source of your frustration will have something to do with settings pertaining to either the file’s owner or group. It’s pretty much inevitable that if you use Linux regularly, at one point or another, you are going to have to change a file or directory’s owner or group setting to fix a problem.
In this article, we’re going to demystify the concepts of Linux file owners and groups and show you how they affect who can access and manipulate the data on your system.
How to Find a File’s Owner and Group in Linux
At the Linux command line, you can view both the owner and group permission settings by using the ls -l (that’s a dash with a lowercase L) command. The -l switch will format the listing in columns that give you more details about your files than the standard ls command output.
The first column shows the type of file and its permission settings. The second column shows the number of links to the file (usually 1). The third and fourth show the owner and group respectively. They are often (but not always) the same.
The settings displayed in the first column represent the bits that determine file permissions in Linux. The first character represents the file type. For example, a "-" indicates a regular file, and a "d" represents a directory. The three following bits (highlighted above) represent the file owner’s permissions—r for read, w for write, and x for execute.
Any permission that is not enabled will show as a dash. Then, in the third column of the directory listing, you see the user that owns the file.
The second set of three bits in that first column (highlighted above) represents the permissions for the group that has access to this file. They work the same as above. They will be either a dash or one of r, w, and x.
How to Change the Owner of a File on Linux
With most Linux distributions, you will need to be the root user or a user with administrative privileges (i.e. you can use sudo) to change the owner of a file or directory.
Giving ownership of a file or directory to any user will give that user complete freedom to do whatever they wish with the file. They will be able to read it, modify it, delete it, and change permissions that dictate what other system users can do with it.
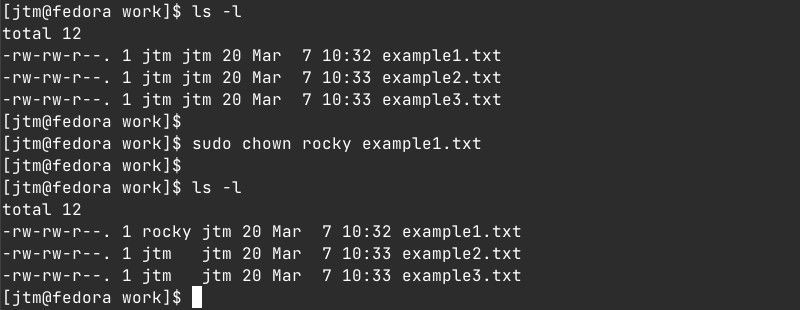
To change the owner of a file or directory, use the chown command with the following format:
sudo chown <user> <file or directory>
Changing the owner of a file will not affect the group settings or permissions of that file.
How to Change a File’s Group Setting on Linux
If you are the owner of a file, you can change its group settings to any existing group. If you are not the owner, you will need root or sudo privileges.
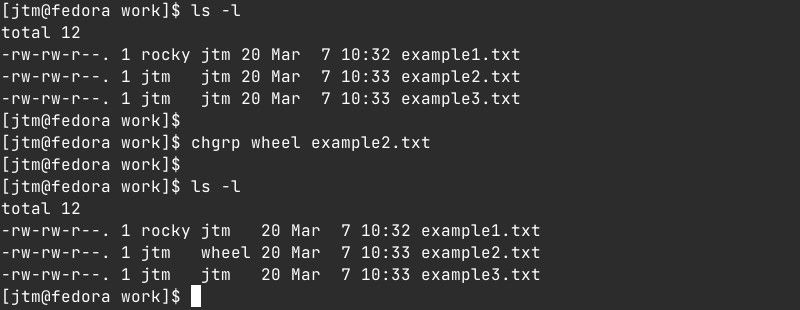
To change group access to a file or directory, use the chgrp command with the following format:
chgrp <groupname> <file or directory>
This will give all members of the chosen group access to the file or directory according to the item’s group permission settings.
How to Change a File’s Owner and Group at the Same Time
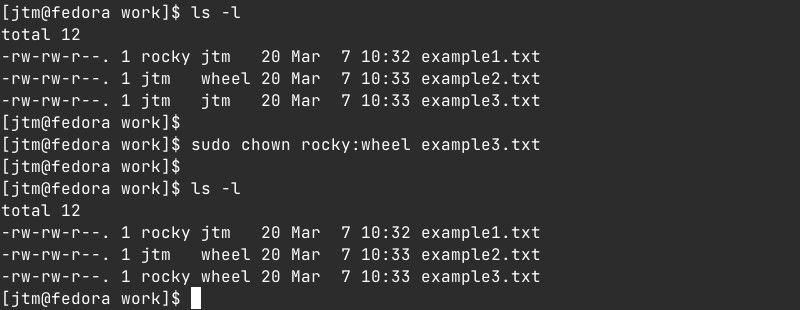
If you need to modify both the owner and group settings of a file or directory, you can do so with a single command. Since it involves changing the owner, you will need to have superuser privileges.
To accomplish this, use the chown command as above but specify both the new owner and new group separated by a colon, with no spaces.
sudo chown <newowner>:<newgroup> <file or directory>
How to Create a Group Using the Linux Terminal
Groups allow you to assign access privileges to multiple users quickly and easily. Users on a Linux system can be members of more than one group at a time. You will need to be the root user or have sudo privileges to create groups.
To add a new group to the system, use the groupadd command.
sudo groupadd <groupname>
To make sure your group has been created, you can use the getent command to list all groups or combine it with grep to look for a specific group.
        getent group
getent group | grep <groupname>
If the output from the command shows the name of the group you were trying to create, this indicates that it was successfully created and you can add users to it. You can also have a look at our guide to managing groups on Linux for more detailed information about setting up new groups.
How to Add a User to a Group on Linux
Adding a user to a group is accomplished with the usermod command. Again, you will need superuser privileges, and both the user and the group must already exist. The following command will add a user to a group:
sudo usermod -a -G <groupname> <username>
The -a switch in the command above stands for append and is important. If you add a user to a group without using the -a flag, the user will be removed from any other groups that they may already be part of. The -G flag signifies that you want to add the user to the group name following the switch.
How to Remove a User From a Group
Removing a user from a group is done with the gpasswd command. Enter the command (using sudo) in the following format.
sudo gpasswd -d <username> <groupname>
This will delete the specified user from the specified group, leaving any other group memberships intact.
How to Remove a Group Using the Linux Terminal
Finally, the last thing you’ll need to know to manage groups on your system is to remove a group. First, it’s important to note that a group must be empty. If the group you want to remove is small, you can use the command above to manually remove each member.
If the group has more than just a handful of members and you need to remove them before deleting the group, you can remove them all at once with the groupmems command. Enter the command with the following format to remove all users from a specific group:
sudo groupmems -p -g <groupname>
Once all members have been removed from the group, you can delete the group from the system with the groupdel command, as follows.
sudo groupdel <groupname>
Linux User Groups Give You Greater Control
With the commands above you’ll be able to manage the owner and group access settings for any file or directory on your Linux system.
If you, or a user on your system, are having trouble accessing something, making sure the owner and group permissions are properly set is often a good first step to finding the solution.


