There are plenty of reasons why you may want to change the hostname of your Linux system. Unfortunately, changing your hostname is not exactly an intuitive process. Don’t worry, though, we’re going to show you how you can change your machine's hostname in less than a minute with just a few clicks and commands.
Although this guide uses Ubuntu to demonstrate the steps required to change the hostname, the commands should work on other Linux distributions as well.
What Is a Hostname?
All computers connected to a network have an IP address and a hostname. The hostname is the name used to identify a computer on a network in “human-readable” form. Without the hostname, when you try to locate a computer on a network, all you would see are numbers, or IP addresses, like 127.0.0.1.
While IP addresses are a great way for computers to identify each other, they don’t really do much to help people identify specific computers. For example, let’s say you want to set up a network shared folder on your Ubuntu system. If someone else wants to access that folder, they will be able to find it much easier if they see your computer on the network as “larry-laptop” rather than “192.168.0.24”.
One common reason for switching hostnames is to avoid duplicate names on the same network. Ubuntu, for example, sets the hostname of all new installations to “ubuntu” by default. If you have more than one computer on your home network and want them all running Ubuntu Linux, you’re going to have to change the default hostnames to avoid problems.
How to Change the Hostname Through System Settings
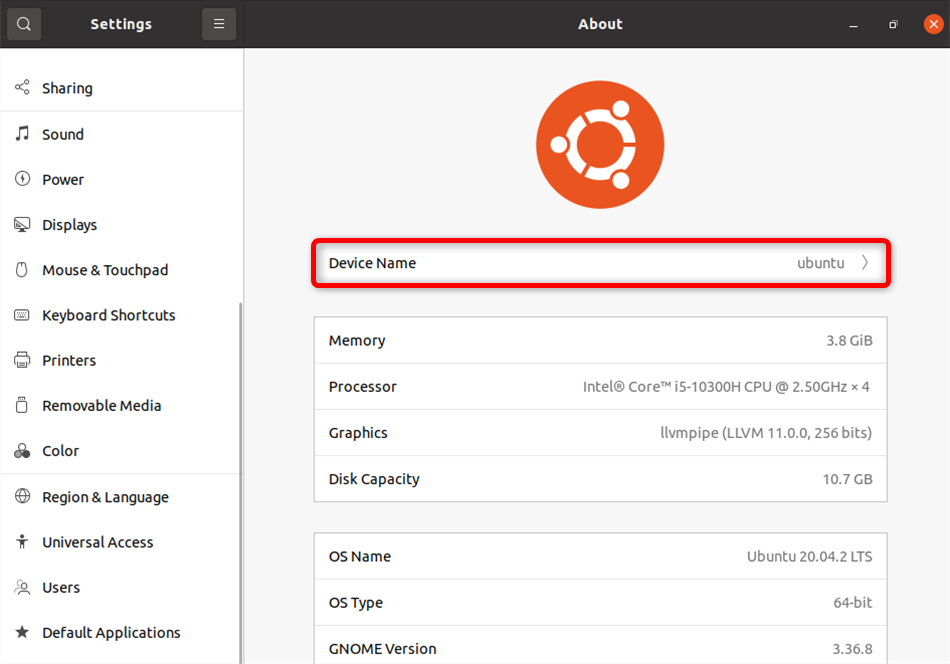
The easiest way for most people to change the hostname on a Linux machine is to simply go into the system settings and click on About. Your computer’s current hostname will appear as the first item on the list, under Device Name, or similar labels on other distros.
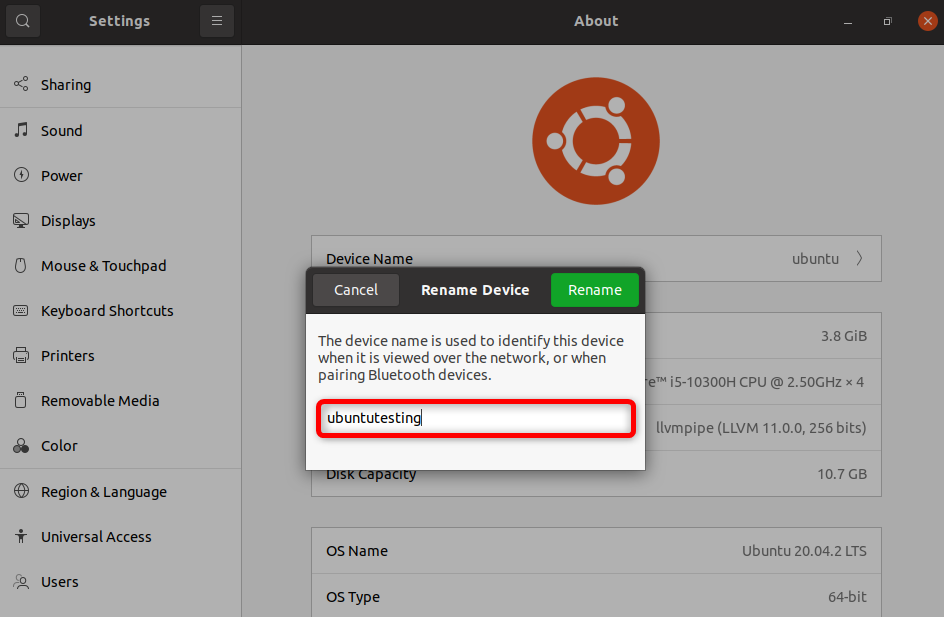
It is not immediately obvious, but you can click on the Device Name item and a dialog box will appear, allowing you to rename your device. Simply type whatever name you would like to use into the dialog and then click on Rename.
The new hostname will be permanently set and your computer will identify itself on your network with the new name.
Change the Hostname Using the Linux Terminal
The options that appear in your system settings depend on the desktop environment you are using. The process described above will work with Ubuntu’s default GNOME desktop. If you have switched your desktop environment or window manager, however, you may not have the option to change the hostname in system settings.
If that's the case, you can change your hostname by opening a terminal window and entering one simple command.
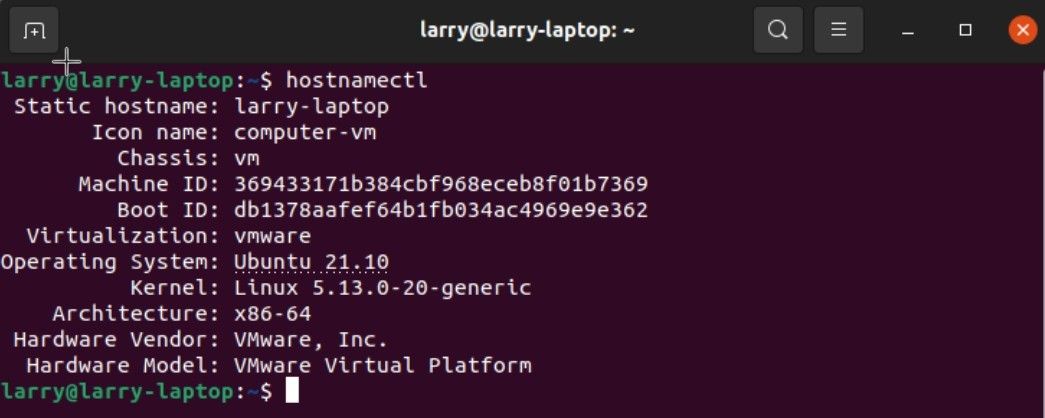
The hostnamectl command will allow you to view and change the hostname on most other Linux distributions. Simply open a terminal window and enter the following command to view your current hostname along with a few related details:
hostnamectl
Output:
To change the hostname, enter the following command, replacing new-hostname with the name you’d like to use:
hostnamectl set-hostname new-hostname
To verify that the new name has been set, type hostnamectl again and you’ll see the updated information.
Again, the command-line method for changing the Linux hostname should work on nearly all modern Linux distributions, not just Ubuntu.
Learn More About How Linux Networks Work
Now that you’ve successfully set your computer’s hostname, it's time to dip your toes into networking with Linux. If you’re having other network problems with your system (or even if you’re just curious), the ss command in Linux will help you troubleshoot the errors.


