Client proofing is an important feature that most photographers and retouchers need in order to work with their clients efficiently. Without it, the process of sitting down with the client to make selections out of what could be hundreds of images would indeed be time-consuming.
Alternate methods of client proofing, like exchanging files and notes, usually amount to a lot more work and a lot of wasted time that can ultimately lead to a frustrated client.
In this article, we’ll cover how to use Lightroom’s Album sharing feature for client proofing. For users who already subscribe to an Adobe CC subscription, there’s no other purchase or extra plugins necessary.
What Is Client Proofing?
Client proofing is simply the process of sharing images so that the client can select which ones the photographer or retoucher will have to edit. There are many client proofing services available, but Adobe users have this feature available in Lightroom.
To use this tool we describe in this article, you'll need to select an Adobe subscription that includes Lightroom. If you're simply curious to follow along, you can sign up for a free trial.
Have the Client Create an Adobe Sign-In
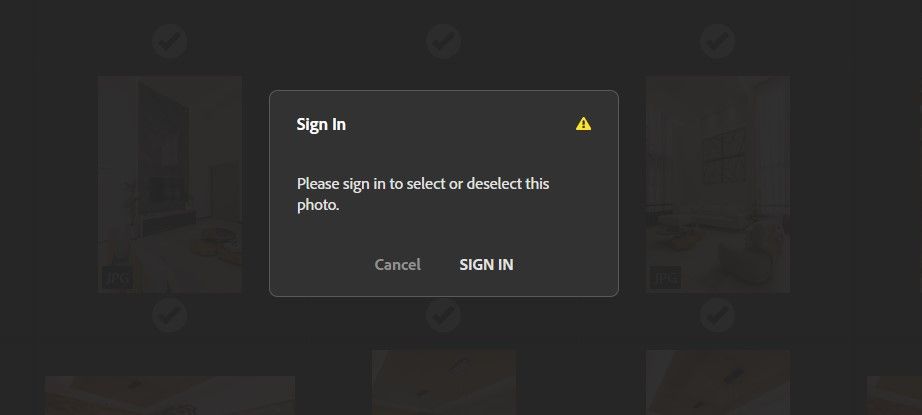
Adobe requires all viewers of its client-proofing feature to sign in to Adobe before access is granted to make selections. Note that there are no purchases or obligations for signups.
If an image is selected before signing in, then a pop-up box will appear—prompting the user to Please sign in to select or deselect this photo.
When the sign-in option is clicked, new users will be prompted to create an account with an Email Address or to click on one of three buttons: Continue with Google, Continue with Facebook, or Continue with Apple.

Once this happens, permission is granted—and the client will have access to make the predetermined number of selections if that option was used. Otherwise, the client will have access to an unlimited number of selections.
Let’s move on to the actual creation of the client-proofing URL in the web version of Lightroom.
How to Create a Client Proofing Album With the Web Version of Lightroom
Collections in Lightroom and Lightroom Classic are essential when it comes to client proofing. If you’re already working with a Collection, it will appear as an Album in the web version of Lightroom. We’ll imagine then that we’re working with an existing Collection that’s already been set up after importing all the client’s images.
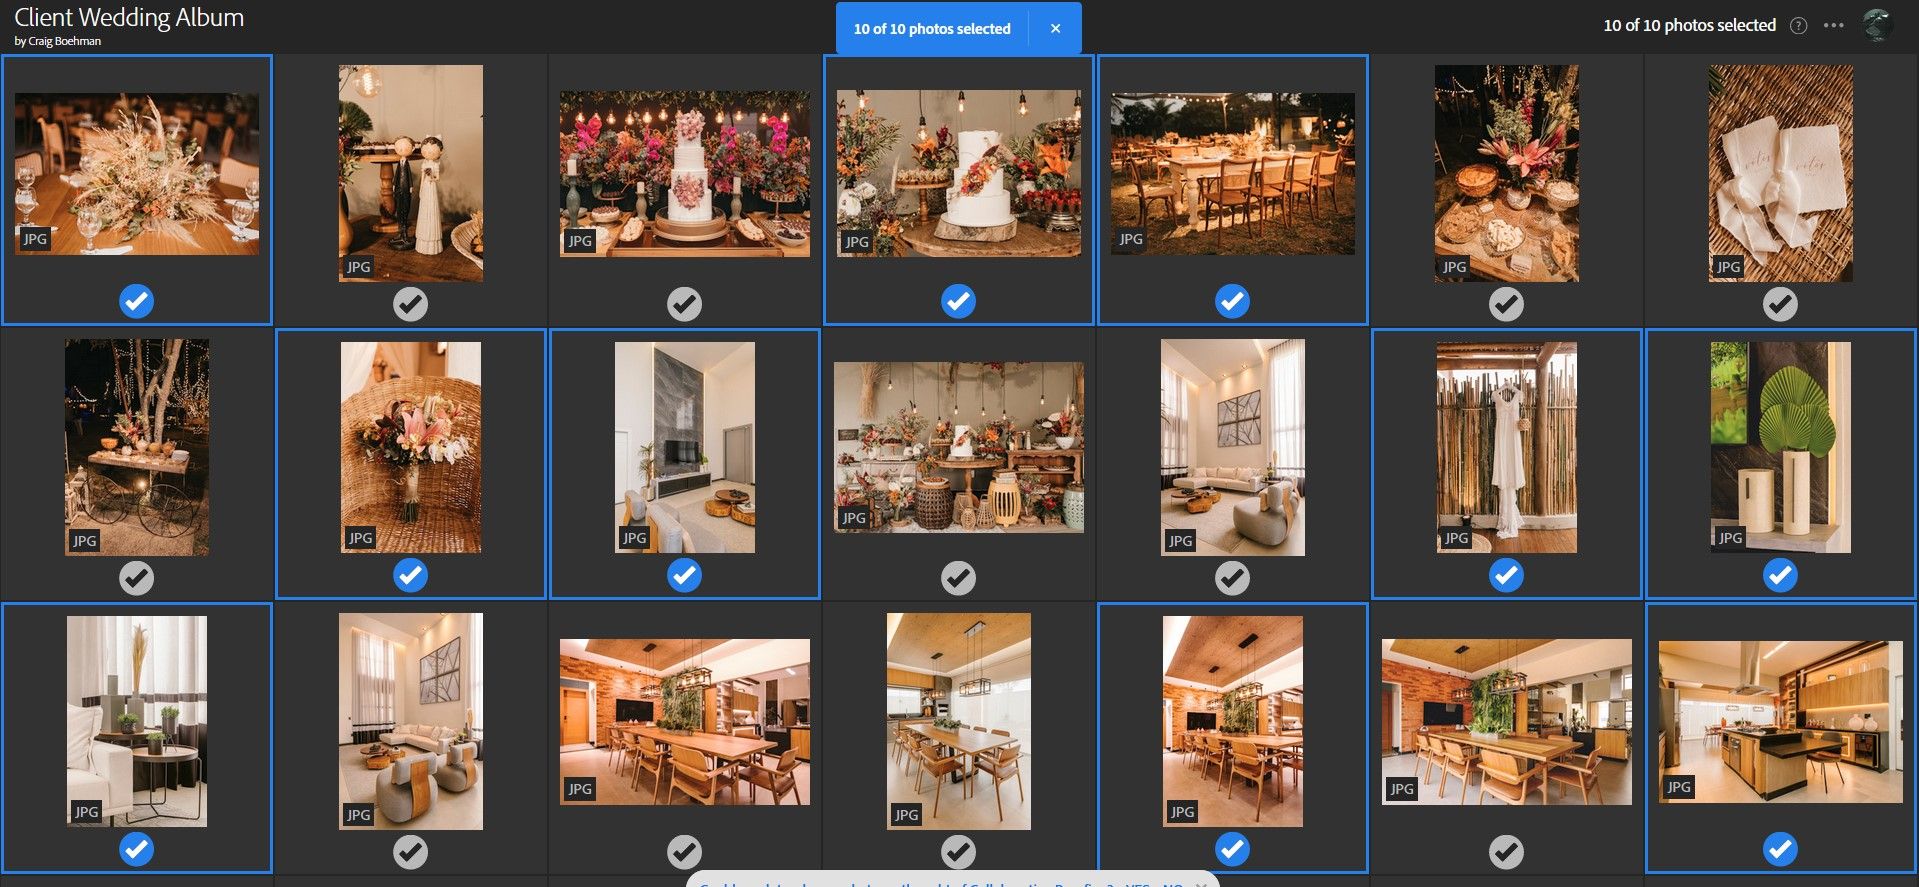
To demonstrate, we’ll use the Album named Client Wedding Album that was created in Lightroom Classic. In the following steps, we’ll set up client proofing in the web version of Lightroom.
Go to your browser and type in the URL: lightroom.adobe.com. Then, locate the album of choice. In our example, we called it Client Wedding Album.

In the bottom left-hand corner, click the Proofing icon, a rectangle with a checkmark.
Then in the upper right-hand corner, click on the + icon and select Enable Proofing.

The Proofing pop-up window will give you the option to limit the number of photos that the client may choose. If needed, click in the box next to Limit Selection To and type in or use the arrow keys to choose the number. For this example, we’ll limit the selection to 10.

Click on the clipboard icon to Copy Link to Clipboard. This will serve as the URL to give to the client.
As you can see if you’ve been following along with us, it’s pretty simple to set up client proofing in the web version of Lightroom. Now, let’s see how the client’s viewing experience would be since we’ve set up the client proofing to allow 10 selections.
How to Test the Client Proofing URL Before the Client Sees It
To ensure a smooth client experience, it’s recommended to double-check that everything has been set up correctly. Follow the below steps to test the client proofing URL before you send it to the client.
-
Open a private browser. Since you’ll be signed in to Adobe already, this will enable you to view the client-proofing URL from their perspective. Paste the client proofing URL.

-
At the top of the screen, you’ll see the number of selections that were set up initially, in our example, 0 of 10. When you click on any image, you’ll be prompted to sign in. Sign in with your own Adobe ID or use another email address.
-
Once access is granted, simply click on any of the checkmarks below the images. Click again at any time to deselect an image. After the maximum number of selections is made, the client can close the browser (there’s no submit or save option).


When everything looks good, send the client proofing URL to the client.
If the client ever requests more images, all you have to do is open the Album back up again and change the number.
Client Proofing Made Easy With Adobe Lightroom
Adobe users have a client proofing feature built-in to Lightroom that most photo editors simply don’t have. This is very advantageous to photographers and retouchers who don’t want the hassle of purchasing another online service. It also guarantees a smooth transition from the final stages in post-production to the final delivery to the client.