Multitasking on a small screen is challenging. You can’t have multiple apps open on the screen at once, and you need to constantly juggle between different apps to work on them.
If you're on Linux, you can leverage the Always on Top feature to work around this and improve your multitasking experience. Here's a guide to help you through the process.
What Is Always on Top? And Why Should You Use It?
Always on Top is a built-in feature on most Linux distros that lets you pin an app to your desktop so that it always appears on top of other app windows regardless of what apps you have/will open on your computer.
For instance, say your work requires you to use multiple apps in the split-screen mode on your desktop such that you need one app to be always on top while you keep rotating the other apps alongside it. In this case, you can enable the Always on Top mode for that particular app window to have it always appear on top of your desktop.

With Always on Top enabled, all the opened apps and the new apps you open going forward, go behind your pinned app. If you prefer, you're free to move your pinned app around the desktop to arrange it to your preference, and it'll continue to hover over other app windows. Once you're done working in a multi-window view and no longer want the app to appear on top of your desktop, you can unpin it and reset it to its default window state.
One thing you need to keep in mind, however, is that the Always on Top feature doesn't work with maximized apps. It makes sense because, ideally, you maximize an app window to utilize the entire estate of your screen, and enabling the Always on Top mode in this setting defeats the feature's very purpose in the first place.
How to Enable Always on Top in Linux
There are a few different ways to enable the Always on Top option in Linux. You have the option to either do it manually with your mouse or use a keyboard shortcut for faster activation. In addition, there's also a custom shortcut trick that makes toggling even quicker.
Let's go over each of these methods in detail.
1. Enable Always on Top Manually
The default and probably the most preferred way of enabling the Always on Top mode is manually using a mouse and keyboard. It involves the following two steps:
- Open the app you want to pin on top of the screen.
- Right-click on the app’s title bar and select Always on Top from the menu options. Alternatively, right-click on the title bar and press the T key.
Once enabled, your pinned window will now afloat other app windows on your desktop. To disable it, go over the same steps again.
2. Enable Always on Top Using Keyboard Shortcuts
Although the default method works fine, it requires using a mouse and involves an extra step. However, if you prefer using a keyboard over a mouse, you have a more direct way to enable Always on Top.
To use this method, open the app you want to pin on top of your desktop and press the Alt + Space keyboard shortcut. When the menu window pops up, press the T key to enable Always on Top. For getting out of the mode, follow the same steps.
3. Toggle Always on Top With a Custom Shortcut
While the two methods we've discussed so far do get the job done, if you want an even quicker way to toggle Always on Top, you can do so by creating a custom keyboard shortcut for it. This way, you can avoid using the mouse and even bypass the extra step of first triggering the menu options and then pressing the T key altogether.
To create a custom shortcut, you first need to install wmctrl on your system. Wmctrl is a Unix/Linux program that lets you interact with the X Window manager and allows you to manage the windows and user inputs of the system.
To install the package, open the terminal and type the following command:
sudo apt install wmctrl
Once you have installed wmctrl, follow the steps below to create a custom shortcut:
- Open System Settings.
- Go to Keyboard and click on the Shortcuts tab.
- Select Custom Shortcuts from the left pane and click on the Add custom shortcut button at the bottom.
- In the popup window, click on the text field against Name and enter a name for your shortcut.
-
For the Command label, click on its adjacent text field and enter the following command:
wmctrl -r :ACTIVE: -b toggle,above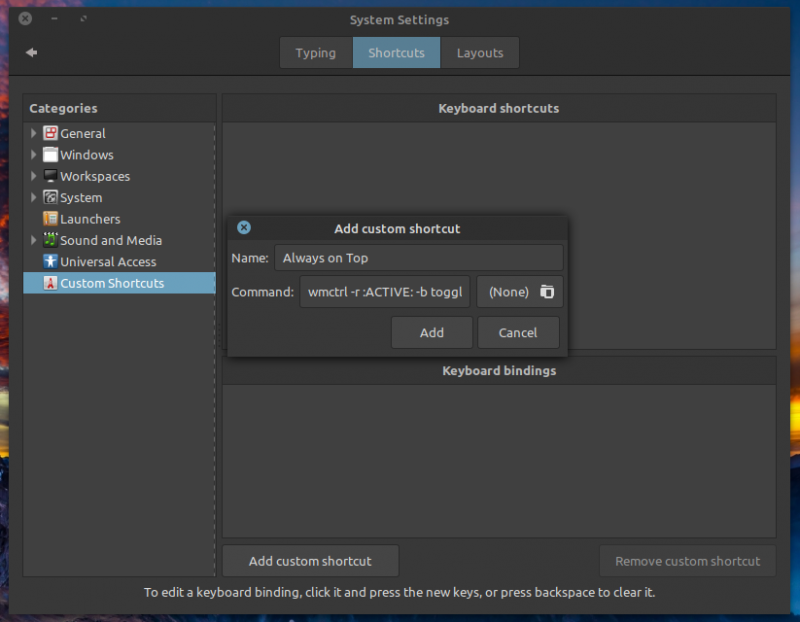
- Click on the Apply button.
-
Double-click on unassigned under the Keyboard bindings section and press a key combination that you want to assign to this shortcut.
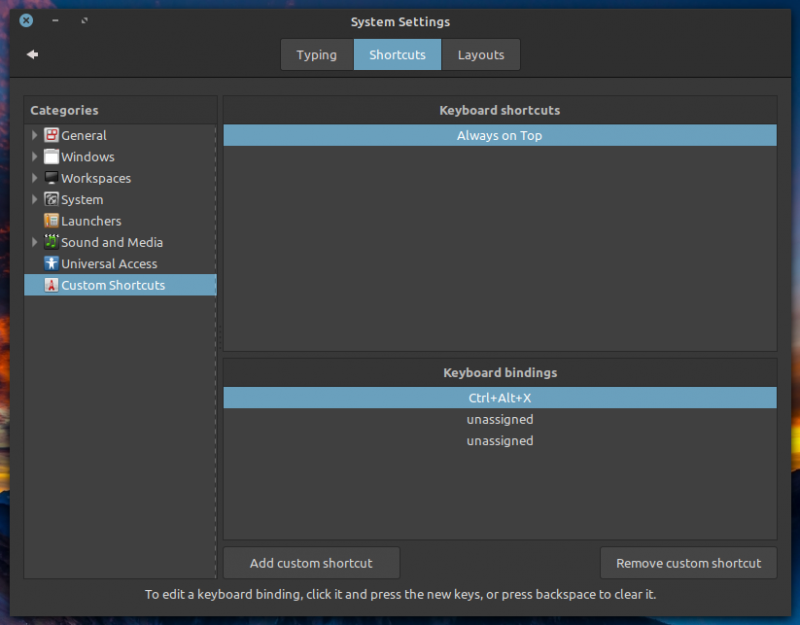


Your custom keyboard shortcut for toggling the Always on Top mode should now be active.
To check if it works, click on the app window that you want to keep on top of the desktop and hit the keyboard shortcut. The shortcut you’ve just created functions like a toggle switch so you can enable or disable the Always on Top window mode using it.
Efficiently Managing Windows on Linux
Using any of the three methods listed above, you should be able to toggle the Always on Top mode for any app on your Linux computer. Although having multiple ways to use a window feature sounds overkill, it gives you the option to choose a method that works best for you.
The custom shortcut method is probably the most ideal way to toggle the Always on Top feature. Even though you need to set it up initially, the convenience it offers over other methods saves you multiple clicks when you consider the number of times you'll use it in the future.
Although you can control your Linux OS graphically by using desktop environments and window managers, working with the command line has its own advantage. If you're new to Linux, learning some fundamental commands will pave your way towards becoming an advanced user.