
LUTs, or lookup tables, are part of many editors' workflows. When used properly, they can be the difference between an hour of work and a single keystroke; operating as a handy shortcut. Applying a LUT to your footage in Kdenlive is a straightforward process, but there are some extra options that editors may not be aware of.
What Are LUTs?
A LUT is a set of pre-configured values that can be applied to footage either before beginning the color correction process or afterward as a final step in the process.

Coming in many different forms, a good LUT can be used to simply convert footage from one color space to another. Or it can be used to dramatically alter the style of the footage in a single step.
Which LUT Formats Does Kdenlive Support?
Kdenlive supports LUTS that are created in four different formats:
- .3dl (After Effects)
- .cube (Iridas)
- .dat (DaVinci Resolve)
- .m3d (Pandora)
Those formats are generally created in other video editing software and then exported out to be used by other editors. Applying the LUT in Kdenlive is exactly the same in each case, regardless of the format.
How to Apply a LUT in Kdenlive
A LUT can be applied to a single clip, an entire track, or all video tracks in the project (called a master). If we think about our editing tracks like layers, a master track would be on the bottom, followed by the track LUT, and finally, the LUT applied to a single clip.
To use an example of how that would work, an editor could use a master LUT to convert the entire project from their camera's default color space into a more commonly used Rec709. They could then apply a different LUT, perhaps a more stylized color grade, to a single track, or even to a single clip in order to further enhance their project.
Kdenlive comes packaged with a small handful of built-in LUTs. We'll discuss further how to apply custom LUTs and a few tips on where to find them, but for now, we'll be using a built-in LUT on our example footage, which has been generously provided by Cinestudy.

To apply a LUT in Kdenlive:
- In the Effects tab, go to Color Correction > Apply LUT. Or alternatively, search for LUT in the search bar at the top of the Effects tab.
-
Click and drag the effect to one of three different targets on the editing page, depending on where and how you wish to apply the LUT itself.
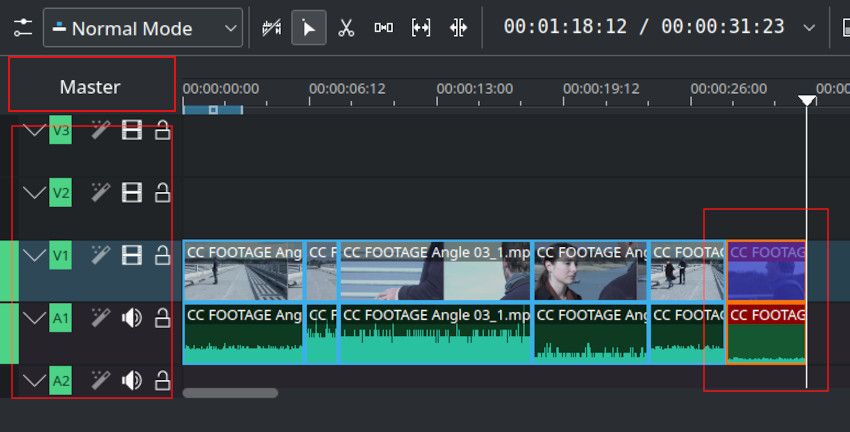
- To apply the LUT to the entire project, drag the effect to the label marked Master in the top-left corner of the timeline and release it.
- To apply the LUT to a single track, drag the effect to the left side of the track you wish to use. The magic wand icon will light up if an effect has been applied to that particular track.
- To apply the LUT to a single clip, drag the effect to the clip itself in the timeline.
- Open the Effect/Composition Stack tab and click on the area where you applied the LUT above. This brings up the effect editor, where you can choose the LUT you wish to use from a drop-down list.
- Below the drop-down is an option to choose one of three interpolation methods: Nearest, Trilinear, or Tetrahedral. This affects the quality and smoothness of the applied LUT but does come with a performance trade-off when playing back the clip in the editor.

If you're also a DaVinci Resolve user, here's how to import and export LUTs in Resolve.
How to Adjust the LUT’s Effect
Often, a LUT will not fit the footage without some adjustment. Depending on the settings within the camera, a LUT could make the footage too dark, for example. For this, we return to the Effects tab and the Effects/Composition Stack.

Any filter applied to the Effects/Composition Stack affects the ones below. In the example we are using, for instance, a simple Bézier curve is applied above the LUT in order to brighten the footage a little bit after the initial effect is applied. Color correction effects, such as Levels and Brightness, can be stacked on top of each other to either enhance or minimize the LUT at the bottom.
How to Download and Apply a Custom LUT
Custom LUTs come in many different styles and can be found in various places online. Some are free, and some are for purchase. Depending on your budget, various options are available, as well as the ability to create your own LUTs in some software.
In our example, we've downloaded a free LUT pack offered by SmallHD.

- Save your LUT in a folder on your computer. Make a note of its location.
- Use the same process described previously to apply a LUT to your project or clip. When the time comes to choose a LUT from the drop-down, however, choose the custom option from the bottom of the list.
- A file explorer will open, allowing you to navigate to the folder in which you saved your custom LUT.
- Double-clicking on your custom LUT will not only apply it immediately to your footage, but the drop-down menu will now contain the LUT and any other LUT that may be in the same folder.
How to Save Your LUT for Later Use
So you've applied a LUT and have added a number of filters above it to make it look better with your footage. Now what? Do you have to re-apply those effects each time you add that LUT to a new clip? While you cannot create a LUT file directly from Kdenlive, you can save it for later use in Kdenlive.
In order to save your effect stack (which includes your LUT and any effects you've applied above it), click on the save icon at the very top of the Effects/Composition Stack tab. In the box that comes up, enter a name and a description. That effect stack will now appear in the Effects tab under the custom category.
Apply LUTs in Kdenlive to Save Time
Applying a LUT in Kdenlive can convert your footage to a new color space before beginning editing. Or a quick stylistic overlay to give you an idea of what your finished product will look like. But the convenience comes with a consideration, and that is that a LUT is rarely a one-stop solution.
LUTS can be created on vastly different hardware, from a home laptop to a professional editing rig with a fully calibrated display to anywhere in between. How the footage looks after the LUT is applied depends on how closely your own display matches that of the LUT's creator, or whether your own display is calibrated correctly.