
Interactive websites can provide a more engaging experience for users. There are many ways you can make a website more interactive, such as adding animations, tooltips, or other extra effects.
Some websites also display information when the user hovers over an element on the page. This includes maps or other visual data that allow the user to hover over the image to view a data point using a tooltip.
You can achieve this effect using HTML, CSS, and JavaScript using certain CSS techniques and JavaScript DOM concepts.
How to Add a Tooltip Over the Image in an HTML File
Images can be a useful way to convey information in a visually appealing way on a webpage. They are also useful for adding other engaging effects such as a simple image gallery.
You can add a tooltip over an image in HTML using CSS and JavaScript.
The code used in this project is available in this GitHub repo under an MIT license.
-
In a new file called index.html, add the basic structure of an HTML file:
        <!DOCTYPE html>
<html>
  <head>
    <title>Image Tooltip Example</title>
  </head>
  <body>

  </body>
</html> -
Inside the body tag, add a container div. This div will include both the image and the tooltip elements:
        <div class="container">

</div> -
Inside the container, add an image. Ensure an image with a matching filename is inside the same folder as your HTML file:
<img src="image.jpg" class="image" height="420" width="840" alt="Your Image"> -
Underneath the image, add a div to represent the tooltip:
<div class="tooltip"></div> -
In the head tag, add a style tag. Inside the style tag, add some styling for the image container and the tooltip:
        <style>
  .container {
    position: relative;
    display: inline-block;
  }

  .tooltip {
   position: absolute;
   left: 0;
   display: none;
   padding: 5px;
   background-color: #000;
   color: #fff;
   font-size: 12px;
 }
</style> -
Create a new script tag at the bottom of the body tag:
        <body>
  <!-- Your webpage content here -->

  <script>

  </script>
</body> -
Inside the script tag, use the DOM selector function, querySelector, to get the HTML elements of the image and the tooltip:
        const image = document.querySelector('.image');
const tooltip = document.querySelector('.tooltip'); -
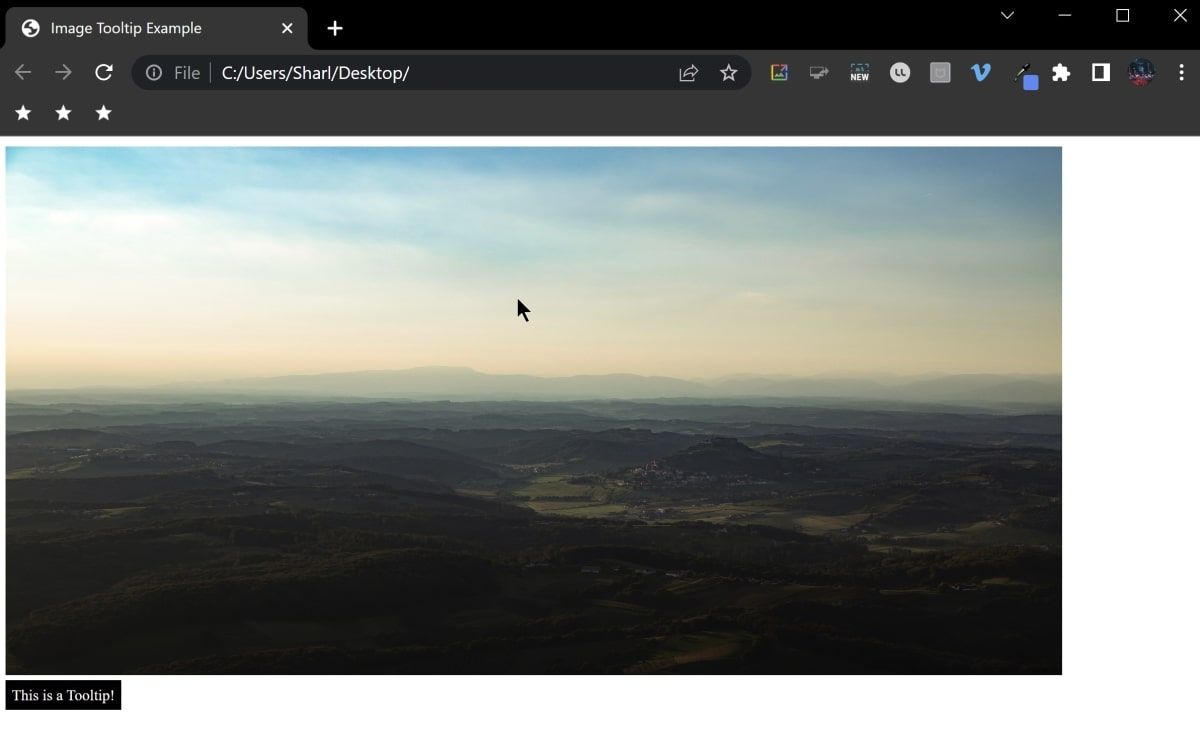
Add an event listener for the mouseover event. This function will run when you hover the mouse over the image. When this occurs, the tooltip will display on the screen:
        image.addEventListener('mouseover', () => {
  tooltip.style.display = 'block';
}); -
Add an event listener for the mouseout event. This function will run when the mouse leaves the image. When this occurs, the tooltip will disappear off the screen:
        image.addEventListener('mouseout', () => {
  tooltip.style.display = 'none';
}); -
Open the index.html file in any browser, and hover over the image to view the tooltip:

How to Calculate and Display the X and Y Pixel Coordinates of the Image
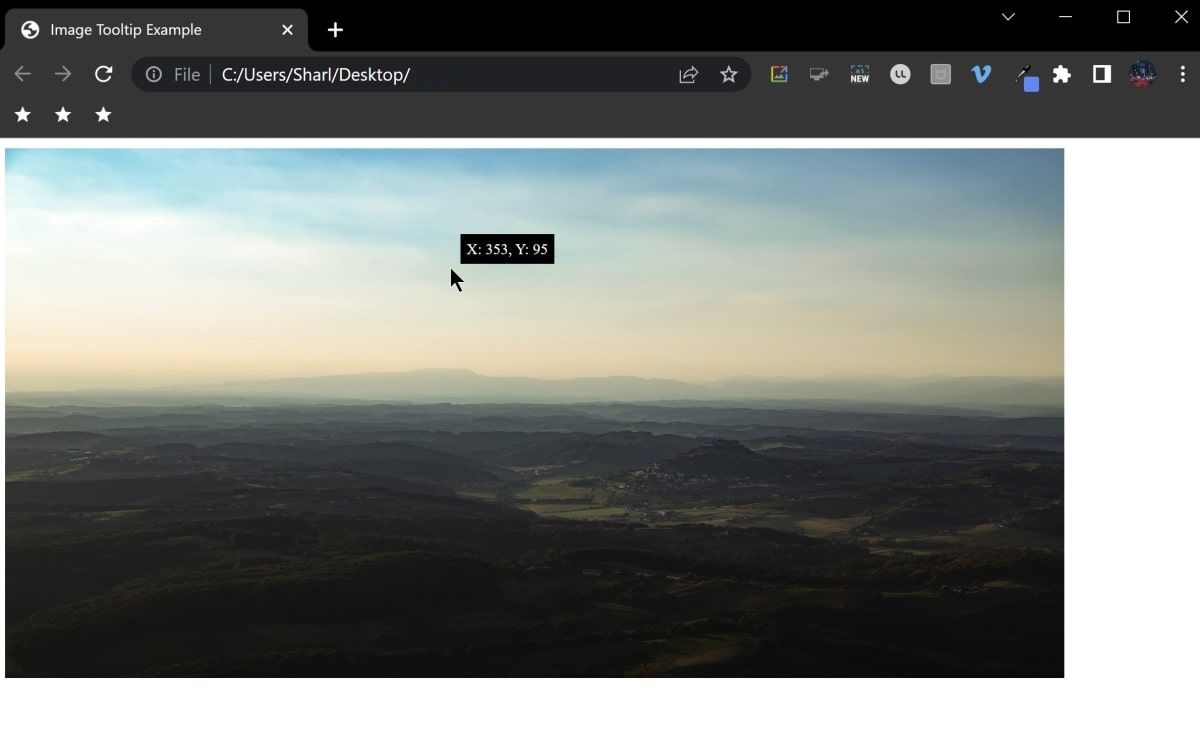
Now that the tooltip is visible on the page, change its position and its text to display the X and Y coordinates of the mouse.
-
Change the CSS styling of the tooltip, so that the tooltip is not visible before you hover over the image. This prevents you from seeing the tooltip at the bottom of the image before jumping to the cursor's location:
        .tooltip {
  position: absolute;
  top: -30px;
  left: 0;
  display: none;
  padding: 5px;
  background-color: #000;
  color: #fff;
  font-size: 12px;
} -
Inside the script tag, add another event listener, to listen for the mousemove event. This function will execute continuously every time your mouse hovers over a new pixel. Add the event parameter, which will input information about the mousemove event into the function. This information includes the image coordinates where the mouse is at that point:
        image.addEventListener('mousemove', (e) => {

}); -
Using the event, change the horizontal position of the tooltip using the left CSS property. Every time the mouse moves, this will update the value to match the X coordinates of the cursor, stored in the clientX variable:
tooltip.style.left = e.clientX + 'px'; -
Change the vertical position of the tooltip using the top CSS property. ClientY represents the y coordinates of the mouse. The offsetHeight property includes any additional padding or borders inside the tooltip. Since you don't want the tooltip directly where the cursor is, you can remove an additional 10px from the position:
tooltip.style.top = e.clientY - tooltip.offsetHeight - 10 + 'px'; -
Change the text content of the tooltip to display the coordinates:
tooltip.textContent = `X: ${e.offsetX}, Y: ${e.offsetY}`; -
Open the index.html file in any browser, and hover over the image to view the updated tooltip:

Adding Effects to Your Interactive Webpage
Now you understand how to add an interactive tooltip over an image on your webpage. You can continue advancing your HTML and CSS skills by experimenting with other interesting HTML effects.