
Apple users enjoy high levels of security in all areas, and their purchased content from iTunes is no different. A feature that protects these purchases is called “authorization.” Put simply, this feature ensures that only authorized devices are able to play the content you’ve bought in iTunes.
In this guide, we’ll talk about everything essential related to iTunes authorization. Let’s get to it.
What Is iTunes Authorization?
When you authorize a Mac using any of the Apple Music, Books, or TV apps, you allow it to access all the content you’ve purchased from the iTunes Store. Authorization prevents other Apple devices using your Apple ID from accessing your content unless they’re allowed to, making it a valuable security feature.
To make iTunes authorization more effective, Apple has limited the number of devices you can authorize at the same time to five. This limit helps you control how many devices can access your content at once.
When selling an authorized device, you should deauthorize it to remove its access to your iTunes content. As a result, the buyer will not be able to play or see any of your content from iTunes Store.
How to Authorize iTunes on a Mac or Windows PC
According to Apple, before you authorize your computer, it is recommended that you update to the latest verion of macOS (or the latest iTunes app version if you’re on a PC).
Once done, here’s how you can authorize your device:
- On a Mac, open the Apple Music, Books, or TV app. On a Windows PC, open iTunes.
- Sign in to your Apple ID, by going to Account > Sign In from the menu bar.
- Here, enter your login credentials and click Sign In.
-
Now, again on the menu bar, go to Account > Authorizations > Authorize This Computer.

- Enter your Apple ID and password, and click Authorize.
-
Once you see the confirmation message, click OK
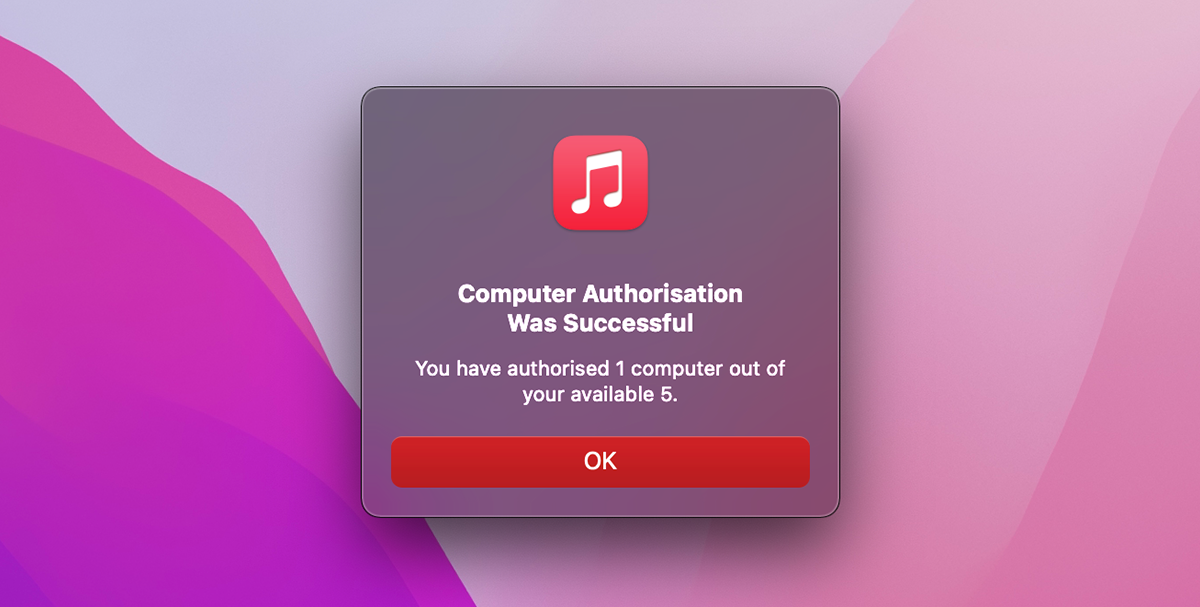


Interestingly, you will also be able to see how many devices you have authorized here.
If you run out of spaces to authorize a new device, you can deauthorize all devices—more on this in a moment—and authorize the five devices you use the most. You can do the same if you’ve lost an authorized device.
How to Deauthorize iTunes on a Mac or PC
The deauthorization process is similar to that of authorization. The only difference is that you need to click Deauthorize This Computer after you go to Account > Authorizations.
It also gives you a confirmation message that the device has been deauthorized.
How to Deauthorize All Devices
You will not see this option if you have authorized only one device, but you can choose to deauthorize all your devices at once.
To deauthorize all devices:
- Open the Music, Books, or TV apps on an app or iTunes on a Windows.
- On the menu bar, go to Account > Account Settings.
- Under the Apple ID Summary section, you’ll see Computer Authorizations.
- Click Deauthorize All.
Now, all your devices will be deauthorized, and you will again have five devices to authorize.
If you sell your only authorized device, you can deauthorize it by authorizing another Apple computer and then deauthorizing all devices again.
How to Fix iTunes Authorization Error Codes

There’s a chance that while authorizing (or deauthorizing) a computer, you see errors similar to “There was a temporary problem completing your request.”
This is a common problem that you can solve by:
- Retrying: A quick authorization retry often resolves this error.
- Restarting: If retrying doesn’t work and the error repeats, restart your computer and retry.
- Checking third-party software: Third-party security software may be interfering with iTunes here, try uninstalling, disabling, or updating them.
- Updating your Mac: If you’re using an older version of macOS, consider updating and then authorizing your device again.
If the problem still persists, you can contact Apple Support. However, another cause for this error can be running out of authorizations. If you already have five devices authorized, you could see this error too.
How to See Your Authorized Devices
With iTunes, you can’t see the names of the devices you have authorized—you can only see the total number of devices accessing your purchased content. When you authorize your computer, the iTunes app updates you about the number of authorized devices.
However, here’s the proper way of checking your authorized devices:
- Open the Music, Books, or TV apps on an app or iTunes on a Windows PC.
- On the menu bar, go to Account > Account Settings.
- Sign in again, if you’re required to.
-
You will now see all your information like this:
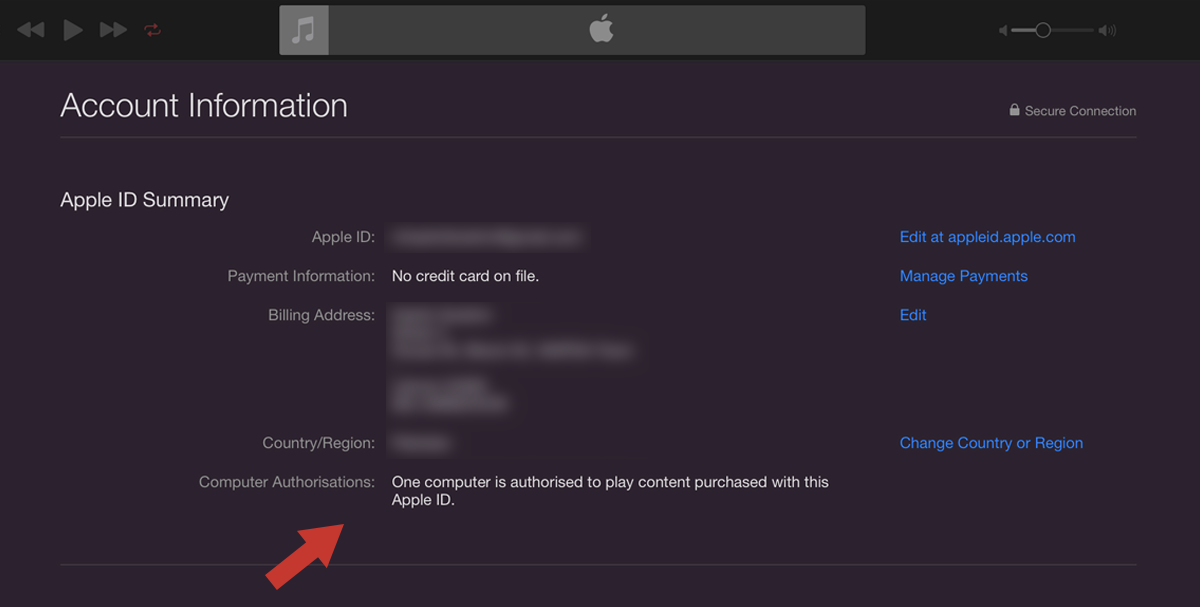
- Under the Computer Authorizations section, you will see the number of your authorized devices.

What if You Sell an Authorized Device?
After you’ve authorized five different devices to access your iTunes Store content, you cannot authorize any more. If you want to authorize other devices, you will have to deauthorize some to make some space.
You cannot deauthorize one device from another. So, if you sell an authorized device and then run out of authorizations, you’ll have to deauthorize all devices and re-authorize only the ones you’re going to use.
This feature prevents others from removing the devices—with the intent of stealing—still in your use. And if they deauthorize all devices, they won’t be able to authorize the device again without your Apple ID password.
Follow the instructions above to deauthorize all your devices in this situation.
Keep Your iTunes Content Safe
Authorization is necessary for both Apple and its users. For Apple, this feature ensures that users don’t abuse subscriptions by sharing them with everyone. As for the users, authorization secures the content they’ve purchased by keeping unwanted people from accessing it.