When you're looking to improve your experience with your iPhone or iPad, one of the best places to start is with your notification settings. Depending on how they're working for you, notifications can be a blessing or a blight on your digital devices, and the notification alert type plays a big part in getting them right.
In this guide, we'll walk you through the various notification alert types you can choose from on an iPhone or iPad, explaining the differences between them and when each of them is best to use.
How to Change the Notification Type

When you customize the notifications on your iPhone or iPad, you need to tweak the settings for each app individually. You do this by going to Settings > Notifications. From here, you'll see some global settings at the top, followed by a list of all the apps that use notifications on your device.
Tap an app to customize the notifications from it. From this page, you can change the delivery times, sounds, and alert type. You can also disable all notifications for the app at the top of the page. You'll only see options to edit the delivery times if you're using Scheduled Summary on your Apple device.
The Alerts section shows three alert types—Lock Screen, Notification Center, and Banners—followed by options to change the Banner Style or enable Sounds and Badges for an app. You can also choose whether notifications from that app will appear when you're using CarPlay. We'll explain what each of these mean below.
To disable notifications for a large group of apps at once, you should look at using the Focus feature on your iPhone or iPad instead.
What Are Alerts on an iPhone or iPad?
An alert is Apple's name for notification bubbles that appear on your device, whether on the Lock Screen, in the Notification Center, or as a banner at the top of your screen. They typically include the app icon—so you know where the notification is coming from—along with a snippet of content from the notification itself.
In the Notification settings for each app on your device, you can choose where you want these alerts to appear. Simply go to Settings > Notifications, then tap the relevant app and toggle each option on or off to fit your preferences.
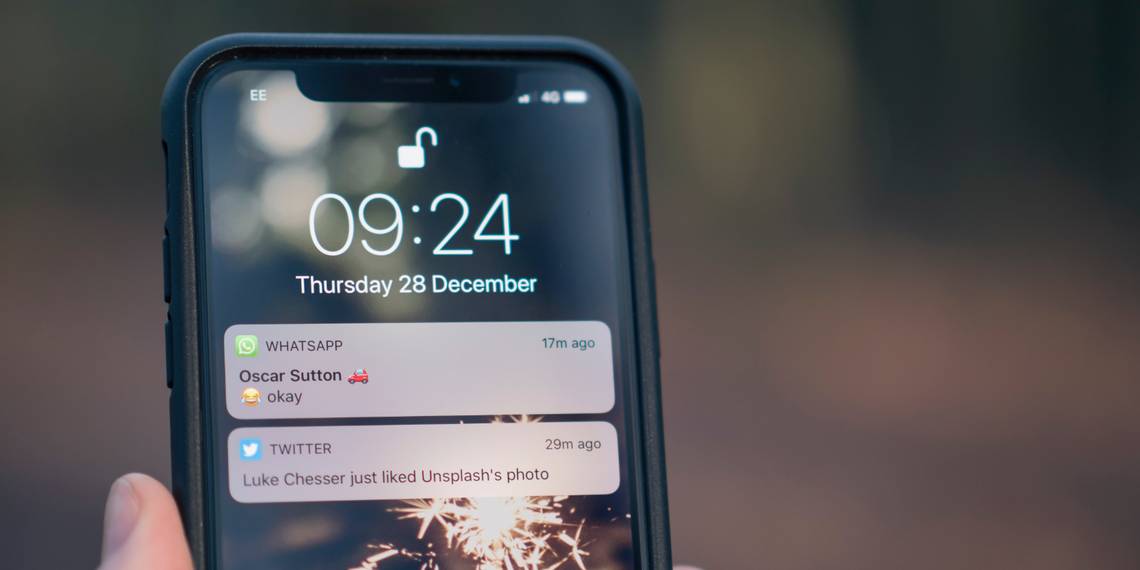
Lock Screen Alerts


As you might expect from the name, you should enable the Lock Screen option if you want notifications to appear on the Lock Screen of your device. This is the screen with the time on it that shows up when you wake up your iPhone or iPad but don't unlock it.
The benefit of a Lock Screen notification is that you'll immediately notice it any time you pick up your iPhone or iPad. The downside to a Lock Screen notification is that anyone else can see these notifications as well, since they show up without you needing to unlock your device. Luckily, you can get around most privacy issues this causes by hiding preview content in notifications.
We suggest you enable Lock Screen notifications for important and timely alerts (like phone calls and bank notifications), but disable them for everything else to ensure your Lock Screen doesn't get cluttered with needless alerts.
Notifications will clear from the Lock Screen each time you unlock and use your device. If you've enabled the relevant option, they'll move into the Notification Center instead.
Notification Center Alerts

Anything that isn't important enough for a Lock Screen notification is still a good candidate for the Notification Center. You can view the Notification Center by swiping up from the Lock Screen or swiping down from the top of the screen after unlocking your device. This will show a list of various notifications, grouped by app, time, and date. It's great for sorting through lots of notifications when you've got a little more time.
We suggest turning on Notification Center alerts for every app that you want to get notifications from, whether they're important and timely or not. That way, you can periodically check the Notification Center to ensure you haven't missed anything important, without letting the alerts get in the way as you go about your day.
Banner Alerts

Banner alerts are the notifications that appear at the top of your screen while you're using another app on your iPhone or iPad. You see them most often with instant messaging apps, but they can be used for any kind of notification. Banners often let you interact with the app through the notification as well, like typing out a WhatsApp reply.
Banners are the most intrusive kind of alert, since they will pop up on your screen no matter what you're doing. So, like with the Lock Screen notifications, we suggest you only enable Banner alerts for important and timely notifications that you can't afford to miss.
After enabling Banner alerts for an app, you'll see a Banner Style option appear. This has two options:
- Temporary banners appear at the top of your screen for a moment, then disappear on their own.
- Persistent banners stay at the top of the screen until you dismiss them yourself, making them useful for notifications you absolutely cannot afford to miss.
What Are Badges on an iPhone or iPad?

Badges are the little red circles or numbers that appear over an app icon on your Home Screen, telling you how many unread notifications you have for that app. They're useful for getting a quick overview of how many notifications you need to look through, but they can also be a source of anxiety if you've got hundreds of notifications that you never plan to read.
If you don't want to use any other types of alert for an app, Badges can be a good prompt for you to open the app itself to read any notifications you've missed. That said, disabling badges for every app is also a great way to simplify your iPhone or iPad Home Screen.
You can enable or disable these notifications for each app by going to Settings > Notifications, then tapping the relevant app and using the Badges toggle.
Changing the Notification Sounds on an iPhone or iPad
By default, every notification on your iPhone or iPad will make a sound when an alert appears on the Lock Screen, in the Notification Center, or as a Banner. You can change or disable this sound going to Settings > Notifications, tapping the relevant app, and opening the Sounds option. If you want to disable it, just select None.


Generally speaking, you almost always want notifications to make a sound. However, if you want to avoid getting distracted by them, but don't want to disable notifications entirely, you could send them straight to the Notification Center with sounds turned off. This way, you'll only find out about new notifications when you check the Notification Center at a later time.
Find the Right Balance of Notifications
Getting your iPhone or iPad notifications working the way you want goes a long way to improving your experience using the device. If the balance is right, you'll learn about important notifications in a timely fashion, without getting distracted by unimportant notifications. At the same time, you won't need to disable all notifications and risk missing something important in doing so.
Notification alert types aren't the only changes you can make to iPhone and iPad notifications. You can also group notifications together, set up a Scheduled Summary, hide previews, and customize various other settings to get your notifications just right.