The acronym CSS stands for "cascading style sheets". CSS is used to style websites and applications used on all devices. The style sheet is commonly used alongside HTML and a front-end programming language such as JavaScript.
CSS can be implemented in one of three ways—inline, internally, or externally. Though external CSS is the recommended approach, there are instances when the two remaining methods of implementation might be more practical.
In this tutorial article, you’ll learn all the basics of CSS to start building applications today.
When to Use the Different CSS Implementation Methods
Inline CSS is the ideal method of implementation when the intent is to only include one or two styling preferences on a web page, along with a few other niche cases. The inline CSS method utilizes the style keyword along with a CSS property to achieve a specific result.
If you intend to change the color of a single heading to red, then inline CSS might be a good option. A niche case, as mentioned above, would be when creating HTML layouts primarily consisting of tables (an outdated practice).
Using Inline CSS Example
<h1 style="color: red;">Main Heading</h1>
The line of code above will display the text “Main Heading” coated in the color red. This is quite possibly one of the only practical reasons for using inline CSS because there’s usually only one h1 element on a given web page.
If you intend to coat all h2 elements on a web page with the color yellow. You’ll have to use the CSS style keyword, along with the color property and its value (yellow) on each element. However, a more efficient way of accomplishing this task is to use internal CSS.
Using Internal CSS Example
        <style>

h2{

color: yellow;

}

</style>
Placing the code above in the <head> tag of your HTML file will ensure that all the h2 elements in that file are coated in yellow. Internal CSS is separated from the HTML code, and this makes the method more efficient because it facilitates the targeting various element groups.
So why is the external CSS implementation method still the most recommended approach? Separation of concerns. With external CSS, your CSS code is completely separated from your HTML code, which ensures scalability for large projects and makes the testing process more efficient.
Using External CSS Example
<link rel="stylesheet" href="css_file_name">
Inserting the line of code above in the <head> tag of your HTML file will facilitate the styling of your web page using the external CSS method. The only aspect of the code above that will change is the value assigned to the href property, which should always be the name of the CSS file (inclusive of the .css extension).
With your CSS file linked to your HTML document, you can now start writing CSS code in your CSS file. At this point, the only difference between the internal CSS example above and the external CSS is the style tag. Therefore, inserting the following code in a CSS file will produce the same result as the internal CSS example above.
        h2{

color: yellow;

}
Exploring CSS Basic Structure
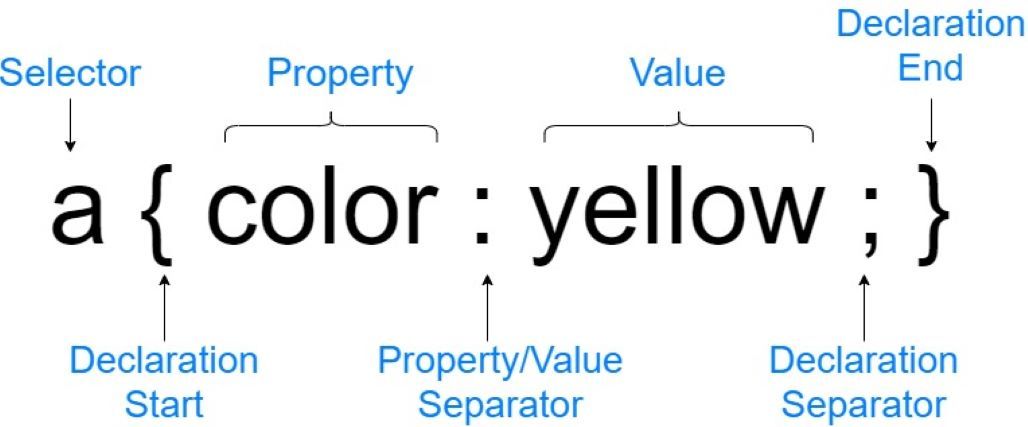
The basic CSS declaration contains seven essential elements, as you can see from the example below. They all work together to achieve a specific set of styling preferences.
The Selector
In a CSS declaration, a selector can either be an id, a class, an element, or in some special instances, a pseudo-selector. In the CSS structure above the a element is used as a selector, which means all the links on a web page will be coated in red. Essentially, the purpose of the selector is to identify the element(s) that should be styled.
Declaration Start and End
The declaration start and end are important because they enclose all of the styling preferences that apply to a specific selector. Both elements are represented by a pair of open and closed curly braces. A good way to remember to use a declaration start or declaration end is to remember that if you have an open curly brace, there should be a corresponding closed curly brace, and vice versa.
The Property
The CSS property in a declaration structure can be any one of over a hundred different property types. The property type used in the CSS structure above is color and this property targets text on a web page. If you'd like to learn more, check out our comprehensive list of CSS properties and their use.
The Property/Value Separator
Though it might seem small and insignificant, the property/value separator is just as important as all the other elements in the CSS structure. If there’s ever an instance where this element is forgotten, the entire CSS declaration will not execute.
The Value
The CSS property value represents the exact style that you’d like to apply to a given property. The values that are available for use are dependent on the property type. For example, the property used in the structure above is color, which means that there’s only one type of value that can be applied to this property, a color name. A color value can be presented in one of four forms: a word value (like in the example above), a hexadecimal value, an HSL (Hue, Saturation, Lightness) value, or an RGB (Red, Green, Blue) value.
The Declaration Separator
The declaration separator indicates that you’re at the end of a specific styling declaration. In the structure above there’s only one declaration separator, but there can be more. It all depends on the number of CSS properties you intend to use on a specific class, id, or element.
What Are ids and classes?
ids and classes play a fundamental role in the CSS styling process. Like HTML elements, CSS ids and classes are used as selectors in a CSS declaration. However, classes and ids take precedence over an HTML element.
The general rule in CSS is that the last style declaration you add to a file will override the ones that were there before. Therefore, if there are two declarations with an h2 selector in a CSS file, the declaration that's added last overrides the ones that were there before.
However, if this h2 element has an id that's used as a selector in a CSS declaration, regardless of its position (before or after) to a CSS declaration that has the h2 element as its selector, the styling preference in the id declaration will always take precedence over the element. In short, an id will override other style selectors.
It's important to remember that in a CSS declaration, ids begin with a number sign and classes begin with a full stop. The most significant difference between an id and a class is that an id is unique, while a class can be duplicated. For instance, a collection of similar <div> tags can be given the same class name; however, the id of each <div> tag needs to be unique.
Exploring the Different Types of Selectors
There are three basic types of selectors—single, multiple, and nested. Thus far, this article has extensively covered single selectors.
When using CSS, there will be instances when you’d like different elements at different positions on a web page to have a similar style that’s different from the general style applied to the entire web page. In these instances, knowing how to use multiple selectors will be helpful.
Basic HTML Template Example
<!DOCTYPE html>

<html lang="en">

<head>

<meta name="viewport" content="width=device-width, initial-scale=1.0">

<title>Document</title>

</head>

<body>

<div class="contianer">

<div class="siteInfor" id="Welcome">

<h2>Welcome</h2>

<p>Lorem ipsum dolor sit amet consectetur, adipisicing elit. Impedit odit voluptates

dignissimos voluptatibus tenetur. <span> Repudiandae, animi corporis! </span> Architecto

tempora voluptates nulla officia placeat quisquam facere at! Quod dolore doloribus eos!

</p>

</div>


<div class="siteInfor" id="About">

<h2>About</h2>

<p>Lorem ipsum dolor sit amet consectetur, adipisicing elit. Impedit odit voluptates

dignissimos voluptatibus tenetur. <span> Repudiandae, animi corporis! </span> Architecto

tempora voluptates nulla officia placeat quisquam facere at! Quod dolore doloribus eos!

</p>

</div>


<div class="content" id="article-1">

<h2>Title</h2>

<p>Lorem ipsum dolor sit amet consectetur adipisicing elit. Labore aspernatur vel dicta quod quibusdam!

Ea delectus sit, laboriosam eos aperiam asperiores? At ad laborum illo inventore quos est dolores

impedit fugit asperiores repellendus harum maxime voluptate sit nulla eaque officiis fuga animi,

perferendis in earum iure dolorum laboriosam enim reiciendis! Eum cum delectus est tenetur corrupti

mollitia, minima, magni at iusto id necessitatibus harum ratione, ipsum doloremque deleniti ex eligendi

impedit hic maxime? Eius modi optio ad, nisi tempora sapiente?

</p>

</div>


<div class="content" id="article-2">

<h2>Title</h2>

<p>Lorem ipsum dolor sit amet consectetur adipisicing elit. Labore aspernatur vel dicta quod quibusdam!

Ea delectus sit, laboriosam eos aperiam asperiores? At ad laborum illo inventore quos est dolores

impedit fugit asperiores repellendus harum maxime voluptate sit nulla eaque officiis fuga animi,

perferendis in earum iure dolorum laboriosam enim reiciendis! Eum cum delectus est tenetur corrupti

mollitia, minima, magni at iusto id necessitatibus harum ratione, ipsum doloremque deleniti ex eligendi

impedit hic maxime? Eius modi optio ad, nisi tempora sapiente?

</p>

</div>


</div>


</body>

</html>
If you look closely at the HTML file above, you’ll see the dynamic that exists between ids and classes. In reference to the file above, if you want to apply the same style to the about section and the articles on the web page only, the following CSS code will accomplish this.
Using Multiple Selectors Example
#About, .content{

color: white;

background-color: darkcyan;

}
When using multiple selectors, you should always separate each selector using a comma. The example above has two selectors, an id and a class. If the comma that follows the about id is missing, the CSS declaration will not execute.
Going back to the Basic HTML Template Example above, there are two <span> tags present—one in the welcome section and the other in the about section. If your goal is to target only one of these <span> tags, a nested selector should be your go-to method.
Using Nested Selectors Examples
        #Welcome p span{

color: red;

}
The nested selector above contains an id and two HTML elements. As you can see from the example above, a nested selector provides you with the ability to target a specific element within a group.
Therefore, only the span section in the <p> tag of the div with the welcome id will be coated in the color red.
How to Write a Comment in CSS
Whether you're using a styling language like CSS or a programing language, you absolutely should know how to write a comment. Comments are essential in enterprise-level projects where multiple developers work together, and it’s also useful when doing small-scale development.
A CSS comment contains two forward slashes, two asterisks, and a comment section.
CSS Single Line Comment Example
/* This is how you write a single line comment in CSS */
CSS Multiple Lines Comment Example
/*
This is how you write

a multi-line comment

in CSS

*/
What’s Next?
This article provides you with the foundational components of CSS. You can now use an identify:
- Any one of the three CSS implementation methods
- All the elements in a CSS declaration
- The three basic types of selectors
- A CSS comment
Yet, this is just the beginning. CSS has several frameworks that will help you develop a better understanding of the language. The only challenge is deciding which one is best for you.


