
Ubuntu's name pops up whenever you think of Linux. Over the years, Ubuntu has become the next best OS for many users who want a reliable alternative to Windows. In comparison, Ubuntu is lightweight and doesn't need a jacked-up laptop or desktop to run smoothly.
But can you install and run Ubuntu from a USB drive? Yes, it is possible to install Ubuntu on a flash drive, so you can have a portable version of Ubuntu that you can plug into any system and use when needed.
Prerequisites to Install Ubuntu on a USB
To install Ubuntu on a USB drive, you will need two USB drives with 16GB or above storage capacity. You'll use one USB drive as a bootable media. The second USB drive will contain the actual Ubuntu installation. For ease of understanding, we will call the bootable drive "USB Drive 1" and the installation drive "USB Drive 2".
Remember that you must use USB 3.0 drives. If you use a USB 2.0 drive, it will have slow read and write speeds. It could take a while to install Ubuntu on a USB 2.0 drive. While the installation process will take a long time anyway, it will complete faster with a USB 3.0 drive.
Also, we will use Windows 11 as our host operating system, but you can create a bootable USB using Linux as well.
First, you need to create a bootable Ubuntu USB drive using Rufus. Then, you will have to install the operating system on USB Drive 2. After that, you need to copy the Ubuntu EFI files from the Windows ESP partition and paste them into the USB Drive 2 EFI folder.
Step 1: Creating an Ubuntu Installation Media Using Rufus
Before installing Ubuntu on a pen drive, you must download Rufus and the Ubuntu ISO image.
Download: Rufus
Download: Ubuntu
Connect USB Drive 1 to your system and follow these steps to create a bootable Ubuntu USB:
-
Launch Rufus by double-clicking the downloaded executable. Under the Device section, click on the arrow button to select USB Drive 1.
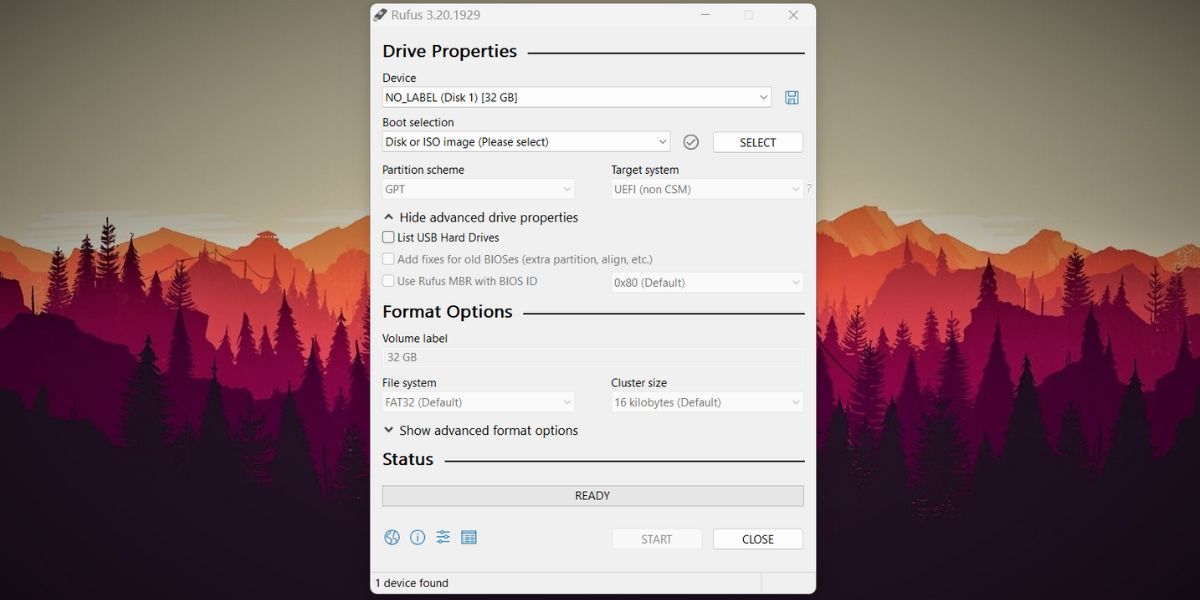
- Click Select and locate the downloaded Ubuntu ISO file. Then, click Open.
- Click the Start button located at the bottom. Rufus will alert you with an "ISOHybrid image detected" notification. Don't change anything and click Ok.
- Rufus will warn you about wiping all the data on USB Drive 1. Click Ok to begin creating the bootable USB device.
- Wait for the process to complete. Finally, hit Close to exit Rufus.

You have successfully created a bootable Ubuntu USB drive. You can now use it to install Ubuntu on any computer.
Step 2: Installing Ubuntu on the USB Drive
In this part, you'll use the bootable USB Drive 1 to install Ubuntu on USB Drive 2.
To begin, restart your system. Hastily press F10 to enter the boot device menu. The key to accessing the boot menu can differ on different systems (Esc, F2, F10, or F12). Check our detailed guide on entering the BIOS on Windows 10/11 for more information.
Now, select USB Drive 1 using the arrow keys and press Enter to boot. The Ubuntu GRUB menu will appear. Select Ubuntu and press Enter to enter the setup. Now, click on the Try Ubuntu tile. Once you enter the Ubuntu desktop, click the Install Ubuntu shortcut.
The Ubuntu installation window will launch. Click Continue. Keep the default keyboard layout and click on the Continue button.

Choose the Minimal installation option in the next window. Uncheck the Download updates while installing Ubuntu option.

Now you need to pick the installation type. Since there are multiple storage drives, you cannot go with the Erase disk and install Ubuntu option. Otherwise, it will wipe your hard disk clean and remove your primary operating system.
Select the Something else option and then click Continue. Now, locate USB Drive 2 in the list of available devices. Make sure you check its capacity and identify the correct drive. Right-click on existing partitions on USB Drive 2 and select the Delete option.
Once you see the total free space listed under USB Drive 2, right-click on it and select the Add option. Keep the partition size 500MB and don't change the rest of the settings. Click on the Use as drop-down menu and select EFI System Partition. Then, click Ok to create the partition.

Right-click on the remaining free space and select the Add option. Don’t change the size, type, or location. Also, keep the Use as option as the Ext4 journaling file system.

Now, select / as the mount point and click Ok. At this point, USB Drive 2 must have an EFI and an ext4 partition in the list of available devices.

Go to the Device for bootloader installation option and select USB Drive 2 from the list. Then, click on the Install Now button.
Select your geographical location, enter your username and password, and click Continue. Wait patiently for the installation to complete. It could take an hour or more depending on the USB drive generation and the USB port you are using for this process.
Once the installation completes, click Continue Testing because we still have to make changes to USB Drive 2.
Step 3: Copying Ubuntu EFI Files From Windows Drive to USB Drive 2
Modern motherboards come with UEFI. While the new firmware has its advantages, there is a slight issue with it. It can only contain one ESP partition on a system. So even if you select USB Drive 2 for bootloader installation, it will still store the files in the existing ESP partition and won’t create a new one for USB Drive 2.
Furthermore, since the Ubuntu EFI files currently reside on your system, you won’t be able to boot using USB Drive 2 on another PC.
A simple tweak is to remove the hard disk from your system and then attempt to install Ubuntu on USB Drive 2. It won’t be able to locate the ESP partition and will place all the EFI files for Ubuntu there. But if you don’t want to remove the hard disk, there is still a workaround.
You can copy the newly created EFI files for Ubuntu stored in the default ESP partition to USB Drive 2. After that, you can easily boot from the Ubuntu USB on any system. You also need to copy some necessary boot files from the Ubuntu ISO file.
After clicking the Continue Testing button, press the Super key and search for the Disks utility.

Launch it and then locate the USB bootable drive. You don’t need to mount it. Go to the Contents area and click on the path mentioned after the Mounted at label. Copy the EFI folder.

Next, switch to the Disks utility and select USB Drive 2. Mount its EFI partition by clicking the Play icon. Open the folder location by clicking on the path as you did in the previous step.
You will notice that the EFI partition is empty. Paste the EFI folder which you copied in the second step. Again, open the Disks utility and select the system disk drive containing the Windows installation.
Click on the Windows EFI partition and then click the Play icon to mount it. Now, go to the EFI folder location by clicking on the path mentioned after the Mounted at label. Navigate to EFI > Ubuntu. Copy the grub.cfg file and shimx64.efi files.

Switch to the USB Drive 2 EFI folder window. Paste the copied files into the Boot folder.

Open the Windows EFI partition folder again and delete the Ubuntu folder from there. Close all the open windows and restart your system.
Be extremely cautious while copying and making modifications to the EFI partition folder. Do not delete any folder except Ubuntu from the system drive.
Now, access the boot menu and select USB Drive 2 as your current boot drive. You will boot to the Ubuntu desktop in a couple of minutes. Finish setting up the system and then use Ubuntu as you'd normally do on a desktop installation.
The overall usability of Ubuntu installed on a pen drive will be decent enough to carry out basic tasks. However, you can experience some delays in opening some apps, even if you are using a USB 3.0 drive.
We suggest you try the same experiment with an external Solid State Drive (SSD) to have a smoother experience of portable Ubuntu installation.
Use Your Portable Ubuntu Installation on Any System
Installing Ubuntu on a USB drive is a slightly lengthier process as compared to normal desktop installation. Make sure to use a USB 3.0 drive and port for this experiment.
If you like the interface and experience offered by the Ubuntu desktop, you can consider dual-booting your existing Windows installation with Ubuntu.