Messaging Queuing Telemetry Protocol, or MQTT, is a lightweight messaging protocol designed for low bandwidth devices and environments. It’s a fast, easy-to-deploy, and energy-efficient solution to connect and exchange information between multiple IoT devices. It requires an MQTT broker/server and the topic to which messages are published and subscribed by the devices or users to send or receive the information.
In this guide, we will deploy the MQTT broker and Node-RED tool on Raspberry Pi to connect MQTT-enabled DIY smart IoT devices and use them for home automation.
Things You Will Need
To build and deploy an MQTT server with Node-RED, you will need the following:
- A Raspberry Pi Zero W or better. We recommend using a Raspberry Pi 3 or 4 (if available).
- A microSD card (8GB or higher).
- A microSD card reader.
- A Linux PC, Mac, or Windows PC.
- Internet connection (Wi-Fi).
Step 1: Install Raspberry Pi OS Lite (64-bit)
You will need the 64-bit Lite version of Raspberry Pi OS. In the Raspberry Pi Imager tool on another computer, click Choose OS > Raspberry Pi OS (Other), then select Raspberry Pi OS Lite (64-bit). In addition, you’ll want to use Imager's advanced settings to enable SSH (we used pi and raspberry as the username and password for this guide) and configure the Wi-Fi connection. For more details, check out our guide on how to install an operating system on a Raspberry Pi. After writing the OS to the card, eject it and insert it into your Raspberry Pi.
Step 2: Connect Over SSH and Update the Packages
You can connect to your Raspberry Pi over SSH using PuTTY on Windows or Terminal on macOS and Linux. However, you should know the IP of the Raspberry Pi to connect over SSH. To find out, you can open your wireless router’s DHCP settings or use the Fing app on your smartphone.

Enter the IP address in PuTTY and click Connect. Type your username and password to log in.

On Linux or macOS terminal, type YourPiUsername@IPAddress and then type the password to log in. Once connected via SSH, run the following command to update the package list and upgrade packages.
sudo apt update && sudo apt upgrade –y
Step 3: Install MQTT Broker
To install and enable the MQTT broker (Mosquitto), take the following steps.
-
Install Mosquitto by running the following command in the Terminal window.
sudo apt install mosquitto mosquitto-clients -yThis will start installing the Mosquitto (MQTT broker) and client services.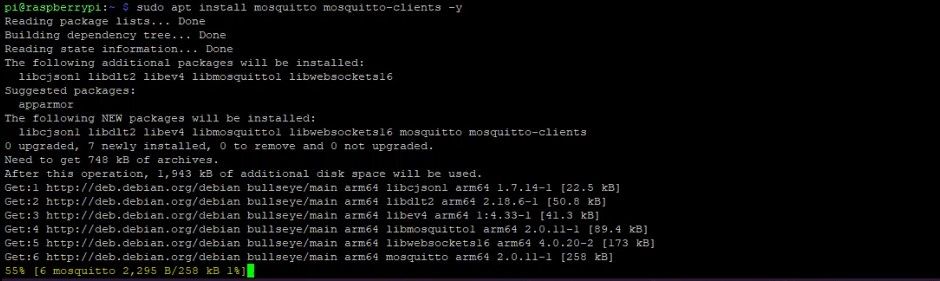
-
After the installation, enable the Mosquitto service and check the MQTT version using the following commands.
        sudo systemctl enable mosquitto.service
mosquitto -v
-
Create a user account to allow authenticated remote access using the following command.
sudo mosquitto_passwd -c /etc/mosquitto/passwd ravi -
Open the mosquitto.conf file in the nano editor using the following command.
sudo nano /etc/mosquitto.confper_listener_settings true
pid_file /run/mosquitto/mosquitto.pid
persistence true
persistence_location /var/lib/mosquitto/
log_dest file /var/log/mosquitto/mosquitto.log
include_dir /etc/mosquitto/conf.d
allow_anonymous false
listener 1883
password_file /etc/mosquitto/passwdPress CTRL+X followed by Y and Enter to save the changes.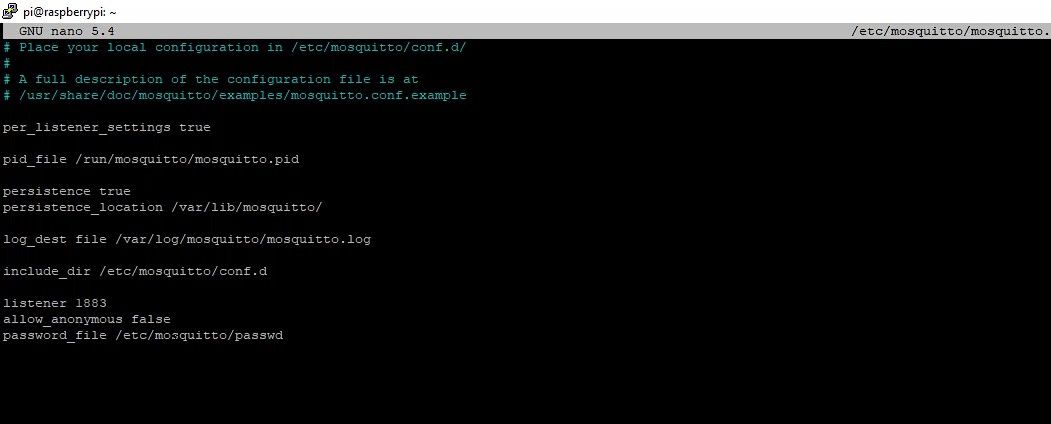
-
Restart the MQTT broker by running the following command.
sudo systemctl restart mosquitto -
Check the MQTT broker status to see whether MQTT is running.
sudo systemctl status mosquittoIf you see the above output, MQTT is running.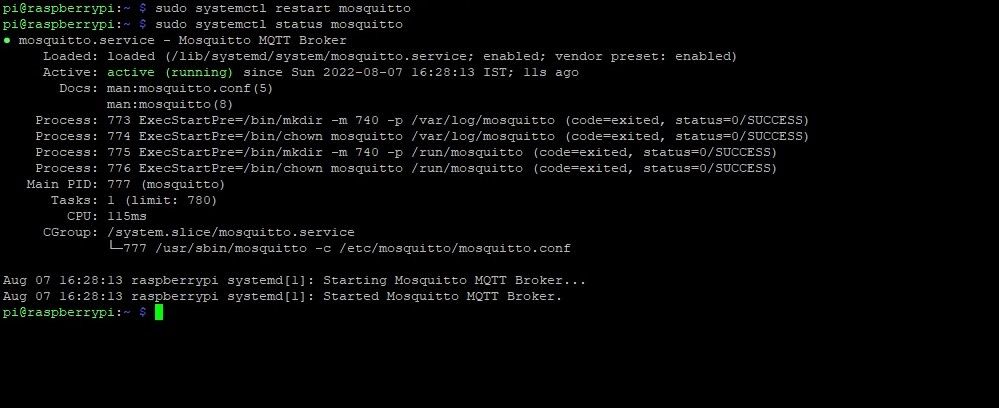


Step 4: Test MQTT Broker
To test whether the MQTT broker is working or not, install MQTTLens or a similar MQTT app in Chrome or any other web browser and launch it. Enter the IP address of the Raspberry Pi and the MQTT username/password. Click Create Connection.

Enter any topic in the Subscribe field and the same topic in the Publish field. Type "Hi" or anything in the message field and click Publish.

If you see the message under the subscriptions, the MQTT broker is working fine.
Step 5: Install Node-RED
With Node-RED, you can publish messages or send and receive payloads to or from your smart devices. This payload can be used to trigger smart devices to switch on/off or receive data (such as temperature) from a sensor. You can use your web browser to create such flows in Node-RED and control your smart devices.
To install Node-RED, execute the following command in the Terminal window.
bash <(curl -sL https://raw.githubusercontent.com/node-red/linux-installers/master/deb/update-nodejs-and-nodered)

This will download and install the Node-RED on your Raspberry Pi. It may take a while to complete. Once Node-RED is installed, you need to create a Node-RED settings file by running the following command.
node-red admin init
Then follow these steps:
- Press the Enter key.
- Do you want to set up user security? Select Yes. Enter a username and a password. Keep it safe as this will be used to log in and manage Node-RED via a web interface.
- Choose Full Access.
- You can add another user or select No to proceed.
- Select No when asked to enable the project features.
- Press Enter.
- Type a passphrase and keep it safe.
- Choose the default theme > Monaco (default).
- Select No when asked to load external nodes.

Once this is done, restart Node-RED.
node-red restart
You can now visit Your-Raspberry-Pi-IP:1880 in a web browser to open and log in to the Node-RED admin panel.

You can now create flows in Node-RED. Below is an example of a Node-RED flow we use to run our WS2812B 8x32 matrix display that shows various sensor information installed in our home in real-time.

To get started, you can also build a DIY smart clock using MAX7219 dot matrix, and connect it to your MQTT server to display text or messages on it.
Enable Home Automation Using MQTT and Node-RED
You can now create flows to control or monitor your MQTT-enabled smart home devices. You can also build DIY Tasmota smart switches or Arduino-based smart sensors, and other smart devices with MQTT control and use them with this MQTT and Node-RED server. You can create flows for home automation based on events, time, or payload received from your smartphone MQTT client.
On your Android smartphone, you can install MQTT Dash to connect to your MQTT broker and send or receive payloads to or from various topics that your smart devices subscribe or publish to.