
The Raspberry Pi 4B is one of the most competent single-board computers available today. Priced at under $150, and with a low power draw, it's the perfect platform to use as a streaming media server for movies, TV shows, music, and audiobooks.
With the powerful and popular Linux operating system, you can install the free and open source Jellyfin server software to manage and consume all of your (legally acquired) media on any connected device.
Prepare Your Raspberry Pi
There are a few accessories you will need before starting out. An SSD or high capacity SD card, a power supply, and an Ethernet cable.
While technically, you can run your Raspberry Pi / Jellyfin server over Wi-Fi, a spotty connection can lead to disappointing results when consuming media. No one wants stuttering movies or laggy audio, and connecting your Raspberry Pi directly to the router using an Ethernet cable will prevent any issues from arising.
Once you have these basic accessories, read through our guide on how to install an operating system on your Raspberry Pi.
Note that when installing using rpi-imager, you will need to click on the cog icon to enable SSH, set a username, and choose a password. Write these down, you will need them later.
As the Pi will be operating as a server, there is no need for a monitor. Connect the Pi to a power source, and via Ethernet cable, to the router.
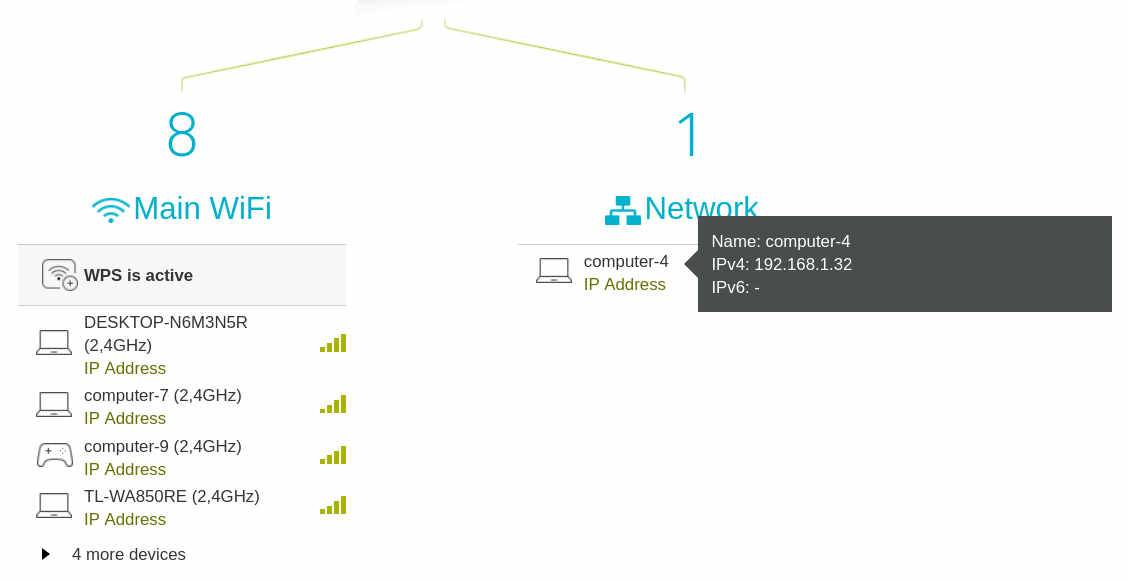
To connect to your Raspberry Pi, you will need to know its IP address, Open a browser on a machine that is on the same local network, and navigate to your router's admin page. You can usually do this by typing 192.168.1.1 into the URL bar of your browser. If this doesn't work, check your router's instruction manual for details.
Your router admin page should show devices that are connected by Wi-Fi separately from those connected by Ethernet cable. The IP address of your Pi should be shown nearby. If it isn't, hovering over the IP address label should produce a tooltip revealing the address. Write it down.
Initially, you will be connecting to the Pi by SSH (secure shell). If you do not know how to do this read through our guide to using SSH on Windows, Mac, and Linux.
Installing the Software
SSH into your Raspberry Pi by typing:
ssh your_username@your.pi.ip.address
and entering the password when prompted. Note that nothing will appear while you are typing the password. Press return when done.
Make sure that Raspberry Pi OS is up-to-date.
sudo apt update
then
sudo apt upgrade -y
Add the Jellyfin repository key:
        sudo apt install curl gnupg
curl -fsSL https://repo.jellyfin.org/ubuntu/jellyfin_team.gpg.key | sudo gpg --dearmor -o /etc/apt/trusted.gpg.d/jellyfin.gpg
The following command will query your Raspberry Pi for the processor type and which OS it's running, then echo the results to a text file which will later be used to fetch and install the correct Jellyfin version.
echo "deb [arch=$( dpkg --print-architecture )] https://repo.jellyfin.org/$( awk -F'=' '/^ID=/{ print $NF }' /etc/os-release ) $( awk -F'=' '/^VERSION_CODENAME=/{ print $NF }' /etc/os-release ) main" | sudo tee /etc/apt/sources.list.d/jellyfin.list
You can see the results of this command with
cat /etc/apt/sources.list.d/jellyfin.list
If you are using the latest Raspberry Pi OS release, the output should be:
deb [arch=arm64] https://repo.jellyfin.org/debian bullseye main
Now enter
sudo apt update
then
sudo apt install jellyfin

The installation will take several minutes. Entering
sudo systemctl start jellyfin
will immediately start the Jellyfin server, and
sudo systemctl enable jellyfin
will ensure that Jellyfin starts whenever the Pi is restarted.
Accessing Jellyfin Through a Browser
You can now access Jellyfin from any machine on the same network by appending ':8096' to the local IP address of the Raspberry Pi. For instance, if the Pi's local IP address is 192.168.1.32, you would type 192.168.1.32:8096 into the URL bar of your browser.
A setup wizard will guide you through the next steps of the process: choosing a language and setting the username and password of the admin user (you).

The wizard will then ask you to add media libraries, but currently, you don't have any.
SSH into the Pi and use the mkdir command to create a new directory for each type of media you plan on streaming.
mkdir movies
will create a new directory called "movies" in your home directory. The complete path will be
/home/pi/movies
In the browser, select the content type from the drop-down list and then navigate to the appropriate directory.
Adding Media to Your Jellyfin Server
Jellyfin doesn't allow you to add media directly through the web interface, so you will need to head back to your terminal or SSH client to transfer files across to the right directory on your Raspberry Pi.
The command to transfer files over a network is scp, which stands for secure copy.
To transfer a single movie file you would input:
scp /path/to/your/file.mp4 pi@192.168.1.32:/home/pi/movies/
To transfer an entire directory of movies into the "movies" folder on your Pi, you would input:
scp -r /path/to/your/local/movies/folder/ pi@192.168.1.32:/home/pi/movies/
Once you have transferred your media, head back over to the browser and click the hamburger icon on the top left.
Select Dashboard, then Libraries, and from the menu for your "Movies" library, click scan library.

Jellyfin will then scan all the files and filenames and attempt to match them up with IMDB entries: identifying actors, release dates, poster images, and synopses.
Repeat this process with your music, audiobook, and TV show libraries.
When finished, your Jellyfin home screen should look something like this:

Accessing Jellyfin From Outside Your Home
It's cool that you can stream movies, TV shows, and music from a browser when you're at home, but typing a string of numbers into the URL bar isn't very stylish—and that same string won't work when you're out in the world.
To be able to securely access streams from your Pi while you're away from home, there are some more steps you need to take.
The first is to contact your ISP and ask for a static public IP address. Most providers will fix your IP for free or for a small fee. Next, you should choose and buy a domain name.
From your registrar's settings page, find the 'Advanced DNS' options and add a new A record. Set the Host field to '@' and the value field to your static IP address. Set the TTL (Time to Lease) value as low as possible, then save.

Any requests made to the domain name you've registered will be directed to the IP address you entered—which in this case, is your home. You now need to persuade your router to forward those requests to your Raspberry Pi.
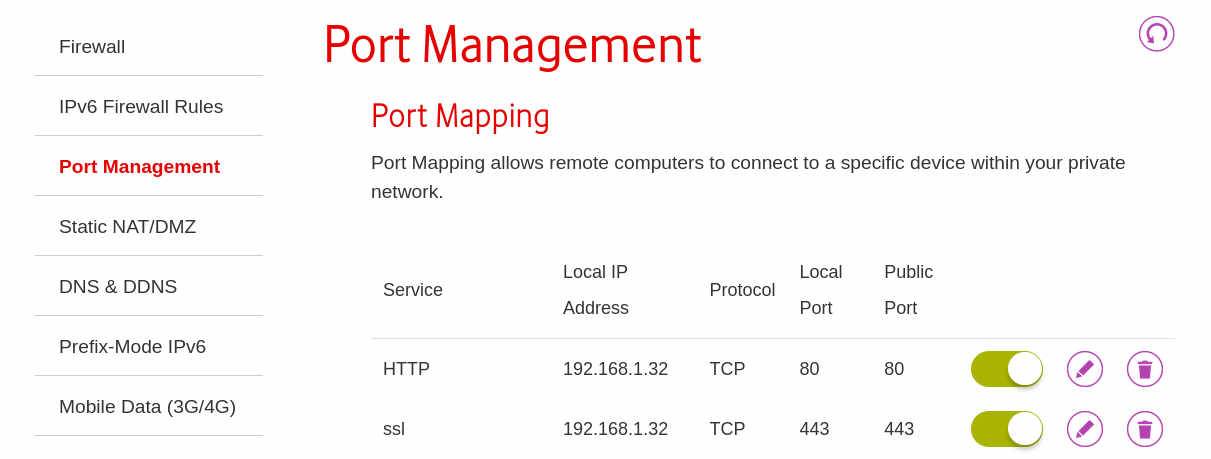
Reopen the router admin page, and find a section titled either Port Forwarding, Port Mapping, or Port Management, then create two new entries.
The first is for HTTP requests. Set both the local and public port to 80, and the local IP address to the IP address of your Pi.
The second is for HTTPS requests. Set both the local and public port to 443, and again, the local IP address to the IP address of your Pi.
To make sure that your Pi understands incoming requests and knows what to do with them, you will need to install some server and security software.
SSH into the Pi and enter:
        sudo apt install apache2
sudo systemctl start apache2
sudo systemctl enable apache2
sudo add-apt-repository ppa:certbot/certbot
sudo apt update
sudo apt-get install python3-certbot-apache
With Apache installed, typing your new domain name into the URL bar of a browser should result in you reaching the default Apache holding page. This is good, because it means requests are definitely going through the Pi, but you now need the Pi to connect them to Jellyfin.
cd /etc/apache2/sites-available
then
sudo nano jellyfin.conf
will create a new Apache configuration file using the text editor, nano.
Paste the following into the file, making sure to substitute your actual domain name along with the local IP address of the Pi:
        <VirtualHost *:80>
ServerName your-server.name
ProxyPreserveHost On
ProxyPass / http://192.168.1.32:8096/
RewriteEngine on
RewriteCond %{HTTP:Upgrade} websocket [NC]
RewriteCond %{HTTP:Connection} upgrade [NC]
RewriteRule ^/?(.*) "ws://192.168.1.32:8096/$1" [P,L]
</VirtualHost>
Save and exit nano with Ctrl + O then Ctrl + X and enable the new conf file with
sudo a2ensite jellyfin.conf
Restart Apache:
sudo service apache2 restart
Obtain a new security certificate from Let's Encrypt with
sudo certbot
Certbot will present you with a list and ask you to select which site you want a security certificate for. There should only be one entry on the list at this point, so enter the appropriate number and hit return. You will also be asked for your email address, and whether you want to be added to the Electronic Frontier Foundation mailing list. Feel free to refuse.
Certbot will check that everything is in order and create a certificate and key file on your system. Choose redirect when asked, then restart Apache once again.
sudo service apache2 restart
You can now securely access Jellyfin on your Raspberry Pi from Anywhere in the world.
Your Raspberry Pi 4B Is Now a Media Server!
We have shown you how to install and use Jellyfin as a low-cost way of streaming movies, TV, shows, audiobooks, and music on your Raspberry Pi 4B. As you can see, it isn't difficult, and if you enjoyed the process, there are many more ways to use your Pi to host websites and services from home.