Wave offers free accounting software for small businesses looking to manage their financial services on the go. Its features are extensive, including income and expense tracking, invoicing, and automatic payments.
This article will explore how to navigate and use the Wave accounting software to manage accounting information for your business effectively.
Getting Started
Wave accounting allows you to create a free account to help you start, move, and manage your finances all in one platform. Here's how you can create your free Wave account:
-
Go to the Wave Accounting website.
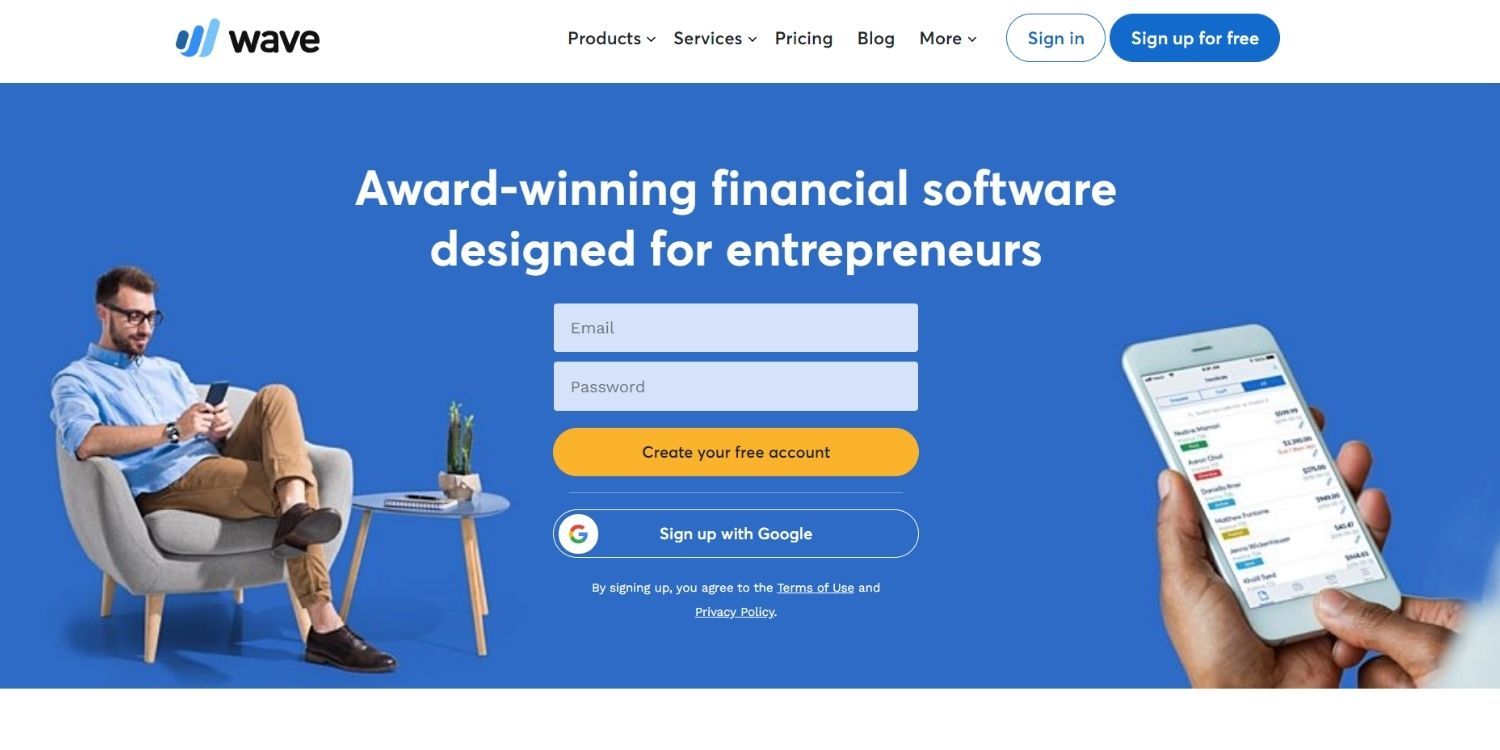
- Click Create your free account or the Sign-up for free button at the top of the landing page.
- Enter your email and password. Then click Get started. Alternatively, you can also click Sign up with Google to sign up with your Google account.

After signing up, you need to set up your business profile. Here is how to do it.
- Enter your first, last name, and business name. Select the industry, your business, and country, click Next.
-
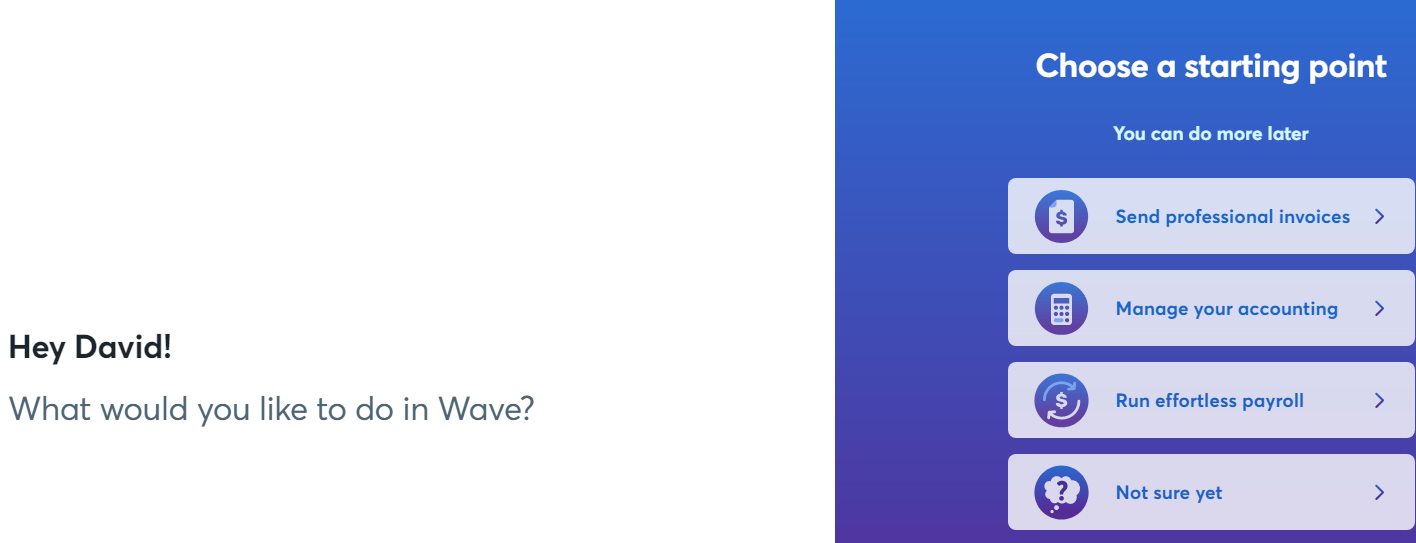
Select what service you would like to use Wave for. You can choose from either send professional invoices, manage your accounting, run effortless payroll, or are not sure yet.
- After this, select the timeline of your business and click One last step. Select how long your business has been running for, what type of business you have, whether you have a bank account, and how you usually pay for business expenses, and lastly click Continue to Wave.

Wave Dashboard

The Wave accounting dashboard is where you can manage all your financial data from multiple sources. It incorporates visuals for tracking cash flow, profit and loss, payable and owing, net income, and expenses.
You can connect your bank account or credit card to track business transactions easily. You can also customize your dashboard from a range of options, including transactions, estimates, invoices, recurring invoices, bills, customers, vendors, products, or services.
How to Create an Estimate
Estimates are the amounts to be debited or credited on items pending approval. Once approved, you can quickly turn them into invoices. Here is how to create estimates on Wave accounting.
- On the left navigation bar, click on Sales > Estimates > Create an estimate. Under Add an Estimate, edit the title, select a customer or Add new customer, choose a currency, select a date, expiry date, add a P.O./S.O (purchase order/shipping order), and enter a subheading, footer, and a memo.
- After setting up the details, choose Product, select an item for this estimate or Add New Product and enter the item's description, quantity, price, and tax.
- Then click Save. You can also choose to convert it to an invoice, edit the estimate, send it to your customer, export it as PDF, print, or delete it by clicking the More options.

How to Create an Invoice
Now that we have finished setting up estimates, it's time to create invoices that will count towards your monthly books. Here is how to create an invoice on Waves Accounting:
1. Go to the Invoice tab, click on Sales > Invoices. You can choose to customize your invoice using templates, adding your logo, accent colors, or you can skip and make changes later by going to Settings on the left navigation bar.

2. After you finish customizing your invoice template, go to New invoice > Add a customer and enter invoice and P.O./S.O. (purchase order/shipping order) number.

3. Select Invoice date > Payment due > Add an item and enter the item's description, quantity, price, and tax. You can also choose to add some notes by selecting Add/edit the Footer.
4. Now you have finished creating your invoice. Click Save and continue and then select Approve Draft to send the invoice.

How to Create Recurring Invoices
If you have some clients to whom you send invoices with the same details, you should consider setting up recurring invoices at regular intervals. This allows your invoices to be sent to these clients automatically. Here's how to create recurring invoices:
1. Click on Sales > Recurring Invoices > Create a recurring invoice. Then under New recurring invoice, select Add a customer and enter P.O./S.O. (purchase order/shipping order) number.

2. Then select Payment due and under Add an item, enter the item's description, quantity, price, and tax and click Save and Continue.
3. After you finish adding invoice details, go to Set schedule, select how often you want Wave to generate the invoice, and click Next.
4. Now, enter the customer's email address and custom message. You can choose to attach a PDF of the invoice to the email sent to the customer and email a copy of each invoice to yourself. Now click Next to finish.

Now, Wave accounting will be generating automatic payments by sending a credit card pre-authorization request to the customer.
How to Create a Bill
Wave accounting enables creating bills to recognize liability in your accounting records. To create a bill, follow these steps:
- Go to the Purchases tab > Bills > Create a bill. Under Add bill, select a vendor or Add a new vendor, currency, date, due date, P.O./S.O., and bill number.
- Then select the item and its category, description, quantity, price, and tax and click Save.

How to Track Transactions
In any organization, tracking your transactions is one of the most essential aspects of the accounting department. Waves offers you the option to track the transactions you make so that you don't miss anything. Here is how you can do this:
1. Go to the Accounting Tab > Transaction and choose to connect your bank, upload a bank statement, or add manual transactions. When you add your bank account, Wave Accounting automatically creates a payment account.

How to Use Chart of Accounts
Waves Account also provides charts of accounts that enable you to monitor all your accounts in one place. It manages five types of accounts: Assets, Liabilities, Income, Expenses, and Equity accounts.
1. To access your Chart of accounts, go to Accounting Tab > Chart of Accounts. You can navigate between different account types by clicking on each tab at the top of the page.

2. To add a new account, click Add a New Account at the top-right side of the screen. You can also browse through the tabs for a new account category you'd like to add and click Add a new account. Enter the Account Type and Account Name and enter the Account ID and Description, then click Save.
How to Track Connected Accounts
You can securely connect your bank account and credit cards on Wave to sync your transactions easily. To add a bank account or credit card: Go to Banking on the left navigation bar and choose Connected Accounts. Then, select the accounts you'd like to connect to Wave accounting.

How to Run Payroll
If you have employees or people you need to pay, the Payroll tool will come in handy. You can easily pay employees and independent contractors using Wave Payroll. Here's how to run your payroll:
1. Go to Payroll on the left navigation bar and select Run Payroll.

2. Under the Team option, select Add employee/ Add contractor to add an employee or a vendor to your payroll.
3. Under Business options, click Add details to set up your business details and Set a schedule to set how often you want to run the payroll.
4. You can then Add a signatory to add your company's legal representative and add a bank account to fund your payroll.
5. When all is set, choose Simplify your payroll and click Authorize to allow Wave to pay your team directly from your bank account.
Understanding Reports
Wave accounting provides you with business reports in the form of charts, graphs, and tables. These are organized into six sections: Financial statements, Taxes, Payroll, Customers, Vendors, and Detailed reporting.
There are different business reports you can view to make informed decisions about your business. They include income statements, balance sheets, cash flows, and sales tax reports.
You can also export your reports in a CSV or PDF format by clicking Export at the top-right side of your report.
Automate Your Accounting
Unlike other cloud accounting software like Quickbooks, Wave Accounting is a free online accounting software best for small businesses and freelancers.
It helps you manage your financial data with automation services like creating recurring invoices, payment deposits, and taxes, allowing you to focus on marketing and product development.