CPU overclocking has traditionally been locked behind your desktop's BIOS settings, which can be clunky and awkward to navigate. However, AMD users have access to Ryzen Master.
This article explains how you can use Ryzen Master to overclock and monitor your PC.
Downloading and Installing Ryzen Master
Download Ryzen Master from AMD's website. Before you go and install the program, it's important to know whether or not your CPU is even supported.
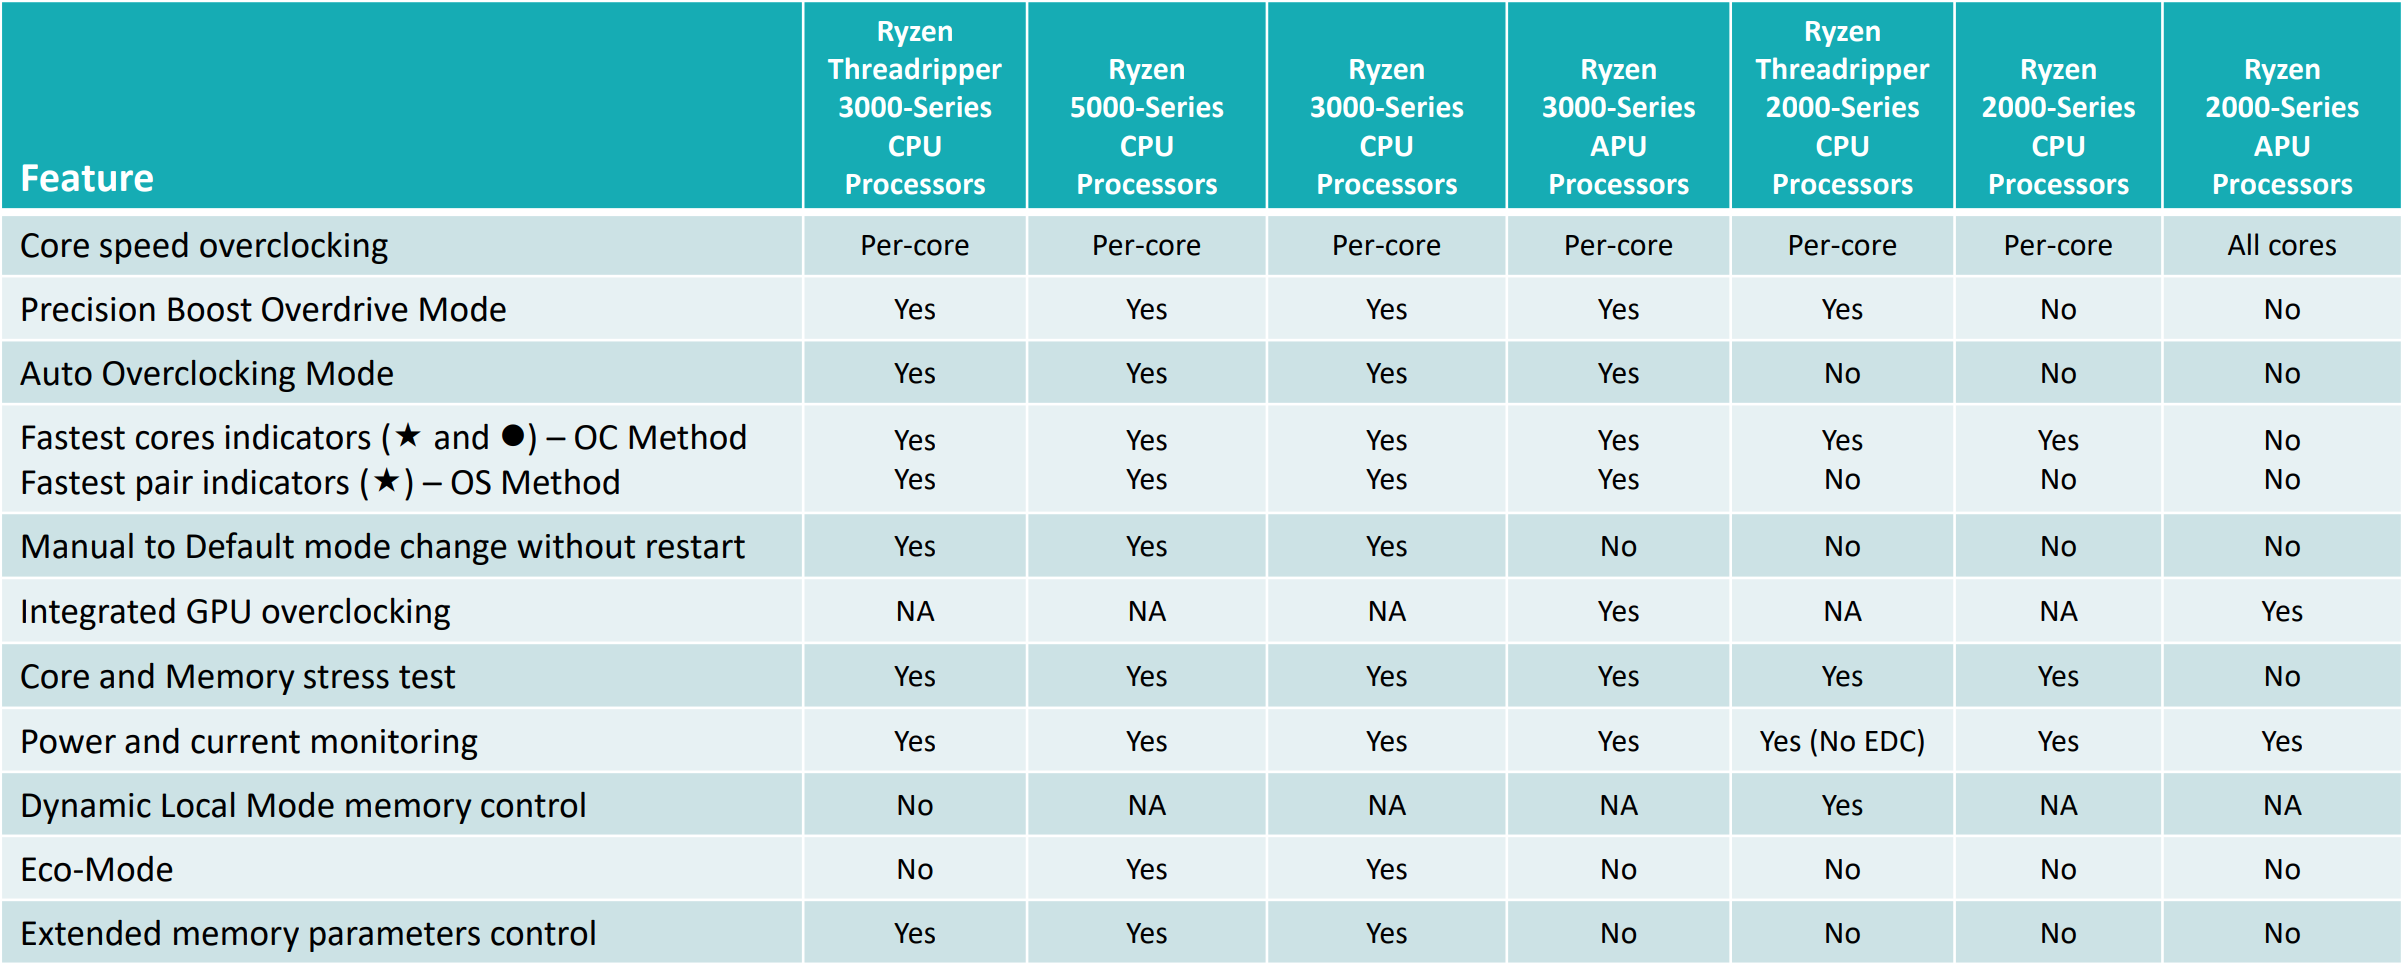
AMD's Reference Guide (located on the same page) provides the list of supported CPUs:
By the way, no laptop APUs are supported by Ryzen Master. According to the table, your Ryzen CPU needs to be as recent as the 2000 series. Strangely enough, Ryzen 1000 is missing from this list even though Ryzen Master launched alongside the 1000 series. It's possible Ryzen Master can work with Ryzen 1000, but we can't confirm it yet.
You might notice that older CPUs are missing certain features. If you want all the features, your Ryzen CPU needs to be as recent as the 3000 series. When using this guide, keep the support chart in mind because this guide is based on the 3000 series CPU with all these features.
Note: Overclock at your own risk. Overclocking is not covered by AMD's warranty, and while it is unlikely that you will cause damage to your CPU, it's possible.
Ryzen Master UI Overview
Let's look at how the Ryzen Master gives you advanced real-time controls to tweak system performance.
Opening Ryzen Master for the First Time
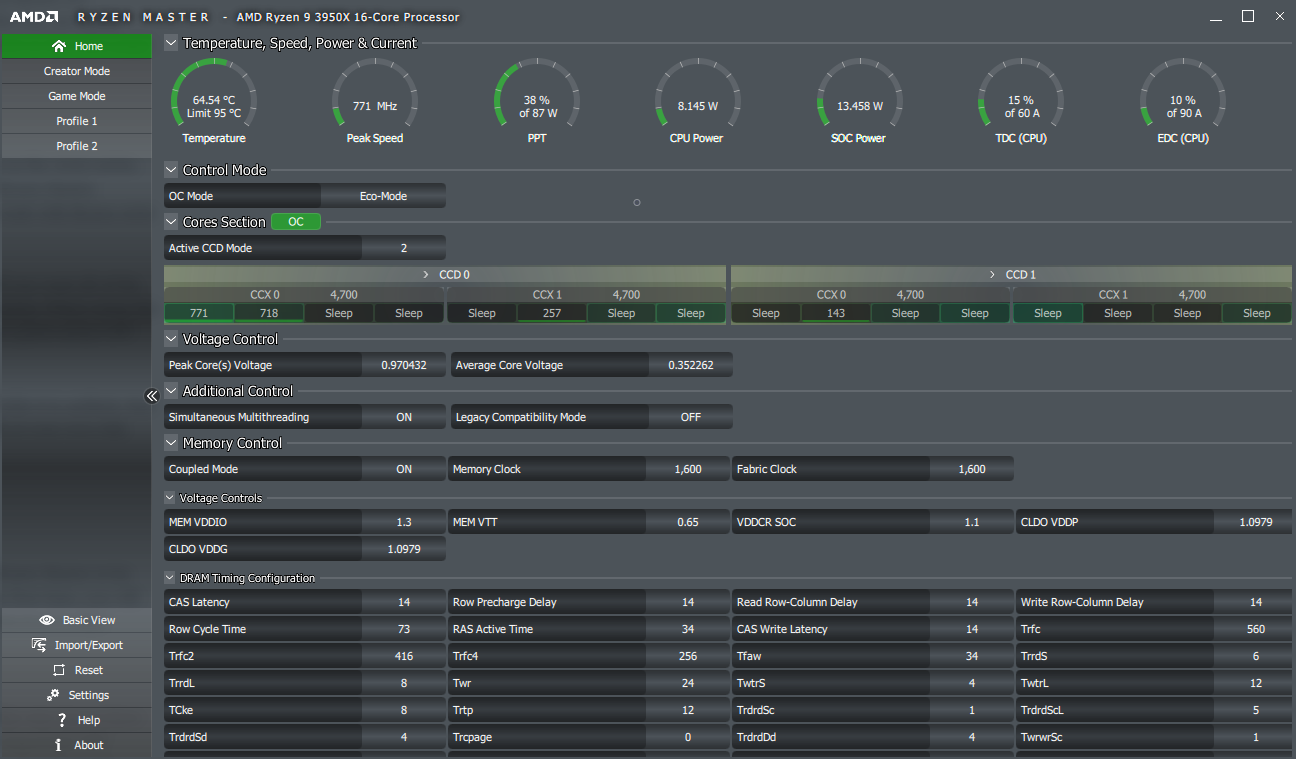
The Ryzen Master UI is fairly complicated, but the interface is designed for both amateurs and enthusiasts. When you open Ryzen Master for the first time, the Home tab should look like this:
This tab shows you the current settings of the CPU and memory. The Temperature, Speed, Power, and Current readings are at the top. These CPU statistics will help you overclock. For instance, you will know if your CPU has reached its power limit.
Next is the Control Mode row, but we will come to it later.
Let's look at the Cores Section. Here Ryzen Master shows you every single-core and their clock speeds. It will also show you the cores with the most potential for overclocking in various shades of green. Further down, you can see all the user-customizable settings related to CPU and memory overclocking.
Making a Custom Profile
To start customizing, you'll need to step away from the Home tab. On the sidebar, you should see more tabs below Home. These tabs address different overclocking scenarios:
- Creator Mode
- Game Mode
- Profile 1
- Profile 2
The only ones we care about right now are Profile 1 and Profile 2. Profiles allow you to configure different settings for different applications. Also, you can rename the profiles.
Select either Profile 1 or Profile 2.
Note: We strongly recommend not using Game Mode because it actually prevents your CPU from using more than 8 cores if it has more than 8.
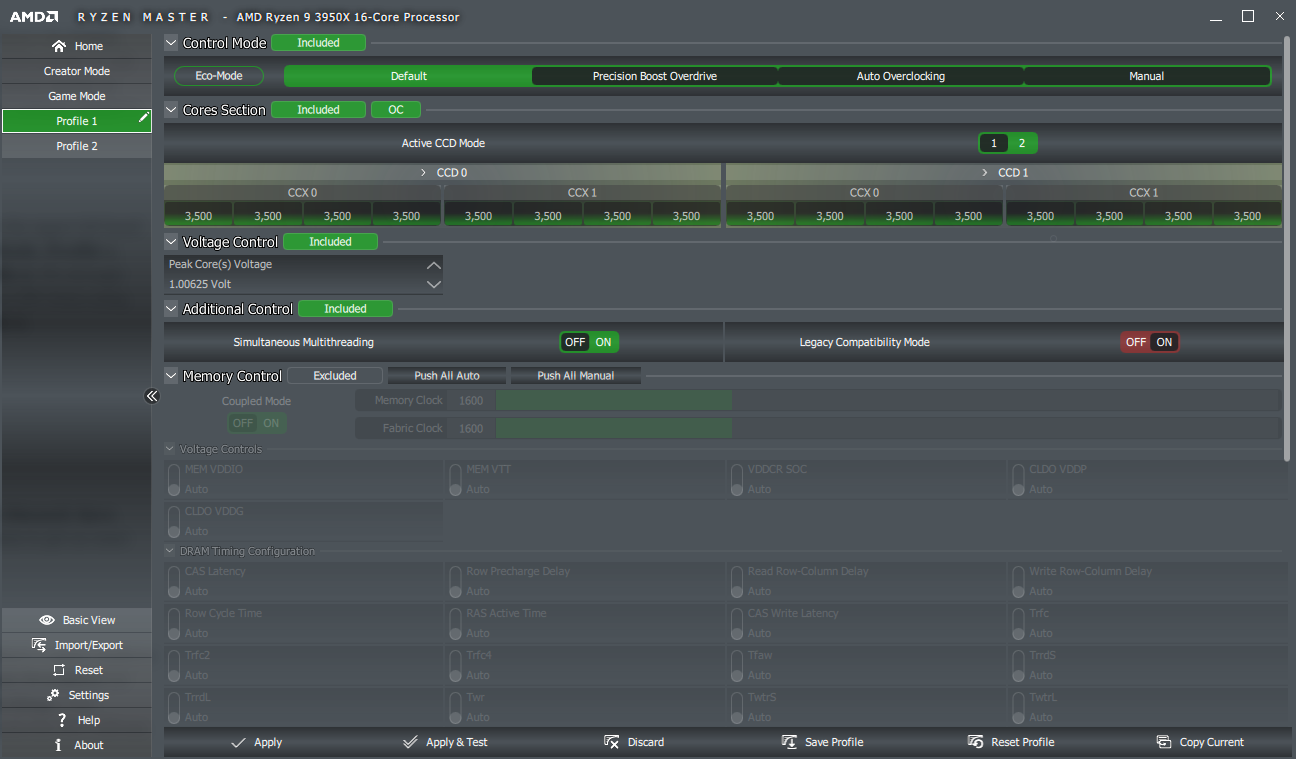
Here is what you would see if you had a Ryzen 9 3950X:
At the bottom, please note all the options: Apply, Apply and Test, Discard, Save Profile, Reset Profile, and Copy Current. You can hover over them to get an exact description of their function, but the labels should be self-explanatory.
Overclocking Your CPU and Memory
This time, Control Mode is the top row. We have five options here. Here's a quick rundown of what they do:
- Eco Mode lowers the power limit.
- Precision Boost Overdrive (or PBO) increases clock speed if the CPU thinks it's safe.
- Auto Overclocking is like PBO but more aggressive.
- Manual means you set the clock speeds the CPU will run at.
To overclock your CPU, you have three options: PBO, Auto Overclocking, and Manual. The first two options are not only the most simple, but they're also probably the best for most users.
Ever since the 3000 series, most Ryzen CPUs have had little overclocking headroom. Unless you are doing some serious manual tuning, the automatic settings might be just as good as your manual settings.
But if you insist on choosing Manual, then you'll want to look at the Cores Section. If you see the Active CCD Mode option, set it to 2. Then, click wherever you see CCD followed by a number.
For example, the 3950X will have CCD 0 and CCD 1.
What you see here is every single core on your CPU. Ryzen CPUs are subdivided into CCXs and CCDs. To put it simply, there will be up to 4 cores in each CCX, and there is always 1 or 2 CCXs in a CCD.
For instance, the 16 core 3950X, for example, has 4 cores in each CCX and 2 CCXs in each CCD, and there are 2 CCDs in total.
The cores with the most overclocking potential are marked with a star, and the cores with the second most overclocking potential are marked with a circle. You can change the clock speed of the cores (in MHz) by dragging the green bars or by clicking the number next to the green bar and then typing your clock speed.
You might notice some red symbols. These symbols allow you to set the clock speed by group (CCX, CCD, or whole CPU) rather than individually. If you want a 100 MHz overclock across the entire CPU, then you would click the left-hand side of the row and add 100 MHz to any core:
Then there's Voltage Control. At this point, we need to warn you that increasing voltage on any CPU is dangerous. Although Ryzen CPUs by default can go up to 1.45 volts, this is only in single-core workloads. In a multi-core workload, the voltage needs to be much lower in order to avoid damage. You should never go above 1.3 volts unless you are willing to kill your CPU faster than normal.
There's also Additional Control, but we're going to ignore it here.
The Memory Control row is responsible for memory overclocking and tuning. To change settings, you'll need to switch from Excluded to Included:
Set Coupled Mode to On to ensure your memory clock speed is in line with the Fabric clock speed. To overclock your memory, drag or type as you did with CPU cores. You can also tune the memory with the settings below, but we highly recommend you research how to tune memory first.
Basic View, Reset, and Settings
Finally, let's look at the options in the bottom left-hand corner of the window.
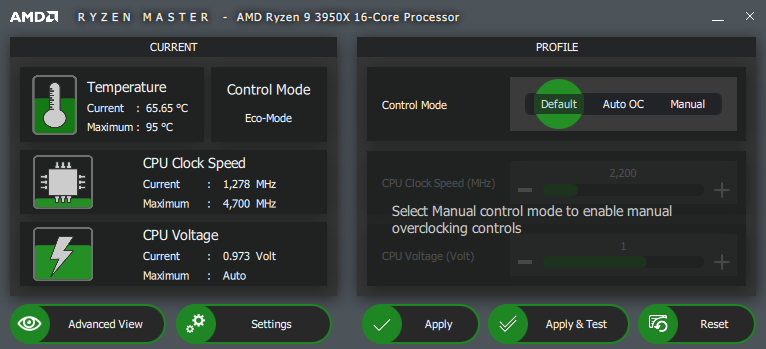
The option Basic View will transform the UI into a more simplistic version of Ryzen Master:
There are far fewer things to do in this mode, but if you want a quick overclock for every CPU core or want to just turn on Auto Overclocking, this basic version of Ryzen Master is sufficient.
There is also the Reset button, which sets every CPU-related setting back to default values. It's basically your big red button to go back to the defaults.
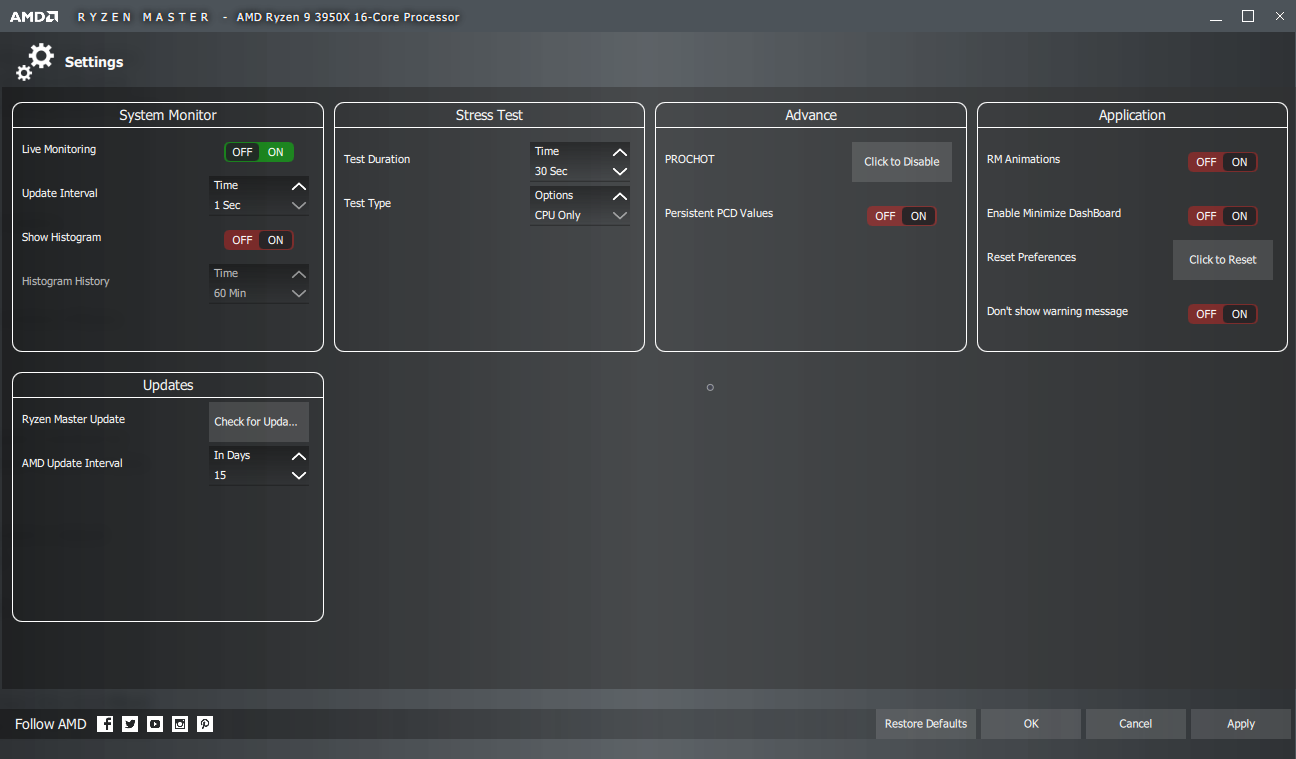
Finally, Settings opens up a generic list of options for the application.
There isn't much to do here, but we would recommend doing two things.
One, turn Show Histogram to On. This enables a nice little graph on the Home tab that shows you clock speed and temperature over time.
Second, you should also increase the Test Duration to the maximum 300 seconds that's allowed. Even a 5-minute long test is fairly light, and even an unstable system might pass this test.
You Can Finally Overclock Without Even Touching Your BIOS
Ryzen Master is suitable for intermediate users who have a basic understanding of overclocking. There isn't any real difference between overclocking from the Windows desktop or through the BIOS. Ryzen Master can also be used to get around complicated and poorly designed BIOS UIs.


