Big projects in Premiere Pro are often difficult to manage. Fortunately, Metadata is here to help.
Metadata in Premiere Pro is your ticket to an indexed, accessible pool of source footage---where everything that you need is right at arm's length.
In this article, you'll learn how to use Metadata in Premiere Pro and what the different types are.
What is XMP Metadata in Premiere Pro?
Short for Extensible Metadata Platform, XMP metadata is a standard that attaches information about a clip to the source file. You add your descriptors one time, and those attributes will follow the footage to any other XMP-enabled application that you bring it into.
This establishes a common language for all of these apps to share with you. It documents meaningful qualities that, when expressed in this standardized way, the program can interpret and understand. You log your metadata once, and you are free to use it everywhere.
XMP metadata was designed to be agile and comprehensive. The technology is open-source, giving professional editors the freedom they need to accommodate whatever they're working on.
It's also very approachable from the perspective of the novice, and keeps your Premiere Pro projects organized.
Why is My Clip Listed Twice After Importing?
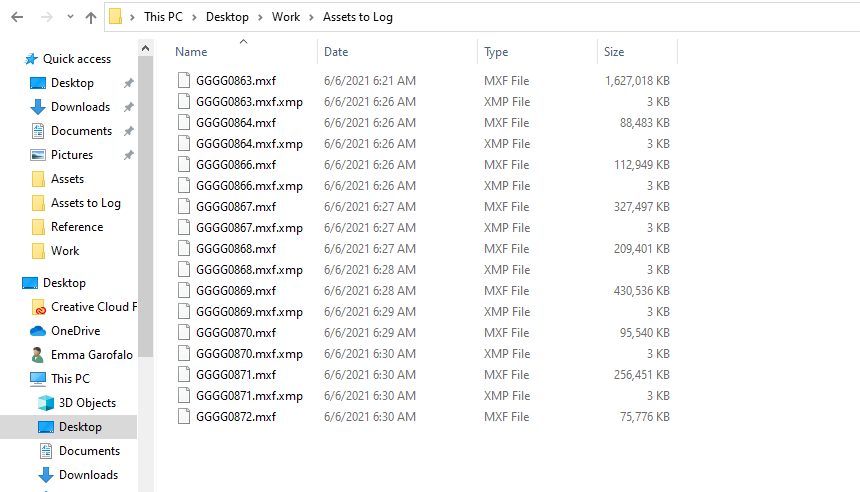
XMP files are not duplicates of your footage---this is the "sidecar" file that Premiere creates as soon as the footage has been ingested.
Most common file types allow the program to store the information inside of the original file without creating this separate file for each clip. These include Quicktime MOVs, JPEGS and PNGs, MP3s and MP4s, even PDFs.
To show you what it looks like when these additional files are generated, we've converted all of our .MOVs to .MXFs.
Working With Metadata in Premiere Pro
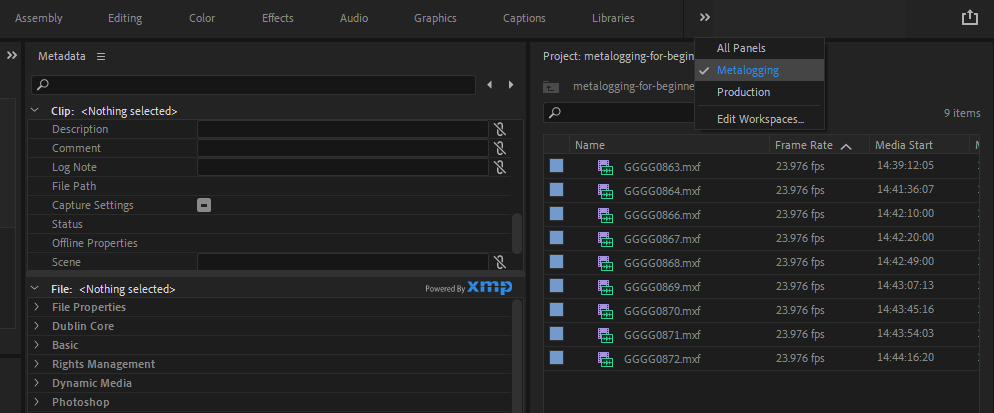
You can use the Metadata panel to take inventory of all of the properties attached to a clip. While you likely have access to it under your default workspace, the layout that the Metalogging workspace offers will make logging your media much easier ergonomically.
To activate the Metalogging workspace, hit the arrows at the top of the user interface (UI) and select the option titled this.
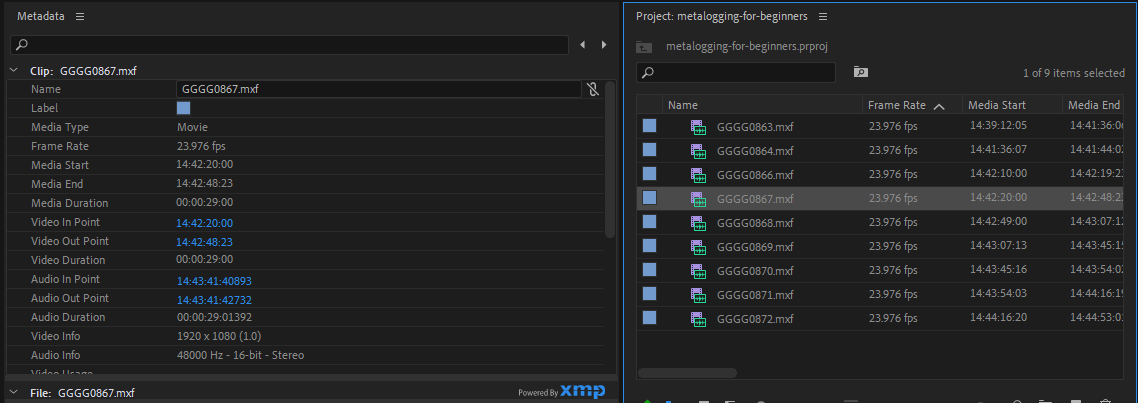
Select any piece of footage in the project panel or in your sequence. The Clip menu will give you context that exists only inside of the program and is stored in the Premiere project file, not on the source footage or in an XMP sidecar.
Included here will be duration, ins and outs, and other modifications that are only applied to the footage after being ingested and utilized.
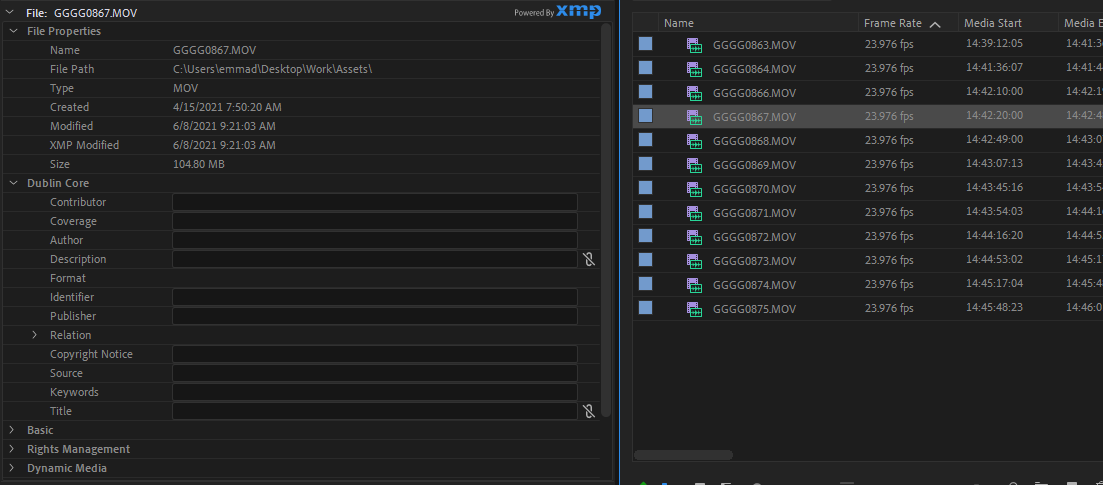
The File dropdown is where you'll find all of your XMP metadata. These are the two types of metadata at your fingertips: clip-instance metadata, exclusive to Premiere Pro, and the XMP file metadata mentioned previously.
Premiere Pro is equipped to convert clip data into XMP metadata so you can use it in other Adobe programs. If you're importing assets already-rich with metadata other than XMP metadata, the program will automatically populate the asset's XMP metadata description with whatever it finds in the file.
Properties and Schema
Properties in Premiere Pro include the date your file was created on, its aspect ratio, and the file type.
Schemas, on the other hand, are groups of properties that are often used together for one reason or another. For example, a schema meant for filmmakers may include properties like scene and shot location.
The Dublin Core Metadata Element Set
The Dublin Core Metadata Element Set is your all-round, everyday schema, applicable to a wide variety of projects. Boiled down to the bare necessities, it was created to cover not only video assets, but also photos and graphic design projects, as well.
Included in the schema are:
1. Properties of Attribution
Credit and attribution are important where you're not the original creator.
The following properties allow you to both label each borrowed piece of material and to connect it meaningfully with the original, full-bodied work, as well as to the person who brought it to life originally.
- Author: If you import a book into your project, the Author will be whoever wrote it.
- Contributor: Dublincore.org describes this property as most of the elements that describe agency and authorship. When there is ambiguity or dispute, you may credit the organizations, business, or individuals who have contributed to your project loosely here.
- Title: What is the name of this resource? For example, a clip from The Simpsons should include both the name of the episode and the title of the series itself.
- Identifier: The objective Identifier property is one type of property that is totally cut-and-dry. A Uniform Resource Name (URN) is like an asset's "identity" within a given domain. Your street address is one example.
- Publisher: Has the asset already been institutionalized? Think about stock photo sites like Getty Images. You have the creator, and then you have whoever represents their work. Sometimes, the creator and publisher will be the same person.
- Copyright Notice: Any intellectual property rights protecting the asset can be added to its profile here.
- Source: Much like when citing an MLA source, this attribute hones in on the part of the original resource that was actually included in the project. You would, for example, do this if you only used a selection of pages in a book.
- Relation: Here, you may link the asset to any related documents, files, or resources that are relevant to its place within your project.
2. Properties of Content
Much like using keywords to gain SEO traction on Google, adding helpful descriptors that lay the contents of the shot out in words will allow you to call up very specific pieces of footage on-the-fly.
- Coverage: Broken down into temporal and spatial coverage, this attribute describes how much of the source material the clip has covered.
- Description: This property describes what the footage shows. You can choose keywords specific to your project, along with shot-specific keywords and more.
3. Technical Properties
Technical properties are ones that you've most likely seen elsewhere. They include:
- Format: The file format that your footage is in.
- Language: The main language that your asset is in.
- Date: The day that the footage was shot.
Tackle Your Biggest Project Ever With Confidence
The more monstrous the project, the more intimidating it can be. Luckily, Adobe has got your back every step of the way.
With the help of XMP metadata in Premiere Pro, there is no challenge too titanic to conquer. Bring the masterpiece of your dreams to life, all with the help of a bit of preliminary footwork. Tedious, sure, but much better than wasting time feeling overwhelmed that you've got too much to do.


