OctoPrint is an open-source application providing a web interface to control and monitor all aspects of your 3D printer. You can install OctoPrint on a Raspberry Pi with a camera module to monitor your prints and create amazing time-lapse videos. But what if you don't have a Raspberry Pi?
Here, we'll explain how you can install and set up OctoPrint on your old smartphone. You can use any old Android device to install the unofficial version of the OctoPrint server, automatically create time-lapse videos of the prints, and monitor prints remotely
Steps to Set Up and Run OctoPrint Server on Android
To control your 3D printer using OctoPrint on an Android smartphone, you need to install the Octo4a Android app. This is an unofficial app developed by FeelFreeLinux on GitHub.
With the Octo4a app on your Android smartphone, you can install OctoPrint on your Android device and use it as a host. It works just like OctoPrint on a Raspberry Pi. It also supports SSH, allowing you to log in to SSH to manage, update and customize your OctoPrint installation on Android. The steps are as follows:
Step 1: Gather the Things Required
You will need an Android smartphone running Android 4.3 or later. It doesn't matter how old it is. If it turns on, you can make use of it for this project. As an additional note, the app doesn't seem to be stable with newer Android versions, such as Android 12.
In our testing, the app crashed while using Galaxy S20+ running Android 12.
You will also need a USB hub or OTG adapter with a power pass-through. This is important as OctoPrint consumes significant power when monitoring and recording the time-lapse videos.

Find a small tripod stand or any attachment that can hold your smartphone in place for recording the time-lapse videos from a certain angle. You may also design and print a 3D case or stand for holding your smartphone.
Step 2: Download and Install the Octo4a Android App
The Octo4a Android app is not available on the Play Store. However, you can download the Octo4a.apk from the GitHub project page and sideload it.
To sideload the app, you can use the ADB commands or simply download the app, tap Install > Settings to trust the source, and then tap on Install again.


Wait for the installation to finish.
Step 2: Install and Setup OctoPrint on Android Smartphone
Once you install the Octo4a app, you can open it, grant the required permissions, and tap on Continue. This will begin downloading and installing the dependencies and required files. Based on your Android device and internet speed, this can take up to 30 minutes to finish.
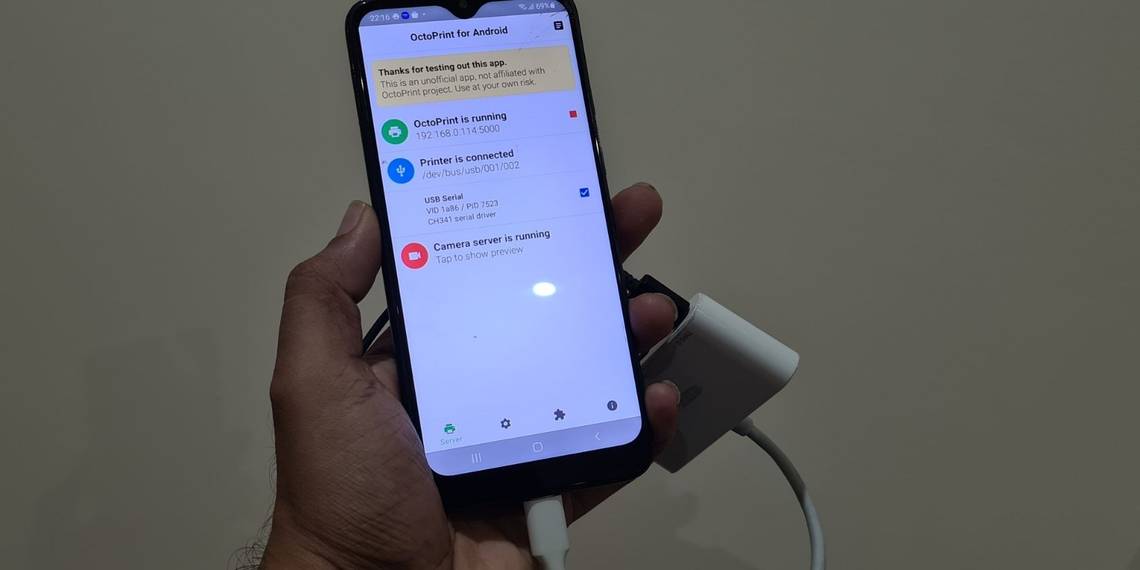
Once your phone completes the installation, you can tap on it to start the OctoPrint server on your Android device. Also, go to Settings and enable the camera to stream the video for real-time monitoring and creating time-lapse.
You may also choose the camera resolution and frame rate (FPS). Depending on your device, you may set the FPS to 30 FPS. Keeping the frame rate lower will save the battery power and avoid high process usage or possible device overheating.


Go back to the Home and tap Start OctoPrint server. This can take a minute to start. Once started, you will see an IP address.
Open the web browser on your PC and visit the IP address shown in the app, such as 192.168.xx.xxx:5000.

Now, follow the wizard to set up the OctoPrint server. In this wizard, you will create an account with a password and edit the 3D printer details, such as bed size, nozzle width, etc.

Once the setup is complete, you are ready to connect your Android device running the OctoPrint server to your 3D printer for remote control and monitoring.

Step 3: Connect the 3D Printer to Android Smartphone
To connect your 3D printer with the Android device, you'll need an OTG cable or adapter. You can buy a cheap OTG cable or hub with a power pass-through from Amazon or a local retailer. This will allow you to keep your device running 24x7 without worrying about the battery.
Connect the USB cable coming from the printer to your smartphone using the OTG adapter. Then, connect the smartphone charger to the other end of the OTG cable or the input power supply port. If your Android phone has a USB-C port, you can buy a USB dongle with multi-ports to connect the printer and power supply.
On your Android phone, grant permission for the app to access the USB serial port.

The 3D printer should be connected to the Octo4A app.

On the web interface in the browser, click Connect. Wait for the server to find and connect to your 3D printer automatically.

Once connected, you can try moving the axis or click on the Home icon under the Control tab to perform auto homing. This will help you ensure that OctoPrint is connected and can control the printer.
You can upload GCode to the SD card connected to your 3D printer, select GCode already on the SD card and click Print to start the 3D printing.
Under the timelapse option, you can edit the settings to record basic timelapse videos automatically when printing starts.

In addition, you can go to Settings > Plugin Manager and install the Octolapse plugin to create amazing timelapse videos. The videos are stored within your Android device and can be downloaded once finished.
Similarly, there are several other plugins that you may install in your OctoPrint server hosted on an Android device to add more features and functionalities.
Monitor 3D Prints Remotely With OctoPrint
Setting up the OctoPrint server on an Android device is much easier and hassle-free when compared to Raspberry Pi. Besides, you don't need to purchase any additional camera module as it's already integrated into the device. The smartphone camera is also better than the one you get for Raspberry Pi and thus, can help you create high-quality timelapse videos.
For now, you can control and monitor your 3D printer on the local server. However, you may install the SimplyPrint Cloud plugin with a free basic plan to monitor up to two 3D printers connected to the OctoPrint server remotely via the internet.